Cette version peut contenir des modifications incorrectes. Passez au dernier aperçu vérifié.
Ce dont vous avez besoin
-
-
Dévissez les 10 vis suivantes, fixant le boîtier inférieur à l'Air :
-
Six vis cruciformes Phillips de 2,8 mm.
-
Deux vis cruciformes Phillips de 3,8 mm.
-
Deux vis cruciformes Phillips de 5,4 mm.
-
-
-
Déconnectez le connecteur de la batterie en le tirant tout droit hors de sa prise.
-
-
-
Ôtez la batterie de l'Air.
-
Chargez-la à 100%, puis laissez-la charger encore au moins deux heures. Utilisez votre appareil normalement. Lors de l'avertissement de batterie faible, enregistrez votre travail et laisser votre ordinateur allumé jusqu'à ce qu'il s'éteint à cause d'une batterie vide. Attendez au moins 5 heures, puis rechargez la batterie à 100% sans interruption.
-
Si vous remarquez quelques chose d'inhabituel ou si vous avez des problèmes après l'installation de la nouvelle batterie, il se peut que vous deviez peut-être réinitialiser le SMC de votre MacBook.
-
-
-
Débranchez de la carte mère le connecteur de la nappe des ports en tirant tout droit sur la languette de traction noire.
-
Décollez la nappe de sortir audio de l'adhésif la fixant au boîtier.
-
Utilisez un spudger pour débrancher du support du disque dur le connecteur de la nappe de sortie audio.
-
-
-
Utilisez la pointe d'un spudger pour tirer le connecteur du câble du ventilateur tout droit hors de son connecteur sur la carte mère.
-
-
-
-
Utilisez un spudger pour retirer le connecteur de la nappe audio de la carte mère.
-
-
Cette étape n’est pas traduite. Aidez à la traduire
-
Remove the two following screws securing the AirPort/Bluetooth board bracket to the upper case:
-
One 4.7 mm Phillips.
-
One 3.9 mm Phillips.
-
-
Cette étape n’est pas traduite. Aidez à la traduire
-
Lift the AirPort/Bluetooth bracket out of the upper case.
-
-
Cette étape n’est pas traduite. Aidez à la traduire
-
Use a spudger to pry the three antenna cables up off the AirPort/Bluetooth board.
-
-
Cette étape n’est pas traduite. Aidez à la traduire
-
Peel the antenna cables up off the adhesive securing them to the upper case.
-
-
Cette étape n’est pas traduite. Aidez à la traduire
-
Remove the single Phillips screw securing the microphone cable ground loop to the upper case.
-
-
Cette étape n’est pas traduite. Aidez à la traduire
-
Remove the following 15 screws:
-
Thirteen 2.3 mm Phillips.
-
Two T6 Torx.
-
-
Cette étape n’est pas traduite. Aidez à la traduire
-
Open the Air so the display is perpendicular to the upper case and place it on a table as shown.
-
While holding the top of the Air with one hand, remove the T6 Torx screw from the lower display bracket.
-
-
Cette étape n’est pas traduite. Aidez à la traduire
-
Remove the T6 Torx screw from the upper display bracket.
-
-
Cette étape n’est pas traduite. Aidez à la traduire
-
Pull the upper case straight away from the display, minding any cables that may get caught.
-
-
Cette étape n’est pas traduite. Aidez à la traduire
-
Remove the two Phillips screws securing the speaker assembly to the upper case.
-
-
Cette étape n’est pas traduite. Aidez à la traduire
-
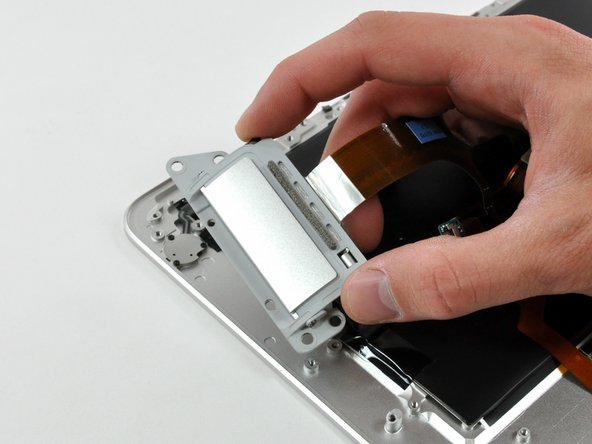
Rotate the speaker assembly toward the center of the Air.
-
Use the pointed end of a spudger to pry the audio cable connector up off the audio board.
-
-
Cette étape n’est pas traduite. Aidez à la traduire
-
Remove the four partially threaded Phillips screws securing the port hatch assembly to the upper case.
-
Lift the port hatch assembly out of the upper case.
-
-
Cette étape n’est pas traduite. Aidez à la traduire
-
Peel the audio cable off the adhesive securing it to the upper case.
-
-
Cette étape n’est pas traduite. Aidez à la traduire
-
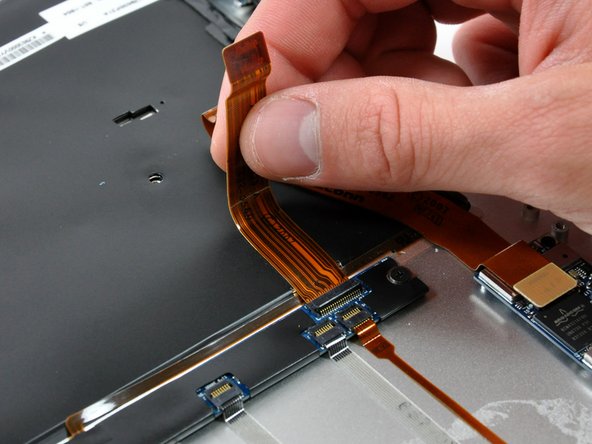
Use the pointed end of a spudger to flip up the retaining flap on the trackpad control cable socket.
-
Peel the trackpad control cable off the adhesive securing it to the upper case.
-
Pull the trackpad control cable out of its socket.
-
-
Cette étape n’est pas traduite. Aidez à la traduire
-
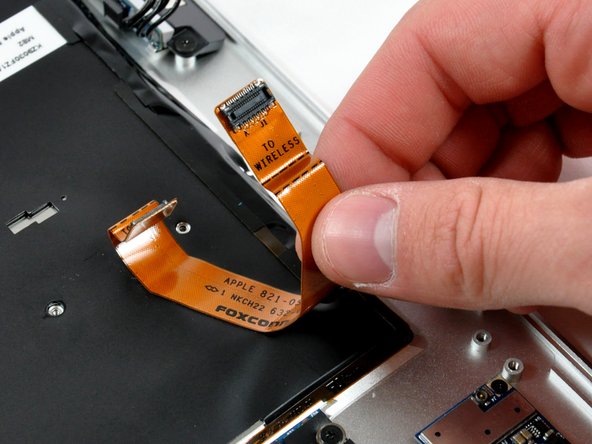
Use a spudger to pry the AirPort/Bluetooth cable connector up off the AirPort/Bluetooth board.
-
Peel the AirPort/Bluetooth cable off the adhesive securing it to the upper case.
-
-
Cette étape n’est pas traduite. Aidez à la traduire
-
Remove the single Phillips screw securing the AirPort/Bluetooth board to the upper case.
-
Lift the AirPort/Bluetooth board out of the upper case.
-
-
Cette étape n’est pas traduite. Aidez à la traduire
-
Remove the two Phillips screws securing the DC-In board to the upper case.
-
Lift the DC-In board out of the upper case.
-
Upper case remains.
-


Annulation : je n'ai pas terminé ce tutoriel.
43 autres ont terminé cette réparation.

5 commentaires
Although my upper case installation went perfect and my macbook Air never operated better all of the sudden my mouse pad , the part that clicks somehow started to respond slow and now takes more tan one or two clicks to register but I do not think it's your fault. If you have any suggestions on how to make it work better it would be appreciated, maybe If I tried to clean it out with isopropyl alcohol to clean it, it might help.
Kind Regards, It was fun fixing my macbook air.
Also It would have helpful to have a few extra small screws as I stripped one in the display to top case connection.
I would say 2 things. First, you will need the exact match of the model (for example A1237) plus the rest of the product specific (exact year of make). For example my model is A1237 but the upper case I bought didn't quite match especially the locations of the inner screws. I could not fit 6No screws back in when reassembling together. Without these screws the macbook air was put together and working ok but if you have a choice you want to get the exact match product. Secondly, screws. Some screws just won't come off. First thing you need a good screwdriver to unscrew a very tight and some are forced into position when assembled in factory. If you cannot take them out, take it to a computer guru who has the right hand. Seriously. I had problem with 3No screws they just won't come off. I forced it and damaged the screws. Luckily a specialist helped me to unscrew them and he told me that it's a known problem on macbook air. Other than that the replacement of the upper case was pleasantly done.
These intructions worked great. I ended up not taking off the cooling fan and then heat sink which saved a lot of time and I think reduced the risk of me screwing something up. Thanks!!!!1