Cette version peut contenir des modifications incorrectes. Passez au dernier aperçu vérifié.
Ce dont vous avez besoin
-
-
Dévissez les dix vis suivantes fixant le boîtier inférieur au boîtier supérieur :
-
Deux vis Pentalobe P5 de 2,3 mm
-
Huit vis Pentalobe P5 de 3,0 mm
-
-
-
Retirez le cache en plastique couvrant la carte de contact de la batterie.
-
-
-
Saisissez l'interposeur avec une pincette.
-
Soulevez l'interposeur et mettez-le de côté.
-
-
-
Avec l'extrémité plate d'une spatule (spudger), faites levier sur le bord droit du connecteur du câble de données de la carte E/S pour le débrancher de sa prise.
-
-
-
-
Avec l'extrémité plate d'une spatule (spudger), soulevez le connecteur du câble du SSD pour le débrancher de sa prise sur la carte mère.
-
Poussez le connecteur de côté pour qu'il ne vous dérange pas.
-
-
-
Avec l'extrémité plate d'une spatule (spudger), soulevez le connecteur de la nappe de la prise casque hors de sa prise sur la carte mère.
-
-
-
Avec votre pouce ou un autre doigt, appuyez sur le dispositif en plastique flexible dans le compartiment du SSD pour ouvrir les deux attaches sur le côté avant de l'ordinateur.
-
Tout en continuant à appuyer sur le dispositif flexible, faites pivoter l'ensemble SSD vers le haut pour le faire sortir de son compartiment.
-
-
Cette étape n’est pas traduite. Aidez à la traduire
-
Remove three 2.2 mm T5 Torx screws from each side of the battery (six screws total).
-
-
Cette étape n’est pas traduite. Aidez à la traduire
-
To protect your display, place a sheet of aluminum foil between the display and keyboard and leave it there while you work.
-
-
Cette étape n’est pas traduite. Aidez à la traduire
-
Now that your MacBook Pro is fully prepped, it's time to prep yourself.
-
Wear eye protection when handling and applying the adhesive remover. (Eye protection is included in your kit.)
-
Do not wear contact lenses without eye protection.
-
Protective gloves are also included in your kit. If you are concerned about skin irritation, put your gloves on now.
-
-
Cette étape n’est pas traduite. Aidez à la traduire
-
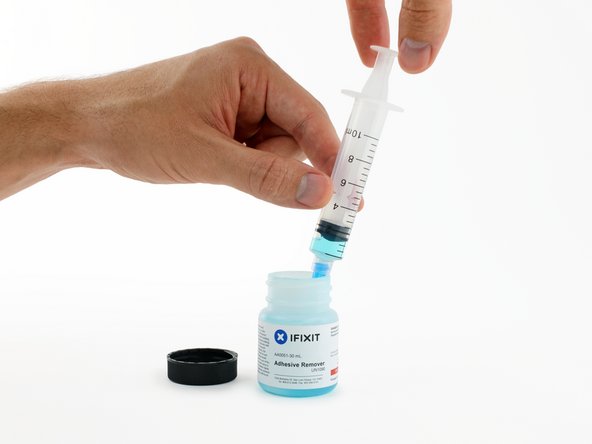
Open your container of adhesive remover.
-
Fill the syringe included in your kit with a small amount (approximately 1-2 milliliters) of adhesive remover.
-
Refill your syringe as needed throughout the rest of this procedure.
-
-
Cette étape n’est pas traduite. Aidez à la traduire
-
Apply a small amount of adhesive remover (approximately 1 ml) evenly under the edge of the leftmost battery cell.
-
Wait 2-3 minutes for the liquid adhesive remover to penetrate underneath the battery cell before you proceed to the next step.
-
-
Cette étape n’est pas traduite. Aidez à la traduire
-
Insert the flat edge of a spudger or plastic card underneath the leftmost battery cell.
-
Run your tool along the bottom perimeter of the battery cell and lift to begin separating the adhesive.
-
-
Cette étape n’est pas traduite. Aidez à la traduire
-
Insert the spudger along the left-hand side of the leftmost battery cell.
-
Run the spudger up along the left side of the leftmost battery cell.
-
Slightly pry the leftmost battery cell to release it from the adhesive.
-
-
Cette étape n’est pas traduite. Aidez à la traduire
-
Repeat the above steps to separate the adjacent battery cell from its adhesive:
-
Apply a small amount (about 1 ml) of liquid adhesive remover under the battery cell.
-
Wait 2-3 minutes for the adhesive remover to penetrate and soften the adhesive.
-
Carefully wedge a spudger or plastic card inwards, being careful to not damage the battery, and separate the battery cell from the adhesive securing it to your MacBook Pro.
-
-
Cette étape n’est pas traduite. Aidez à la traduire
-
Insert the flat end of a spudger underneath the larger leftmost battery cell.
-
Carefully wedge the spudger inwards, being careful to not damage the battery cells.
-
Pry the larger leftmost battery cell up off the upper case.
-
-
Cette étape n’est pas traduite. Aidez à la traduire
-
Grasp the battery cells and gently move (but do not remove) them from their recess in the upper case.
-
Leave the battery cells resting on top of the upper case as shown in the third picture.
-
-
Cette étape n’est pas traduite. Aidez à la traduire
-
Switch sides and repeat the above procedure for the two battery cells on the right-hand side of the MacBook Pro.
-
Remember to add about 1 ml of liquid adhesive remover under each battery cell, and wait 2-3 minutes for it to penetrate before prying up the cell.
-
-
Cette étape n’est pas traduite. Aidez à la traduire
-
Lift the battery as a whole up out of the upper case, and remove the battery.
-
With a little luck, you can slowly pull out each strip of adhesive with your fingers.
-
Otherwise, soak each section of adhesive with a bit of adhesive remover for 2-3 minutes, and then scrape it out with an opening pick or one of the other tools in your kit. This can take quite a bit of work, so be patient.
-
Mop up any remaining adhesive remover and give your MacBook Pro a few minutes to air dry.
-
Calibrate your new battery before using it: allow it to drain overnight, then charge it to 100% and drain it again until your MacBook Pro shuts down automatically. Charge it again and use it normally.
-


Annulation : je n'ai pas terminé ce tutoriel.
2 autres ont terminé cette réparation.

Un commentaire
Step 14 and Step 18 (disconnecting the speakers) are not really useful. But there should be a reason I didn’t catch for these steps. Thank you by the way, it was really clear and it worked perfectly!