Aller au contenu principal
Pour réparer ensemble - Je crée un compte

MacBook Pro 13" Retina Display Mid 2014 AirPort Board Replacement

Ce dont vous avez besoin

    1. MacBook Pro 13" Retina Display Mid 2014 AirPort Board Replacement, Lower Case: étape 1, image 1 de 1
      Outil utilisé dans cette étape :
      Magnetic Project Mat
      $19.95
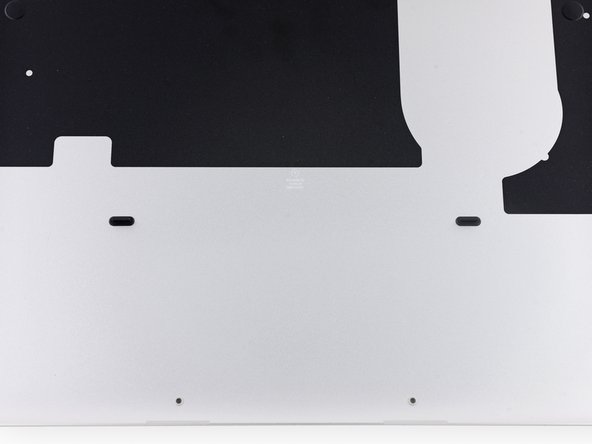
      • Remove the following ten screws securing the lower case to the upper case:

      • Two 2.3 mm P5 Pentalobe screws

      • Eight 3.0 mm P5 Pentalobe screws

      • Throughout this repair, keep track of each screw and make sure it goes back exactly where it came from to avoid damaging your device.

      Demander à FixBot

      Ajouter un commentaire

    2. MacBook Pro 13" Retina Display Mid 2014 AirPort Board Replacement: étape 2, image 1 de 1
      • Wedge your fingers between the upper case and the lower case.

      • Gently pull the lower case away from the upper case to remove it.

      Demander à FixBot

      Ajouter un commentaire

    3. MacBook Pro 13" Retina Display Mid 2014 AirPort Board Replacement: étape 3, image 1 de 2 MacBook Pro 13" Retina Display Mid 2014 AirPort Board Replacement: étape 3, image 2 de 2
      • The lower case is connected to the upper case with two plastic clips near its center.

      • During reassembly, gently push down the center of the lower case to reattach the two plastic clips.

      Demander à FixBot

      Ajouter un commentaire

    1. MacBook Pro 13" Retina Display Mid 2014 AirPort Board Replacement, Battery Connector: étape 4, image 1 de 1
      • If necessary, remove the plastic cover adhered to the battery contact board.

      Demander à FixBot

      Ajouter un commentaire

    2. MacBook Pro 13" Retina Display Mid 2014 AirPort Board Replacement: étape 5, image 1 de 2 MacBook Pro 13" Retina Display Mid 2014 AirPort Board Replacement: étape 5, image 2 de 2
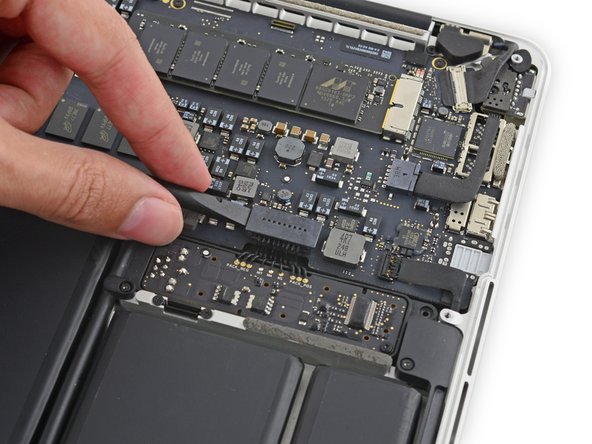
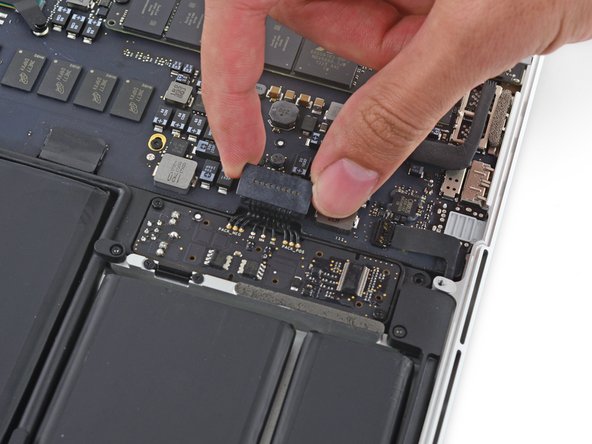
      • Use the flat end of a spudger to lift the battery connector straight up out of its socket on the logic board.

      • Be sure you lift up only on the connector itself, not the socket, or you risk permanent damage to the logic board.

      Demander à FixBot

      Ajouter un commentaire

    3. MacBook Pro 13" Retina Display Mid 2014 AirPort Board Replacement: étape 6, image 1 de 1
      • Bend the battery connector up out of the way to prevent accidental contact with its socket during your repair.

      Demander à FixBot

      Ajouter un commentaire

    1. MacBook Pro 13" Retina Display Mid 2014 AirPort Board Replacement, AirPort Board: étape 7, image 1 de 3 MacBook Pro 13" Retina Display Mid 2014 AirPort Board Replacement, AirPort Board: étape 7, image 2 de 3 MacBook Pro 13" Retina Display Mid 2014 AirPort Board Replacement, AirPort Board: étape 7, image 3 de 3
      • Wedge the tip of a spudger underneath each of the antenna cables, near their connectors and pry up to disconnect them from the AirPort board.

      • The three cables are coded with black sleeves of different lengths. During reassembly:

      • Connect the long-sleeved cable to the center socket.

      • The short-sleeved cable connects next to the screw.

      • The remaining cable has no sleeve, and connects in the last empty socket, next to the fan.

      Demander à FixBot

      Ajouter un commentaire

    2. MacBook Pro 13" Retina Display Mid 2014 AirPort Board Replacement: étape 8, image 1 de 1
      • Remove the single 2.7 mm T5 Torx screw securing the AirPort board to the I/O board.

      Demander à FixBot

      Ajouter un commentaire

    3. MacBook Pro 13" Retina Display Mid 2014 AirPort Board Replacement: étape 9, image 1 de 3 MacBook Pro 13" Retina Display Mid 2014 AirPort Board Replacement: étape 9, image 2 de 3 MacBook Pro 13" Retina Display Mid 2014 AirPort Board Replacement: étape 9, image 3 de 3
      • Lift the free end of the AirPort board up slightly and pull it straight out of its socket on the logic board.

      Demander à FixBot

      Ajouter un commentaire

Conclusion

To reassemble your device, follow these instructions in reverse order.

Annulation : je n'ai pas terminé ce tutoriel.

18 autres ont terminé cette réparation.

Sam Goldheart

Membre depuis le 10/18/12

477 923 Réputation

538 tutoriels rédigés

Équipe

iFixit Membre de l'équipe iFixit

Staff

123 membres

63 713 tutoriels rédigés

0 commentaires de tutoriel

Ajouter un commentaire

Nombre de vues :

Dernières 24 heures : 3

7 derniers jours : 18

30 derniers jours : 83

Total : 28,377