Aller au contenu principal

MacBook Pro 16" 2023 Lower Case Replacement

Ce dont vous avez besoin

  1. MacBook Pro 16" 2023 Lower Case Replacement, Unfasten the lower case: étape 1, image 1 de 1
    Outil utilisé dans cette étape :
    FixMat
    $36.95
    J'achète
    • Use a P5 pentalobe driver to remove the eight screws securing the lower case:

    • Four 9.1 mm‑long screws

    • Four 6 mm‑long screws

    • Throughout this repair, keep track of each screw and make sure it goes back exactly where it came from.

  2. MacBook Pro 16" 2023 Lower Case Replacement, Insert an opening pick: étape 2, image 1 de 3 MacBook Pro 16" 2023 Lower Case Replacement, Insert an opening pick: étape 2, image 2 de 3 MacBook Pro 16" 2023 Lower Case Replacement, Insert an opening pick: étape 2, image 3 de 3
    • Apply a suction handle to the center of the lower case's front edge.

    • Pull up on the suction handle to create a gap between the lower case and the frame.

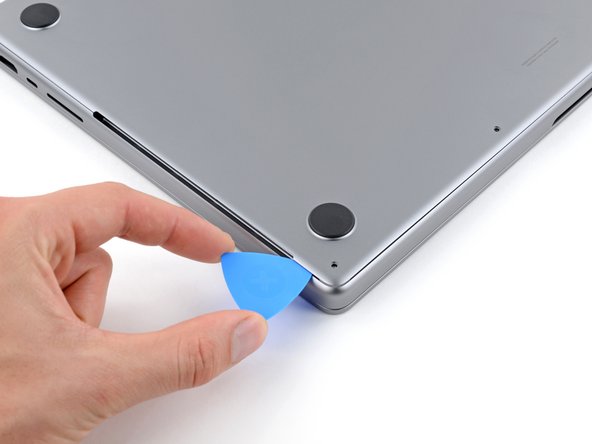
    • Insert an opening pick into the gap.

  3. MacBook Pro 16" 2023 Lower Case Replacement, Release the right clips: étape 3, image 1 de 3 MacBook Pro 16" 2023 Lower Case Replacement, Release the right clips: étape 3, image 2 de 3 MacBook Pro 16" 2023 Lower Case Replacement, Release the right clips: étape 3, image 3 de 3
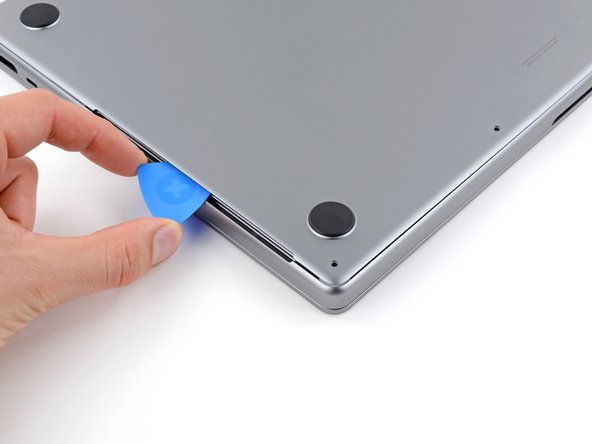
    • Slide your opening pick around the bottom right corner and up the right edge of the lower case.

    • If your pick gets stuck at the cutout, use your fingers to lift the lower case up slightly to allow your pick to slide underneath.

    • Slide your pick until it reaches the middle of the cutout, or until the rightmost clip stops it from sliding.

    • Twist your pick to release the two right clips.

    • You'll hear and feel a pop when each of the two clips releases.

  4. MacBook Pro 16" 2023 Lower Case Replacement, Release the left clips: étape 4, image 1 de 3 MacBook Pro 16" 2023 Lower Case Replacement, Release the left clips: étape 4, image 2 de 3 MacBook Pro 16" 2023 Lower Case Replacement, Release the left clips: étape 4, image 3 de 3
    • Slide your opening pick around the bottom left corner and up the left edge of the lower case.

    • If your pick gets stuck at the cutout, pry the lower case up slightly to allow your pick to slide underneath.

    • Slide your pick until it reaches the middle of the cutout, or until the leftmost clip stops it from sliding.

    • Twist your pick to release the left two clips.

    • You'll hear and feel a pop when each of the two clips releases.

  5. MacBook Pro 16" 2023 Lower Case Replacement, Release the sliding clips: étape 5, image 1 de 3 MacBook Pro 16" 2023 Lower Case Replacement, Release the sliding clips: étape 5, image 2 de 3 MacBook Pro 16" 2023 Lower Case Replacement, Release the sliding clips: étape 5, image 3 de 3
    • Sliding clips along the back edge of the MacBook further secure the lower case. Separating these clips may require a lot of force—consider using gloves to protect your hands from the sharp edges of the lower case.

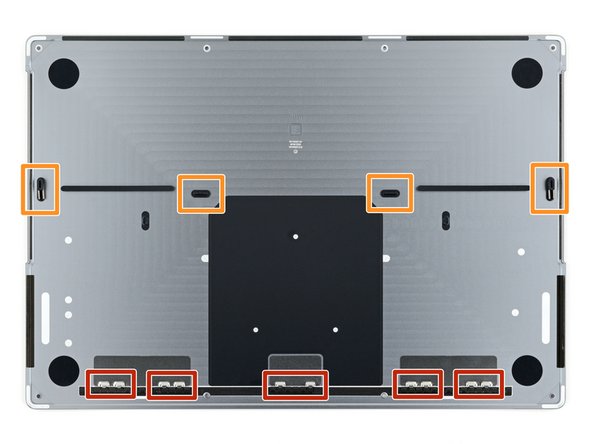
    • Firmly pull the lower case away from the back edge, one corner at a time, to disengage the sliding clips.

    • Keep the lower case flat to the MacBook. Don't pull upward until it's completely separated.

  6. MacBook Pro 16" 2023 Lower Case Replacement, Remove the lower case: étape 6, image 1 de 2 MacBook Pro 16" 2023 Lower Case Replacement, Remove the lower case: étape 6, image 2 de 2
    • Remove the lower case.

    • To reinstall the lower case:

    • Lay it down and align the sliding clips with the back edge of the MacBook. Press down on the lower case and slide it toward the back edge to engage the clips.

    • When one side is engaged, it may push the other out of alignment. Check both sides as you push.

    • Once the back corners of the lower case are secured and flush with the frame, press down along the middle of the lower case to engage the four remaining clips.

    • You'll hear and feel each clip snap into place.

Conclusion

To reassemble your device, follow these instructions in reverse order.

Repair didn’t go as planned? Try some basic troubleshooting, or ask our Answers community for help.

Une autre personne a terminé cette réparation.

Clay Eickemeyer

Membre depuis le 09/19/22

67 203 Réputation

453 tutoriels rédigés

Équipe

iFixit Membre de l'équipe iFixit

Staff

136 membres

17 410 tutoriels rédigés

0 commentaires

Ajouter un commentaire

Nombre de vues :

Dernières 24 heures : 0

7 derniers jours : 23

30 derniers jours : 94

Total : 946