Cette version peut contenir des modifications incorrectes. Passez au dernier aperçu vérifié.
Ce dont vous avez besoin
-
-
Utilisez vos doigts pour pousser les deux onglets de libération de la batterie et retirez la batterie de l'ordinateur.
-
-
-
Retirez les quatre vis Phillips 3,4 mm identiques à partir de la trappe de la mémoire. Ces vis ont 4 mm de diamètre de tête au lieu de 3 mm sur les vis du corps.
-
-
-
Retirez les trois vis cruciformes situées dans le compartiment de la batterie, près du loquet. Apple a eu la gentillesse d'incliner légèrement ces vis pour les rendre plus faciles à retirer. Sur le A1261, ces vis ont des têtes de 4 mm de diamètre au lieu des têtes de 3 mm des vis restantes.
-
-
-
Cette étape n’est pas traduite. Aidez à la traduire
-
Use a spudger to pry up the translucent plastic sheath covering the keyboard connector.
-
-
Cette étape n’est pas traduite. Aidez à la traduire
-
Use the tip of a spudger to flip up the black plastic flaps locking down the keyboard and keyboard backlight ribbon cables.
-
-
Cette étape n’est pas traduite. Aidez à la traduire
-
Slide the orange keyboard backlight ribbon out of its connector.
-
-
Cette étape n’est pas traduite. Aidez à la traduire
-
Peel up the orange tape covering the keyboard backlight connector.
-
-
Cette étape n’est pas traduite. Aidez à la traduire
-
Use the tip of a spudger to flip up the brown plastic flap locking down the keyboard backlight ribbon cable.
-
-
Cette étape n’est pas traduite. Aidez à la traduire
-
Use a spudger or your finger to slide the keyboard backlight ribbon out of its connector.
-
-
Cette étape n’est pas traduite. Aidez à la traduire
-
Carefully peel up the orange ribbon cable which carries the power and sleep signals.
-
-
Cette étape n’est pas traduite. Aidez à la traduire
-
Peel up the two black protective sheaths on the bottom of the keyboard. It is not necessary to fully remove these, but only to peel them back enough to access the screws beneath.
-
-
Cette étape n’est pas traduite. Aidez à la traduire
-
If you have a MacBook Pro 17" Model A1151 or A1212, refer to the first picture to remove the ten identical Phillips screws attaching the keyboard to the casing.
-
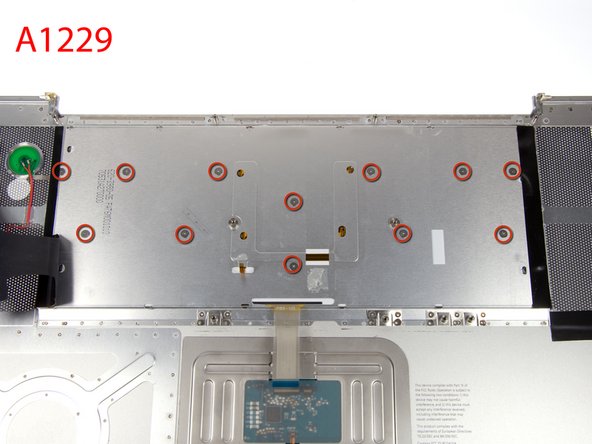
If you have a MacBook Pro 17" Model A1229, refer to the second picture to remove the twelve identical Phillips screws attaching the keyboard to the casing.
-
-
Cette étape n’est pas traduite. Aidez à la traduire
-
If you have a MacBook Pro 17" Model A1151 or A1212, refer to the first picture. There are four locking tabs along the back edge of the keyboard holding it in place. These tabs must be straightened before you can remove the keyboard.
-
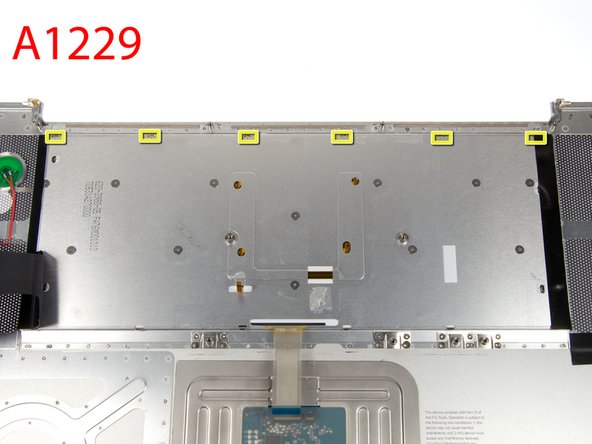
If you have a MacBook Pro 17" Model A1229, refer to the first picture. There are six locking tabs along the back edge of the keyboard holding it in place. These tabs must be straightened before you can remove the keyboard.
-
-
Cette étape n’est pas traduite. Aidez à la traduire
-
The first frame shows a tab in the "locked" position and the second frame shows the same tab in the "unlocked" position.
-
Use needlenose pliers or a spudger to bend each of the four tabs so that they are all in the "unlocked" position.
-
-
Cette étape n’est pas traduite. Aidez à la traduire
-
Place the upper casing on its edge and use a spudger to push the keyboard away from the casing, poking the spudger through the central keyboard screw hole. Grasp the keyboard as it separates from the casing.
-
-
Cette étape n’est pas traduite. Aidez à la traduire
-
Maintaining your hold on the keyboard, lay the casing flat and gently bow the keyboard until the two tabs on either side of the keyboard come free.
-
Slide the keyboard away from the trackpad and out of the upper case.
-


Annulation : je n'ai pas terminé ce tutoriel.
16 autres ont terminé cette réparation.
