Aller au contenu principal
Pour réparer ensemble - Je crée un compte

MacBook Pro 17" Unibody Hard Drive Cable Replacement

Ce dont vous avez besoin

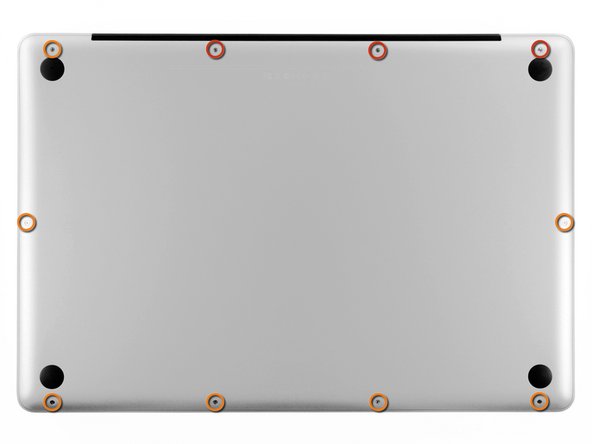
    1. MacBook Pro 17" Unibody Hard Drive Cable Replacement, Lower Case: étape 1, image 1 de 1
      • Remove the following ten screws securing the lower case to the upper case:

      • Three 13.5 mm Phillips screws.

      • Seven 3 mm Phillips screws.

      Demander à FixBot

      Ajouter un commentaire

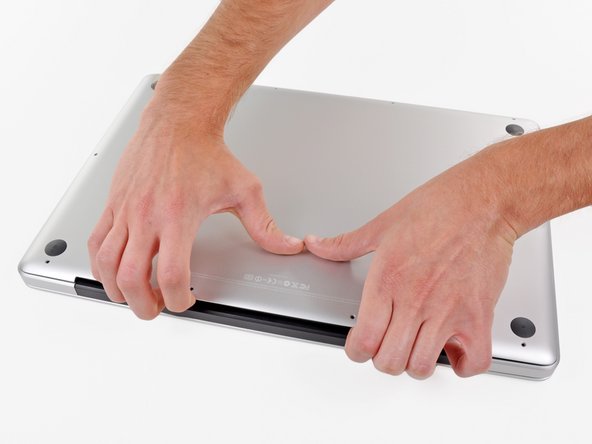
    2. MacBook Pro 17" Unibody Hard Drive Cable Replacement: étape 2, image 1 de 2 MacBook Pro 17" Unibody Hard Drive Cable Replacement: étape 2, image 2 de 2
      • Wedge your fingers between the lower case and the vent, and lift upward to release the two clips holding the lower case to the upper case.

      • During reassembly, carefully align the lower case and then press it firmly until both clips engage.

      • Remove the lower case.

      Demander à FixBot

      Ajouter un commentaire

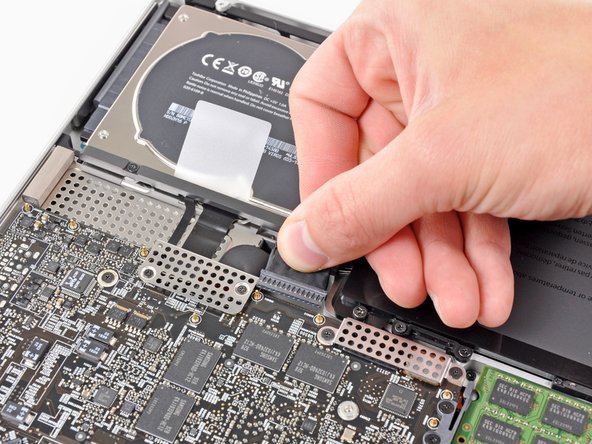
    1. MacBook Pro 17" Unibody Hard Drive Cable Replacement, Battery: étape 3, image 1 de 3 MacBook Pro 17" Unibody Hard Drive Cable Replacement, Battery: étape 3, image 2 de 3 MacBook Pro 17" Unibody Hard Drive Cable Replacement, Battery: étape 3, image 3 de 3
      • Whenever working near the logic board, it is always wise to first disconnect the battery to avoid short circuits.

      • If present, grab the plastic tab attached to the battery connector and pull it toward the front edge of the device. For Late-2011 models the battery connector will not have a tab and is simply a plug that inserts straight down into the motherboard--to remove pry the plug straight up.

      • If the plastic tab is missing, use a spudger to pry the connector up from its socket.

      • Pull the tab parallel to the face of the logic board.

      Demander à FixBot

      Ajouter un commentaire

    1. MacBook Pro 17" Unibody Hard Drive Cable Replacement, Hard Drive: étape 4, image 1 de 1
      • Remove the two Phillips screws securing the hard drive bracket to the upper case.

      • These screws are captive to the hard drive bracket.

      Demander à FixBot

      Ajouter un commentaire

    2. MacBook Pro 17" Unibody Hard Drive Cable Replacement: étape 5, image 1 de 1
      • Remove the hard drive bracket from the upper case.

      Demander à FixBot

      Ajouter un commentaire

    3. MacBook Pro 17" Unibody Hard Drive Cable Replacement: étape 6, image 1 de 1
      • Use the hard drive's pull tab to lift it out of the upper case.

      • Don't try to completely remove the hard drive just yet! Its cable is still connected.

      Demander à FixBot

      Ajouter un commentaire

    4. MacBook Pro 17" Unibody Hard Drive Cable Replacement: étape 7, image 1 de 2 MacBook Pro 17" Unibody Hard Drive Cable Replacement: étape 7, image 2 de 2
      • Pull the hard drive connector away from the body of the hard drive.

      • Remove the hard drive from your MacBook Pro.

      Demander à FixBot

      Ajouter un commentaire

    1. MacBook Pro 17" Unibody Hard Drive Cable Replacement, Hard Drive Cable: étape 8, image 1 de 2 MacBook Pro 17" Unibody Hard Drive Cable Replacement, Hard Drive Cable: étape 8, image 2 de 2
      • Remove the following four screws securing the hard drive cable assembly to the upper case:

      • Two 1.6 mm Phillips screws securing the shield that covers the hard drive cable connector.

      • Two 2.2 mm Phillips screws securing the hard drive cable connector to the upper case.

      • Remove the shield from the logic board.

      Demander à FixBot

      Ajouter un commentaire

    2. MacBook Pro 17" Unibody Hard Drive Cable Replacement: étape 9, image 1 de 1
      • Use the flat end of a spudger to pry the hard drive connector up and out of its socket on the logic board.

      Demander à FixBot

      Ajouter un commentaire

    3. MacBook Pro 17" Unibody Hard Drive Cable Replacement: étape 10, image 1 de 1
      • Lift the hard drive cable out of the upper case.

      Demander à FixBot

      Ajouter un commentaire

Conclusion

To reassemble your device, follow these instructions in reverse order.

Annulation : je n'ai pas terminé ce tutoriel.

16 autres ont terminé cette réparation.

0 commentaires de tutoriel

Ajouter un commentaire

Nombre de vues :

Dernières 24 heures : 1

7 derniers jours : 16

30 derniers jours : 56

Total : 21,288