Introduction
Remplacer un ventilateur défectueux évitera que votre ordinateur surchauffe.
Ce dont vous avez besoin
-
-
Boîtier fermé, placez l'Unibody à l'envers sur une surface plane.
-
Appuyez sur le côté rainuré du loquet de déverrouillage de la trappe d'accès de manière à saisir l'extrémité libre du loquet. Soulevez le loquet de déverrouillage à la verticale.
-
-
-
Tirez sur la languette en plastique blanc et retirez la batterie de votre MacBook Unibody.
Great tutorial ! great step !
-
-
-
-
Retirez les huit vis suivantes par lesquelles le boîtier inférieur est fixé au châssis :
-
Une vis Phillips 3 mm.
-
Trois vis Phillips 13,5 mm.
-
Quatre vis Phillips 3,5 mm.
Make sure you have a good quality Phillips screwdriver. Mine had removable tips and had a small play at the connection. As a result I didn't have a good feel and damaged my screws (those securing the fan and the top left in step 23). Game over for me installing new thermal paste...
Be very carefull with your screws! Especially those on the inside.
You can get away with a Phillips #00 for many of the screws involved but the 4 at the bottom case split are likely to strip if you don’t use a JIS #00 or, in a pinch, a Phillips #000.
I used the Phillips #00 tip from my Pro Tech Toolkit, and it worked well enough. But yes, maybe #000 might have been better on the lower row of screws. Note to myself: Always read the comments first.
When replacing these screws, the order to replace them in is as follows:
1, Top left
2. Top right
3. Top center-left
4. Top center-right
5. Bottom center-right
6. Bottom center-left
7. Bottom right
8. Bottom left
I hope this information is helpful.
I followed my usual process of putting in all the screws loosely, then tightening them gradually in distributed pattern, to help ensure that the panel settles in place evenly. But maybe some orders are better.
-
-
-
En vous servant des deux mains, soulevez le boîtier inférieur et retirez-le du boîtier supérieur.
Thanks for the guide!
It's implicit in the two photos, but worth mentioning because it blocked my progress in this step for a bit: You have to put the release latch back into its horizontal, closed position before you can lift off the lower-case panel.
-
-
-
Avec une spatule (spudger), soulevez délicatement le connecteur du ventilateur pour le débrancher de la carte mère.
Is there anyway to solder the fan socket back on to the mother board? It broke off :(
Solder back to the mother board!
Me too!!! WHAT NOW?
solder back to the mother board
It helped me a lot to look at the closeup pictures of the fan connector socket on the motherboard and the fan connector itself. Then I could figure out where to apply the axial rotating pressure with the plastic "spudger" (a trimmed old credit card). Needed more force to remove the 7-year old connection than I felt comfortable with. The pic's helped with the leverage point to use - just past and under the fan wires BUT not on the board itself.
Excellent guide! Moved fan from MB to MBP and installed new fan in old MB.
-
-
-
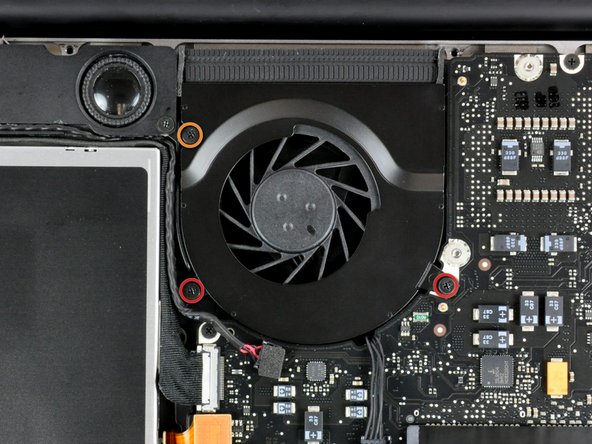
Dévissez les trois vis suivantes, fixant le ventilateur au boîtier supérieur :
-
Deux vis cruciformes de 5 mm.
-
Une vis cruciforme de 7 mm.
Screws were locktited and I have stripped head of right one while trying to remove it…
same issue as Oleg. have tried multiple screwdrivers and they won’t budge.
-
-
-
Ôtez le ventilateur du boîtier supérieur.
One of the screw was messed up. How can I remove it ?
I ended up removing the three screws holding down the black gasket that the fan is attached to on the left hand side in the photo. Remove the two screws holding the speaker assembly. then you can remove the 3 screws running vertically down. One is on top of the dvd drive holding it down to the black chassis. dvd drive comes out as well, i followed the specific guide to get that out. Doing this let me flip the mobo out along with the fan, luckily the heatfin is separate from the fan.
Two of my screws did not want to come out when I used Philips #00 and it damaged the screw so now I don't know if I will manage to get it out. What can I do?
Don't know about ruined screw head removal, but for future reference: Place the tool lightly on screw head & rotate axially 'til the tool drops into the screw head for a comfortable, firm fit, before applying pressure & torque for screw removal. If the tool does not drop in the screw head for the comfortable, snug fit, you may have the wrong tool or the wrong size. Try a different size 'til U get the right fit before applying pressure & torque to remove the screw. It can save you grief from a ruined screw head.
-


Pour remonter votre ordinateur, suivez les instructions dans le sens inverse.
Pour remonter votre ordinateur, suivez les instructions dans le sens inverse.
Annulation : je n'ai pas terminé ce tutoriel.
113 autres ont terminé cette réparation.
Merci à ces traducteurs :
100%


Ces traducteurs nous aident réparer le monde ! Vous voulez contribuer ?
Commencez à traduire ›

5 commentaires
This doesn't look ANYTHING like my A1278. You should check that not every A1278 is the same.
All Non-Retina 13" MacBook Pros and the Late 2008 Aluminum MacBook have the same A1278 Model Number (I guess due to the almost identical chassis).
Bonjour. j’ai bien réalisé toutes les étapes mais l’ordinateur ne redémarre plus et l’écran s’allume mais reste “sombre” (pas d’apparition de la pomme non plus)…
J’ai réinstallé les anciens ventilateurs mais le problème persiste (initialement, j’avais bien vérifié que mon macbook s’allumait correctement avant le changement des ventilos).
Quelqu’un aurait une solution? Les forums indiquent le reset SMC, mais ça ne donne rien… Merci
Vérifie la petite prise qui relie le chassis principal avec l’écran. Elle se débranche facilement sans crier gare, l’écran fonctionne anormalement ou pas du tout et la pomme au dos reste éteinte. C’est pas grave, rien n’est cassé mais c’est c….t ! A rebrancher avec précaution. Apple adore les connecteurs minuscules fragiles. Ceci dit je ne remplacerai pas mon Mac de sitôt !
This is a very straightforward job. I was on the point of changing my laptop when I realised how easily and cheaply I could change the fan, getting rid of the annoying noise of a worn out fan. One tip: use a vacuum cleaner to clear the dust from the air intake and general area of the fan.
This is not a a1278 unibody MacBook Pro. A1278 MacBooks backs are one solid metal piece not two separate pieces. This guide is for a different MacBook Pro.
Brad Burgeson - Réponse
This guide isn’t for a pro; it’s a MacBook unibody.
Nicholas -
So, it turns out that Apple used the model code A1278 for quite a few different Mac models, including both Pro and non-Pro versions! This guide is for the non-Pro Macbooks. There’s also one for the Pro models with the same A1278 identifier.
tempelmann - Réponse