Aller au contenu principal

Magellan RoadMate 5236T-LM Motherboard Replacement

Ce dont vous avez besoin

  1. Magellan RoadMate 5236T-LM Motherboard Replacement, Back Cover: étape 1, image 1 de 3 Magellan RoadMate 5236T-LM Motherboard Replacement, Back Cover: étape 1, image 2 de 3 Magellan RoadMate 5236T-LM Motherboard Replacement, Back Cover: étape 1, image 3 de 3
    • Place the device face down on a flat surface.

    • Remove the four 5mm screws at each corner using a #000 Phillips head screwdriver.

  2. Magellan RoadMate 5236T-LM Motherboard Replacement: étape 2, image 1 de 3 Magellan RoadMate 5236T-LM Motherboard Replacement: étape 2, image 2 de 3 Magellan RoadMate 5236T-LM Motherboard Replacement: étape 2, image 3 de 3
    • Gently wedge a plastic opening tool into the seam along the side of the device.

    • Slide the tool along the seam to pry apart the front and back covers.

  3. Magellan RoadMate 5236T-LM Motherboard Replacement: étape 3, image 1 de 2 Magellan RoadMate 5236T-LM Motherboard Replacement: étape 3, image 2 de 2
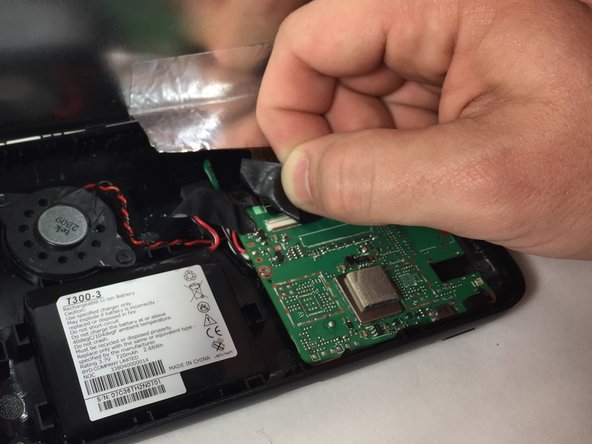
    • A ribbon cable attaches the display screen and the motherboard via a ZIF connector. Remove the tape covering where the ZIF connector connects to the mother board.

    • Use tweezers to disconnect the ZIF connector from the motherboard.

    • The ZIF connector may disconnect itself from the motherboard when removing the tape.

  4. Magellan RoadMate 5236T-LM Motherboard Replacement, Battery: étape 4, image 1 de 2 Magellan RoadMate 5236T-LM Motherboard Replacement, Battery: étape 4, image 2 de 2
    • Lay the back panel on a flat surface with the battery, motherboard, and speaker facing up.

    • Use a plastic opening tool to gently pull the battery away from the back panel in order to remove the adhesive that helps the battery stick to the panel.

  5. Magellan RoadMate 5236T-LM Motherboard Replacement: étape 5, image 1 de 1
    • Unscrew the two 5mm screws using a Phillips #000 screwdriver.

  6. Magellan RoadMate 5236T-LM Motherboard Replacement: étape 6, image 1 de 3 Magellan RoadMate 5236T-LM Motherboard Replacement: étape 6, image 2 de 3 Magellan RoadMate 5236T-LM Motherboard Replacement: étape 6, image 3 de 3
    • Use a Phillips #000 screwdriver to remove three 5mm screws that hold the motherboard down to the the back panel.

    • Remove the battery, speaker and motherboard. Place them on a flat surface upside down.

  7. Magellan RoadMate 5236T-LM Motherboard Replacement: étape 7, image 1 de 1
  8. Magellan RoadMate 5236T-LM Motherboard Replacement, Motherboard: étape 8, image 1 de 1
    • Using the soldering iron, carefully desolder the two wires connected to the speaker.

    • The motherboard should now be separated from both the battery and the speaker.

Conclusion

To reassemble your device, follow these instructions in reverse order.

Une autre personne a terminé cette réparation.

Jared Fadding

Membre depuis le 10/18/16

161 Réputation

1 tutoriel rédigé

Équipe

UMass Dartmouth, Team 4-7, Catania Fall 2016 Membre de l'équipe UMass Dartmouth, Team 4-7, Catania Fall 2016

UMASSD-CATANIA-F16S4G7

3 membres

5 tutoriels rédigés

Un commentaire

Is the hard drive solded to the motherboard as a chip? Do someone have the pinout/things-in-the-diagram of the mother board?

@mscribner @jfadd3

Kind-hearted, spirited Man - Réponse

Ajouter un commentaire

Nombre de vues :

Dernières 24 heures : 0

7 derniers jours : 0

30 derniers jours : 1

Total : 468