Introduction
The rear discs are very easy to replace. If you have your rear calipers off and are replacing hoses and pads, consider changing the rear discs if you have any doubt of their condition. They are inexpensive and very fast to swap.
Ce dont vous avez besoin
-
-
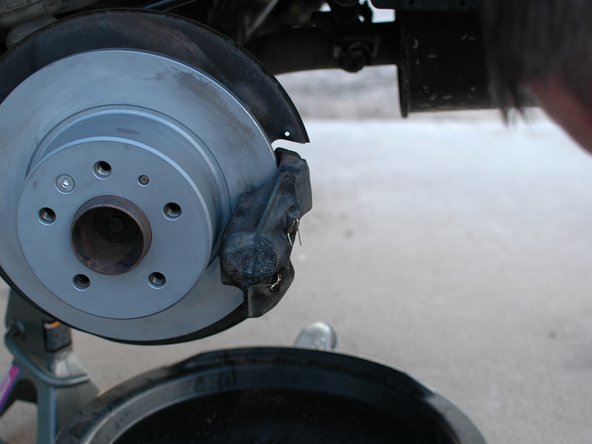
You will first need to remove your wheel to complete the remainder of this job.
-
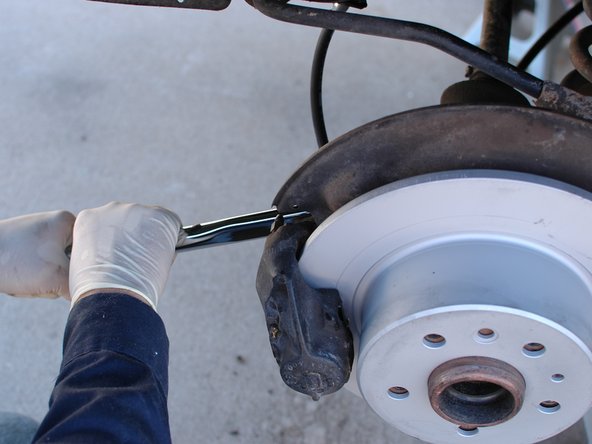
Then unbolt the two 19mm bolts on the back of the caliper. They are in very tightly and held in by thread locker, you may need a long wrench or breaker bar to remove these.
-
Lift the caliper off of the rotor and hang it with a wire hanger from the sway bar or other strong point on the car. Do not let the caliper hang by the brake hose, this can damage the hose leading to an unsafe driving condition.
-
Or, optionally, remove the caliper from the car for cleaning and new pad install. See the caliper replacement and break pad replacement guides.
-
The rear rotor can then be simply pulled off. If it seems to be stuck to the rear hub, tap around the outside of the rotor with the wooden handle of a hammer, or a rubber mallet, to break it loose.
-
-
-
With the rotor off the rear hub is exposed. It may be quite rusty like this. If the rotor was seized to the hub it was because of this rust.
-
-
-
-
Use a fine grit sandpaper, and optionally a power sander, to work around the flat surface of the hub to remove rust.
-
Then use the sandpaper to remove rust from the raised portion at the center of the hub.
-
The area around the lug bolt holes is recessed slightly and does not contact the rotors so it does not to be fully de-rusted.
-
Spray the hub down with brake cleaner to remove the dust.
-
-
-
Now apply a light coat of anti-seize to the surfaces on the hub that contact the rotor.
-
This will help prevent the new rotor from seizing to the surface of the hub the next time you need to remove it.
-
-
-
Now set the new rotor in place. There is a small raised pin on the hub that the rotor has a corresponding hole for. This ensure the rotor is installed correctly aligned with the bolt holes.
-
Spray both sides of the new rotor down with brake cleaner to remove any oils from the factory or from your gloves.
-
-
-
Now re-install the caliper. Make sure to put blue thread locker on the caliper bolts.
-
Torque the caliper bolts down to 115 nm / 85 lb-ft
-


When you are finished be sure to go on a test drive before going on any long trips.
When you are finished be sure to go on a test drive before going on any long trips.
Annulation : je n'ai pas terminé ce tutoriel.
10 autres ont terminé cette réparation.

Équipe

6 commentaires
This is a great, well illustrated guide. I just want to add that the parking brake shoes need inspection and may need adjusting.
After step six, the star wheel can be rotated with a flat blade screwdriver. Access is through one of the lug bolt holes if rotated to about 10 o'clock position on the driver side (and about the 2 o'clock position on the passenger side). Just rotate the star wheel until the shoes are tight enough to prevent the rotor/drum from rotating and then back off about 3 clicks.
There are also cable adjustments in board from the drivers side brake to equalize the tension on the two drums and to give the proper amount of travel when the parking brake petal is pressed.
Thanks! Good advice. I did inspect mine while the rear disc was off. They need replacement. I didn't have the parts on hand. I bought the parts and will be replacing them in a few months. When I do I'll write a guide on that job, and also a guide on adjusting them. I'll then link them from this guide. In the mean time your comment will hopefully help a few folks!
True! I haven't had to do this on my cars so have not written a guide yet. You are more than welcome to write one, if you have the desire!
Love the explanation how to take the disc off, tap it off, and then you show a picture (step 2) of a parking brake shoe minus its friction material. If there is a lot of resistance, the possibility is a lip has formed on the drum part, so backing off the adjuster for the parking brake is needed to remove the rear disc/drum. Otherwise get ready to buy a couple of new parking brake shoes (so as not to be a parking “break”).