Aller au contenu principal

Microsoft Surface Charging Port Replacement

Ce dont vous avez besoin

  1. Microsoft Surface Charging Port Replacement, Back Cover: étape 1, image 1 de 3 Microsoft Surface Charging Port Replacement, Back Cover: étape 1, image 2 de 3 Microsoft Surface Charging Port Replacement, Back Cover: étape 1, image 3 de 3
    • Prior to any repairs make sure that the device is orientated correctly, and you are familiar with all ports and buttons. The screen should be facing up with the Windows logo located on the bottom.

    • Turn off device prior to continuing

  2. Microsoft Surface Charging Port Replacement: étape 2, image 1 de 3 Microsoft Surface Charging Port Replacement: étape 2, image 2 de 3 Microsoft Surface Charging Port Replacement: étape 2, image 3 de 3
    • Carefully turn the tablet over so the screen is facing down.

    • Pull up on the bottom corners to open the stand.

    • Refer to the images.

  3. Microsoft Surface Charging Port Replacement: étape 3, image 1 de 2 Microsoft Surface Charging Port Replacement: étape 3, image 2 de 2
    • Locate the two 5.08mm T5 Torx screws. The two screws will be located on the left and right sides in the kickstand.

    • Make sure when removing the screws to be careful to prevent stripping of the head.

    • With all the screws removed gently wiggle the stand side to side until the lever in the middle is free, releasing the stand.

  4. Microsoft Surface Charging Port Replacement: étape 4, image 1 de 2 Microsoft Surface Charging Port Replacement: étape 4, image 2 de 2
    • Use a spudger or similar flat headed tool to release the small bezels out lined in the image. Remove the plastic trim covering the camera with the soft flat headed tool.

    • Be patient; you will have to work around the casing because there are several small bezels along the edges.

  5. Microsoft Surface Charging Port Replacement: étape 5, image 1 de 2 Microsoft Surface Charging Port Replacement: étape 5, image 2 de 2
    • Next, remove the ten 5.92mm T5 torx screws located underneath the kickstand.

    • Remove the seven 5.87mm T5 torx screws located under the camera casing. There is a sticker covering the second screw from the left.

    • Disconnect the rear cover from the main shell of the system by loosening it with a spudger where the gaps exist.

    • There is an electrical ribbon connecting the rear cover to the motherboard. Do not pull apart the rear cover from the motherboard once you have loosened the rear cover from the main system.

    • Continue working your way around to each corner and loosen the snap-ons on each side until the rear cover comes off.

  6. Microsoft Surface Charging Port Replacement: étape 6, image 1 de 3 Microsoft Surface Charging Port Replacement: étape 6, image 2 de 3 Microsoft Surface Charging Port Replacement: étape 6, image 3 de 3
    • Rotate the device 180 degrees so that the bottom of the device is facing you.

    • A ribbon connects the battery on the rear cover, to the motherboard. Slowly lift the bottom of the rear cover up until you can see the ribbon.

    • Use a spudger to push the ribbon away from the motherboard and parallel to the motherboard in order to remove the ribbon.

    • Separate the rear cover by lifting it up away from the main system.

    • When reassembling the rear cover to the motherboard, reinserting the ribbon cable with a spudger may prove difficult. In this case, gently use your hands to slide the cable end into the slot until they click into place.

  7. Microsoft Surface Charging Port Replacement, Charging Port: étape 7, image 1 de 3 Microsoft Surface Charging Port Replacement, Charging Port: étape 7, image 2 de 3 Microsoft Surface Charging Port Replacement, Charging Port: étape 7, image 3 de 3
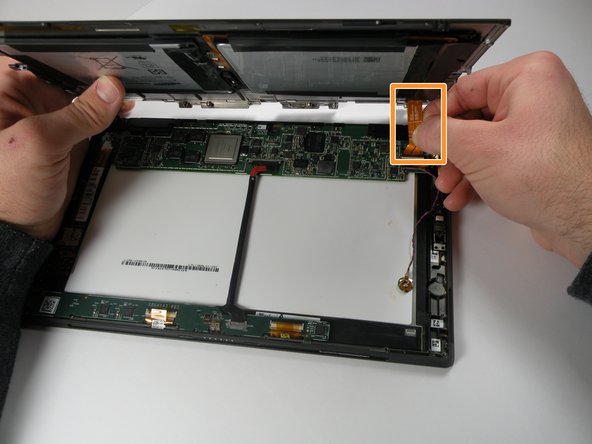
    • Orient the Surface so the side with the charging port is facing you.

    • Use your finger to lift the tab and unplug the orange ribbon from the motherboard.

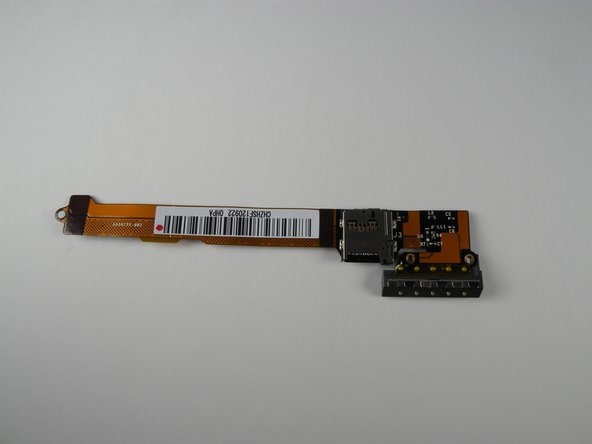
    • Remove the two 3.6 mm T4 Torx screws that hold the charging port in place.

    • Remove the charging port by sliding it out from the main board.

Conclusion

To reassemble your device, follow these instructions in reverse order.

12 autres ont terminé cette réparation.

Erin Beane

Membre depuis le 01/11/13

324 Réputation

2 tutoriels rédigés

Équipe

Cal Poly, Team 17-23, Forte Winter 2013 Membre de l'équipe Cal Poly, Team 17-23, Forte Winter 2013

CPSU-FORTE-W13S17G23

5 membres

17 tutoriels rédigés

5 commentaires

Can anyone confirm whether this charging port will work for a Microsoft Surface 3 (non-pro)? The port is loose and cannot get a fitting connection with a micro-usb cable. Thank you.

Michael Zimmerman - Réponse

Probably, As They Are The Same Aren’t They? I’d Say About 80% Chance Of It Working, Good Luck!

I’ll Have To Do This Myself Soon, All The Pins Seemed To Have Been Sucked Into The Actual Body Of The Device.

Callum Hull -

Is the charging circuitry also located on this board or is it only the port?

rolfeilert1970 - Réponse

The light on the charger connector is on when connected to the Surface. Does this suggest that the charger is working or that the Surface is charging? The unit will not turn on. When I turned it on earlier, I got the ‘low battery symbol’ on the screen but after charging I can get nothing on the screen. I am hesitant to take apart.

dickrwh - Réponse

My surface is not charging anymore, and the pins on the charger are black (at least 2 of them are) does it help to repair the charging port? Or is the charging circuitry located somewhere else?

Rick Okkersen - Réponse

Ajouter un commentaire

Nombre de vues :

Dernières 24 heures : 5

7 derniers jours : 31

30 derniers jours : 165

Total : 51,728