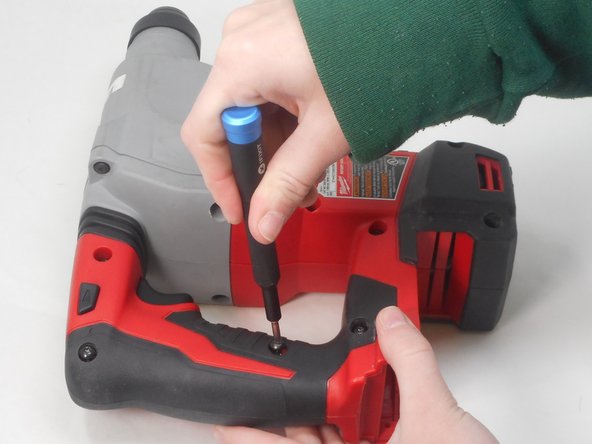
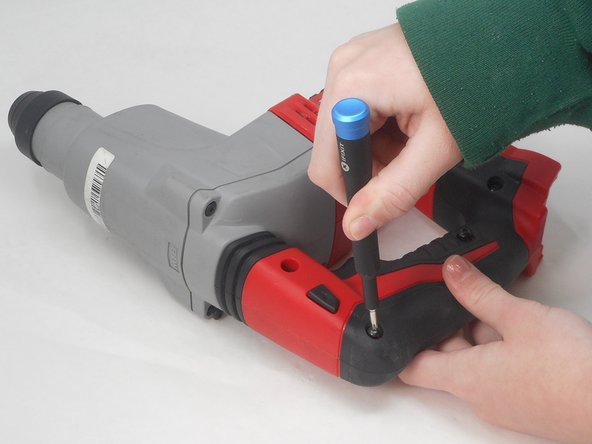
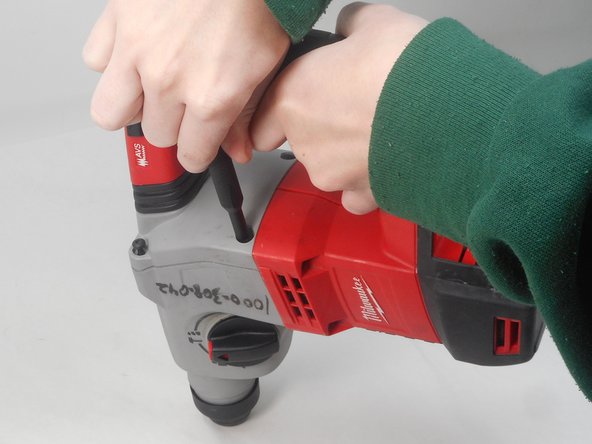
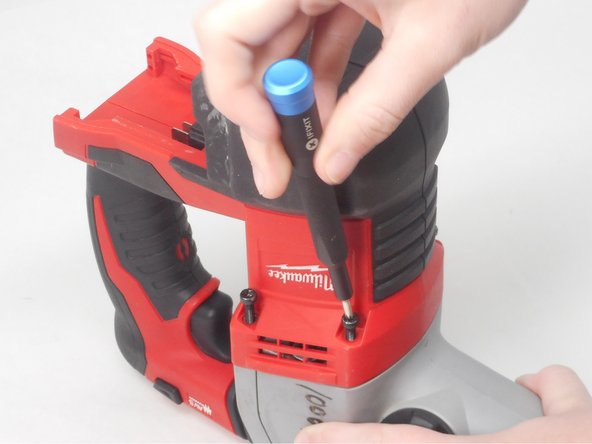
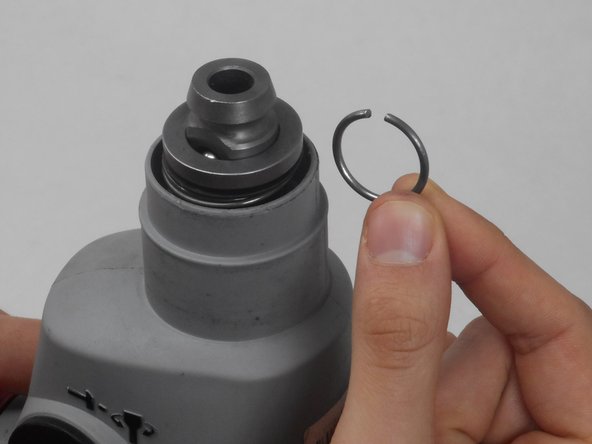
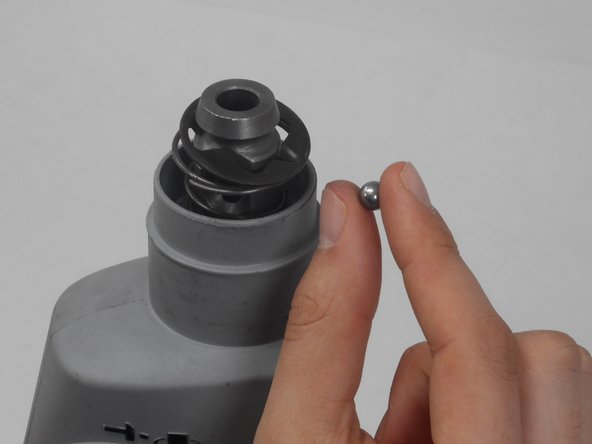
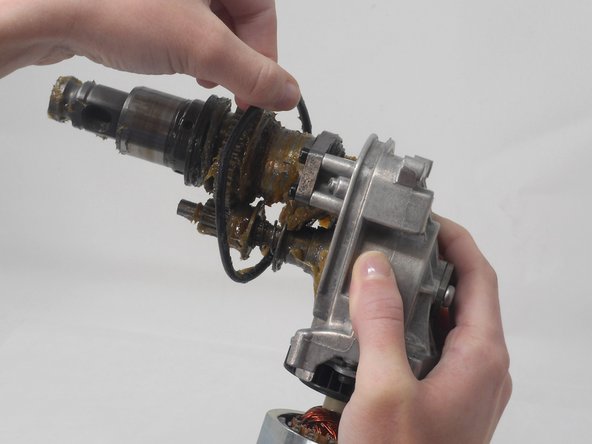
Aller au contenu principal

Milwaukee Rotary Hammer 260520 D14A 2016 Gasket Replacement

Ce dont vous avez besoin

  1. Milwaukee Rotary Hammer 260520 D14A 2016 Gasket Replacement, Side Handle Case: étape 1, image 1 de 1
    • Remove the battery by sliding it from the base.

  2. Milwaukee Rotary Hammer 260520 D14A 2016 Gasket Replacement: étape 2, image 1 de 1
    • Remove two 20.3 mm screws at the right side of the drill base using a Torx T3 screwdriver.

  3. Milwaukee Rotary Hammer 260520 D14A 2016 Gasket Replacement: étape 3, image 1 de 3 Milwaukee Rotary Hammer 260520 D14A 2016 Gasket Replacement: étape 3, image 2 de 3 Milwaukee Rotary Hammer 260520 D14A 2016 Gasket Replacement: étape 3, image 3 de 3
    • Remove five 20.3 mm screws on the right side of the handle using a Torx T3 screwdriver.

  4. Milwaukee Rotary Hammer 260520 D14A 2016 Gasket Replacement: étape 4, image 1 de 2 Milwaukee Rotary Hammer 260520 D14A 2016 Gasket Replacement: étape 4, image 2 de 2
    • Remove four matte 24 mm screws on the crankcase at the rear cover of the drill (connecting the chuck to the handle) using a Torx T3 screwdriver.

  5. Milwaukee Rotary Hammer 260520 D14A 2016 Gasket Replacement: étape 5, image 1 de 1
    • Remove two 24 mm screws on the housing cover beneath the ventilation slots. These screws point into the drill.

  6. Milwaukee Rotary Hammer 260520 D14A 2016 Gasket Replacement: étape 6, image 1 de 2 Milwaukee Rotary Hammer 260520 D14A 2016 Gasket Replacement: étape 6, image 2 de 2
    • Using a Torx T5 screwdriver bit, remove two 26.8 mm screws on each side of the drill housing cover, located beneath the ventilation slots. These screws point upwards.

  7. Milwaukee Rotary Hammer 260520 D14A 2016 Gasket Replacement: étape 7, image 1 de 1
    • Gently pry apart the covers for the drill handle.

  8. Milwaukee Rotary Hammer 260520 D14A 2016 Gasket Replacement, Dust Cap & Locking Sleeve: étape 8, image 1 de 1
    • Push down the locking sleeve at the head of the drill.

  9. Milwaukee Rotary Hammer 260520 D14A 2016 Gasket Replacement: étape 9, image 1 de 2 Milwaukee Rotary Hammer 260520 D14A 2016 Gasket Replacement: étape 9, image 2 de 2
    • With the sleeve pushed down, pry off the dust cap.

  10. Milwaukee Rotary Hammer 260520 D14A 2016 Gasket Replacement: étape 10, image 1 de 1
    • Remove the locking sleeve.

  11. Milwaukee Rotary Hammer 260520 D14A 2016 Gasket Replacement, Gasket: étape 11, image 1 de 2 Milwaukee Rotary Hammer 260520 D14A 2016 Gasket Replacement, Gasket: étape 11, image 2 de 2
    • Using the iFixit Opening Tool, pry the C-ring off the drill.

  12. Milwaukee Rotary Hammer 260520 D14A 2016 Gasket Replacement: étape 12, image 1 de 1
    • Remove the ball retaining washer.

  13. Milwaukee Rotary Hammer 260520 D14A 2016 Gasket Replacement: étape 13, image 1 de 2 Milwaukee Rotary Hammer 260520 D14A 2016 Gasket Replacement: étape 13, image 2 de 2
    • Turn the drill so that it points downwards. Push in the ball support plate so that the 7 mm ball falls out.

    • The ball may fall out unexpectedly. Make sure you are attentive and have a clean workspace.

  14. Milwaukee Rotary Hammer 260520 D14A 2016 Gasket Replacement: étape 14, image 1 de 1
    • Remove the ball support plate.

  15. Milwaukee Rotary Hammer 260520 D14A 2016 Gasket Replacement: étape 15, image 1 de 1
    • Remove the conical spring.

  16. Milwaukee Rotary Hammer 260520 D14A 2016 Gasket Replacement: étape 16, image 1 de 1
    • Remove the drill from the side handle case assembly.

  17. Milwaukee Rotary Hammer 260520 D14A 2016 Gasket Replacement: étape 17, image 1 de 1
    • With the screws removed, gently pry the grey gear housing cover from the rear of the drill.

  18. Milwaukee Rotary Hammer 260520 D14A 2016 Gasket Replacement: étape 18, image 1 de 2 Milwaukee Rotary Hammer 260520 D14A 2016 Gasket Replacement: étape 18, image 2 de 2
    • Remove the drill from the grey gear housing.

    • Remove the damaged gasket from the crankcase.

Conclusion

To reassemble your device, follow these instructions in reverse order.

Une autre personne a terminé cette réparation.

Sophie Nieder

Membre depuis le 02/14/24

796 Réputation

6 tutoriels rédigés

Équipe

University of Memphis, Team 3-3, Sneed Spring 2024 Membre de l'équipe University of Memphis, Team 3-3, Sneed Spring 2024

UM-SNEED-S24S3G3

4 membres

8 tutoriels rédigés

0 commentaires

Ajouter un commentaire

Nombre de vues :

Dernières 24 heures : 0

7 derniers jours : 10

30 derniers jours : 15

Total : 85