Introduction
The breadmaker drive belt can fail due to worn bearings, age, lack of use etc. and the new belt costs about £13 on ebay.
An alternative repair to this one below, is to cut the plastic base off the breadmaker to access the belt, but this leaves a hole in the base which is a safety hazard for small hands.
This guide shows how to disassemble the machine. There is a good disassembly video on you-tube for the US market where this manufacturer is called 'Sunbeam' so it's not easy to find for UK repairers.
The repair was successful.
Ce dont vous avez besoin
-
-
Image shows general view of Morphy Richards model 48280 breadmaker. Model 48281 (and others) are virtually identical.
-
This machine was dated 2003 but not used till 2023 and the belt failed on switch on! I guess the belt had taken a 'set' after being in the same position for 20 years, leading to failure
-
To make the job easier I removed the top lid, though it is not necessary. (ease out the white plastic square by the hinge, using the two holes provided, and pull off lid)
-
-
-
Note that the square heating element is supported by a bracket (red arrow). remove the top screw. Then remove the 8 screws (eg green arrow) securing the oven liner to the base. It's helpful to have a long screwdriver for this. The element can be moved slightly to improve access to the screws.
-
Using gloves, pull up the liner out of the machine. This sheet metal has very sharp edges, thus use gloves. It will be necessary to bend the sheet metal liner slightly to clear the heater element and the rim (due to a screw sticking out from the bracket ceramic insulator)
-
The second image shows the liner removed.
-
-
-
-
Turn the breadmaker up-side-down and undo the 5 screws in the base (Pink arrows). Some of these screws are probably anti-tamper. If you don't have any anti-tamper screw bits, you may for example need to cut a slot in a flat head screw driver (or go to your local repair cafe for help with this bit)
-
Turn the breadmaker upright again and gently push and partially (because they are also connected electrically) separate the top and base covers. Note the base cover is also held in place by 9 plastic clips, which may need slight bending.
-
When partially free, move the top cover to get better access to the 18 pin connector on the main board. On models 48280, the connector is secured with hot wax. This is simply removed using a drop or two of methylated spirit (or similar alcohol) and the hot wax will fall away allowing the connection to come apart.
-
Model 48281 has a connector with a clip which must be depressed to open the connection. The top cover can now be removed.
-
-
-
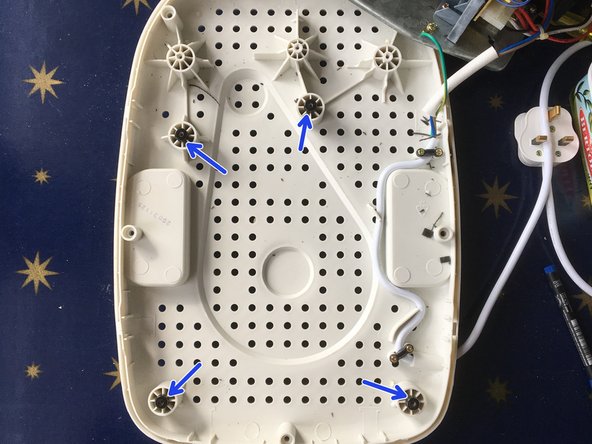
Undo 7 screws holding the metal plate to the plastic base cover (mark their positions to aid reassembly as there are 15 holes in the metal plate)
-
Gently, partially lift off the metal plate, noting that they are still electrically connected by mains wire as in the second image.
-
Note in the second image there are four loose black spacers on the attachment posts (blue arrows) and three posts without spacers. Marks positions to aid reassembly.
-
You can remove the mains wiring if desired or just turn over the metal plate to expose the drive belt.
-
-
-
Image shows my old distressed drive belt with some strands wrapped around the motor pulley, jamming the mechanism. Remove any damaged belt eg by cutting and clean off any debris from pulleys.
-
Fit new belt, by turning the large wheel by hand to slip the belt over the large wheel.
-
New belts for the Morphy-Richards models 48280/48281 can be found on ebay for about £13. There are cheaper £4 universal belts, but I don't know if they fit. (I took a belt from an older machine). Belt size about 535mm circumference, 8mm width about 214teeth
-


To reassemble your device, follow these instructions in reverse order. Remember to wear gloves when fitting back the sheet metal oven liner- it's very sharp.
To reassemble your device, follow these instructions in reverse order. Remember to wear gloves when fitting back the sheet metal oven liner- it's very sharp.
Annulation : je n'ai pas terminé ce tutoriel.
3 autres ont terminé cette réparation.
7 commentaires
On my 48280 I believe there are about 179 teeth.
Just did in about 2 hrs..I personally 6think cutting of the bottom as per the video is unneccessary. Bought a replacement allegedly 50% stronger off Ebay for £15 as opposed a cheap chinese as don't want to have to do the job again..Its a good write up thank you
For the 48330: Remove the lid for easier access. You then have to prise out the 3 x plugs on the top plastic cover that includes the control buttons to remove hidden 3 x screws holding the top cover to the main body (1 by the hinge, 2 towards the front either side of the baking well) before prising off the top cover. You can then access the screws holding the motor plate in place. Belt can then be replaced. Good luck, it isn't easy but perseverance rewards your tenacity ;D
The belt is available and has the code 3m-537-6. They cost around 13£ if you actually search for 'Morphy Richards 48280' and around half the price from stores that sell by code number.