Aller au contenu principal

Motorola C168 Screen Replacement

Ce dont vous avez besoin

  1. Motorola C168 Screen Replacement, Battery: étape 1, image 1 de 2 Motorola C168 Screen Replacement, Battery: étape 1, image 2 de 2
    • Turn the phone so its back is facing you.

    • Press the release button on the back cover, while simultaneously pulling the cover down.

    • Remove the back cover.

  2. Motorola C168 Screen Replacement: étape 2, image 1 de 2 Motorola C168 Screen Replacement: étape 2, image 2 de 2
    • Pinch the sides of the bottom of the battery and pull upward.

  3. Motorola C168 Screen Replacement, SIM Card: étape 3, image 1 de 2 Motorola C168 Screen Replacement, SIM Card: étape 3, image 2 de 2
    • Press and slide the SIM card down.

    • Remove the SIM card.

  4. Motorola C168 Screen Replacement, Front Panel: étape 4, image 1 de 2 Motorola C168 Screen Replacement, Front Panel: étape 4, image 2 de 2
    • Orient the phone so its back is facing you.

    • Using a Torx T-4 screwdriver, carefully remove the 4 screws located at the corners of the phone.

    • Note: If you are using iFixit's screwdriver toolkit, look for the smallest T-screwbit.

  5. Motorola C168 Screen Replacement: étape 5, image 1 de 2 Motorola C168 Screen Replacement: étape 5, image 2 de 2
    Outil utilisé dans cette étape :
    Spudger
    $3.99
    J'achète
    • Lodge a spudger in between the front panel and the main frame of the phone.

    • Using a good amount of torque, pry the front panel from the phone.

  6. Motorola C168 Screen Replacement, Screen: étape 6, image 1 de 2 Motorola C168 Screen Replacement, Screen: étape 6, image 2 de 2
    Outil utilisé dans cette étape :
    Spudger
    $3.99
    J'achète
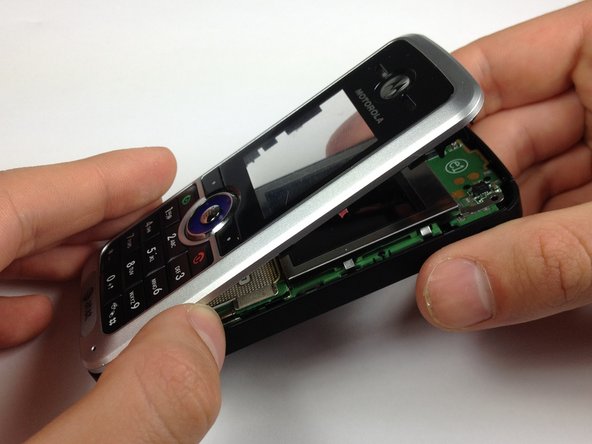
    • Place the phone on its back.

    • Insert the spudger at the bottom of the phone, between the phone's frame and the circuit board.

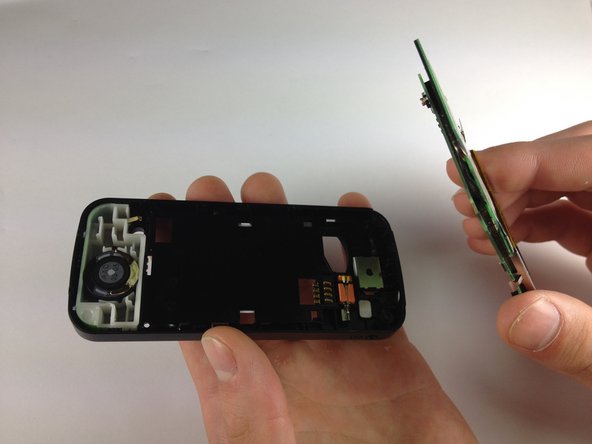
    • Remove the circuit board from the frame.

    • Removing the board takes more force than you would expect.

  7. Motorola C168 Screen Replacement: étape 7, image 1 de 2 Motorola C168 Screen Replacement: étape 7, image 2 de 2
    • Bend the screen clamps outward so they are no longer underneath the circuit board.

    • Pull the screen encasing away from the circuit board.

    • Caution: The screen-to-phone interface will still be connected.

  8. Motorola C168 Screen Replacement: étape 8, image 1 de 2 Motorola C168 Screen Replacement: étape 8, image 2 de 2
    • Unplug the screen-to-phone interface.

    • Remove the screen from its encasing by pushing it out.

Conclusion

To reassemble your device, follow these instructions in reverse order.

Une autre personne a terminé cette réparation.

Christopher Wu

Membre depuis le 04/17/12

37 Réputation

3 tutoriels rédigés

Équipe

Cal Poly, Team 12-40, Regan Spring 2012 Membre de l'équipe Cal Poly, Team 12-40, Regan Spring 2012

CPSU-REGAN-S12S12G40

4 membres

8 tutoriels rédigés

2 commentaires

motorola c168 network not working problem. how to repair network problem?

sattar - Réponse

pls tell me?

sattar - Réponse

Ajouter un commentaire

Nombre de vues :

Dernières 24 heures : 0

7 derniers jours : 0

30 derniers jours : 4

Total : 1,363