Aller au contenu principal

Motorola Droid Turbo Rear Facing Camera Replacement

Ce dont vous avez besoin

  1. Motorola Droid Turbo Rear Facing Camera Replacement, Rear Case: étape 1, image 1 de 1
    • Prepare an iOpener and lay it over the rear case to soften the adhesive on securing the rear case to the phone.

    This di not work; I had to use a blow dryer.

    Caroline Downie - Réponse

  2. Motorola Droid Turbo Rear Facing Camera Replacement: étape 2, image 1 de 2 Motorola Droid Turbo Rear Facing Camera Replacement: étape 2, image 2 de 2
    • Use a plastic opening tool to pry the rear case off of the rest of the device.

    • Remove the rear case.

    • The wireless charging coil may try to stick to the rear case, so make sure to remove it from the case before fully separating the rear case from the rest of the device.

    I had to go around the case, starting on the non-button side, around the top and then the other side. This, unfortunately, pulled on the rear case, pressed the power button and turned the device back on. I would suggest starting on the button side and going around.

    Ryan Helinski - Réponse

  3. Motorola Droid Turbo Rear Facing Camera Replacement, Midframe: étape 3, image 1 de 1
    • Remove the midframe bezel.

    The next immediate step should be to remove the cable for the battery from the motherboard, lower left corner. That will keep you from accidentally turning the phone on while working with it.

    decker5 - Réponse

  4. Motorola Droid Turbo Rear Facing Camera Replacement: étape 4, image 1 de 1
    • Remove the four Torx T5 screws securing the midframe plate.

    Step 4, there are also 2 T shaped tabs on the sides locking the mid frame plate. Above them you can see an angled hole where you can insert a paper clip to push them out and up to unlock them.

    Mike Mangiaruca - Réponse

    The WiFi on the Turbo I’m working on has stopped working. The phone was reset to factory to see if this would fix it after all other try-this-first methods to fix had failed. I opened it to check there and find nothing apparently wrong.. No bent connectors or dirty pins. Any suggestions? I started to clean this section with alcohol but decided I’d better ask first. Any suggestions?

    Rongwey - Réponse

  5. Motorola Droid Turbo Rear Facing Camera Replacement: étape 5, image 1 de 1
    • Remove the midframe.

    There's two clips to the left and the right of the midframe. Use a SIM tool and insert them into the holes above the clips, and push the clips out from the inside. Once both have been pushed the midframe is released.

    rkarnes1988 - Réponse

    Many ANY thanks for that additional tip. Rather important!

    Nate Baxley -

  6. Motorola Droid Turbo Rear Facing Camera Replacement, Battery: étape 6, image 1 de 2 Motorola Droid Turbo Rear Facing Camera Replacement, Battery: étape 6, image 2 de 2
    • Use the point of a spudger to pop up the battery connector.

    When you’re doing this step in reverse to attach the new battery, be sure that you fold over the connector strip like it is in this image so that you’re not trying to snap in the new connector upside-down.

    Darren Smith - Réponse

    Yes. I did the same thing myself.

    Ryan Helinski -

  7. Motorola Droid Turbo Rear Facing Camera Replacement: étape 7, image 1 de 2 Motorola Droid Turbo Rear Facing Camera Replacement: étape 7, image 2 de 2
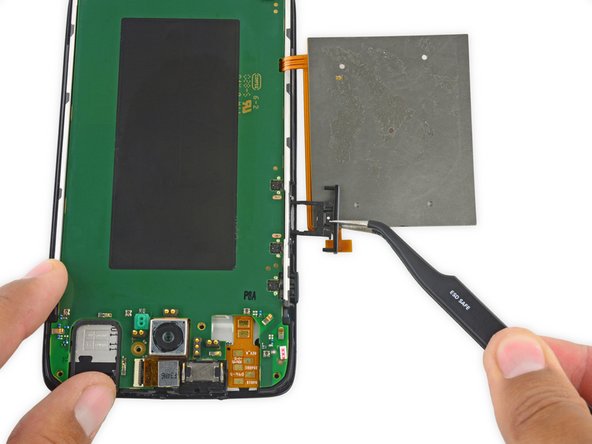
    • Fold the wireless charging coil away from the battery.

    Pry the nub at the top of the wireless charger from the battery first, then use a playing card to slide between the battery and the wireless charger.

    rkarnes1988 - Réponse

    Actually, now that I think about it, you don't need to do this step at all.

    rkarnes1988 -

    My charging coil was really on there. I used two of the blue opening picks to separate the adhesive. Playing card sounds like a good idea too.

    Griffin - Réponse

    FYI if you damage the flex harness it will prevent the phone from charging.

    Denny - Réponse

    When prying up the charger, make sure to get under the adhesive backing attaching it to the battery first and not separate the backing from the charger itself. Otherwise this will cause tearing of the grey surface backing on the charger and possibly rip into the orange membrane itself.

    Justin - Réponse

  8. Motorola Droid Turbo Rear Facing Camera Replacement: étape 8, image 1 de 2 Motorola Droid Turbo Rear Facing Camera Replacement: étape 8, image 2 de 2
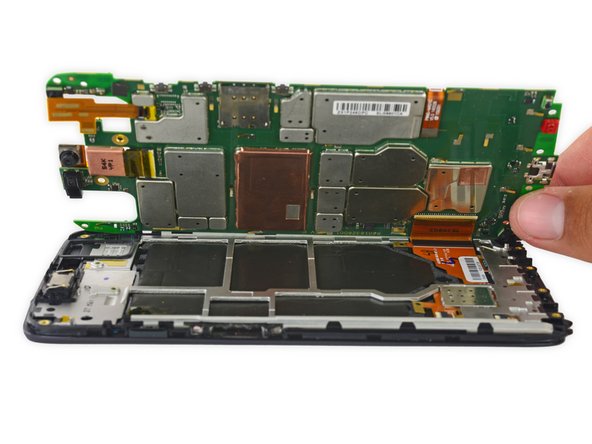
    • Use a spudger to gently pry the battery up from the rest of the device.

    • The battery is secured with some moderate adhesive, so some force may be necessary.

    This step isn't necessary, the mobo comes out even without removing the battery.

    rkarnes1988 - Réponse

    This is in the battery replacement tutorial, why would you want to remove the MOBO along with the battery? I’d consider the battery removal quite essential if the goal is to replace it.

    Chris - Réponse

    Only pry from the near sides - do not reach underneath to pry the far side under. You’ll damage the black coating over the metal plate on the motherboard…

    kempenbills - Réponse

    so.. I did this. How do I fix it?

    andie.shop.xd -

    What is the black coating for?

    Denny -

    Gently pry evenly along both long sides of the battery when removing. The factory adhesive, at least on my phone, was applied in two strips near both edges beneath the long sides of the battery (not applied near the center or along short sides of battery). I made the mistake of working one side loose, thinking I could just slowly lift the battery free of the remaining adhesive on the opposite side. The battery was coming out but actually began bending near the opposite edge because the adhesive held tight. I finished up by gently prying the side still held by adhesive and the battery came free. I did not damage the black coating on the mobo beneath the battery.

    Alan - Réponse

    That black layer appears to be graphite and serves to be a heat shield. If it’s just damaged, you should be able to push it gently back together and continue on with your work.

    Rongwey - Réponse

  9. Motorola Droid Turbo Rear Facing Camera Replacement, Rear Facing Camera: étape 9, image 1 de 1
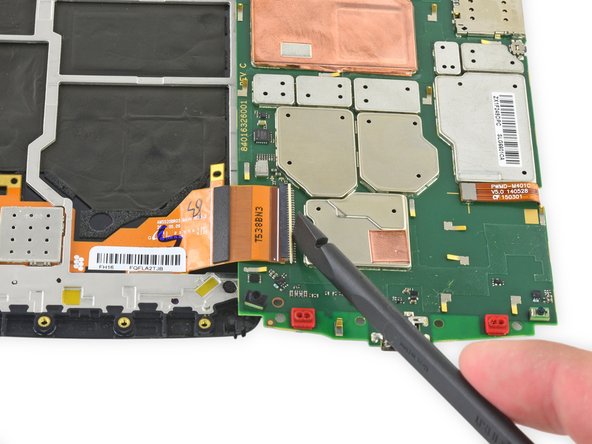
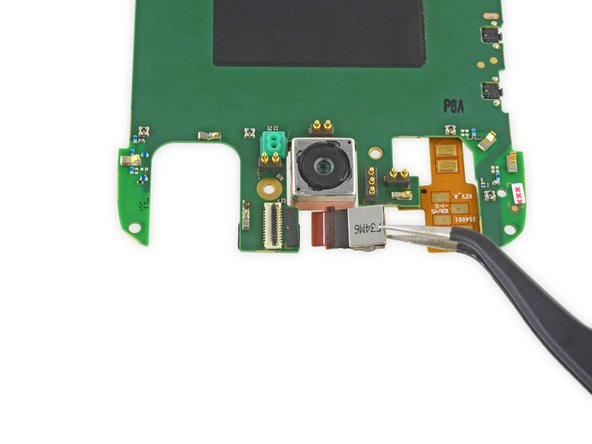
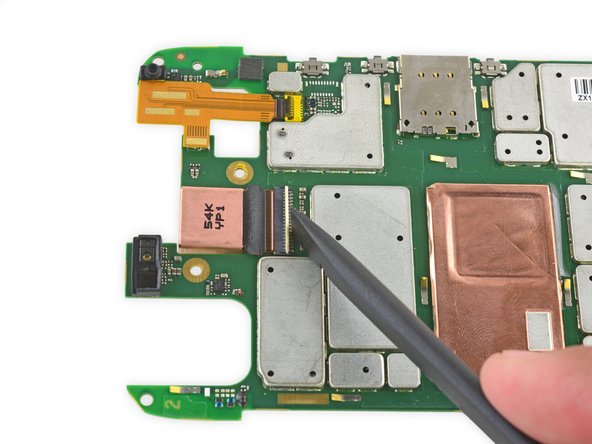
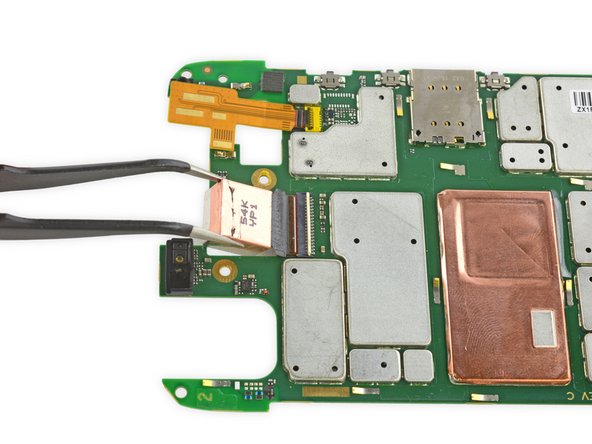
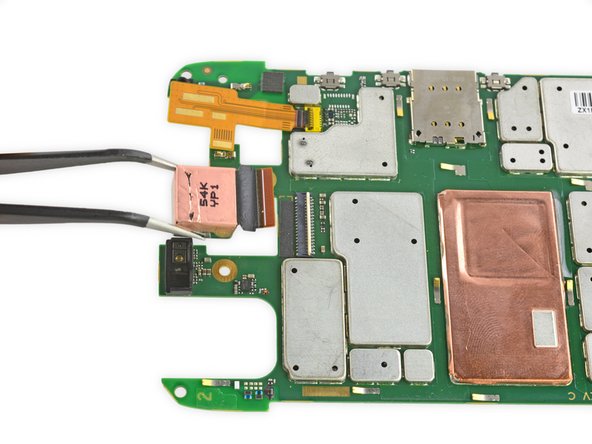
    • Remove the four Torx T5 screws securing the lower antenna board to the motherboard.

  10. Motorola Droid Turbo Rear Facing Camera Replacement: étape 10, image 1 de 2 Motorola Droid Turbo Rear Facing Camera Replacement: étape 10, image 2 de 2
    • Remove the lower antenna board.

  11. Motorola Droid Turbo Rear Facing Camera Replacement: étape 11, image 1 de 2 Motorola Droid Turbo Rear Facing Camera Replacement: étape 11, image 2 de 2
    • Remove the SIM card holder/volume button rocker.

  12. Motorola Droid Turbo Rear Facing Camera Replacement: étape 12, image 1 de 2 Motorola Droid Turbo Rear Facing Camera Replacement: étape 12, image 2 de 2
    • Carefully lift up the motherboard to expose the display connector.

  13. Motorola Droid Turbo Rear Facing Camera Replacement: étape 13, image 1 de 2 Motorola Droid Turbo Rear Facing Camera Replacement: étape 13, image 2 de 2
    • Use the flat end of a spudger to flip up the retaining flap on the display ZIF connector.

    • Pull the display ribbon cable free of the connector.

    • Disconnecting the display ribbon cable makes it easier to remove the rear-facing camera, but it is not strictly necessary.

  14. Motorola Droid Turbo Rear Facing Camera Replacement: étape 14, image 1 de 2 Motorola Droid Turbo Rear Facing Camera Replacement: étape 14, image 2 de 2
    • Use the flat end of a spudger to flip up the black retaining flap on the front-facing camera ZIF connector.

    • Removing the front-facing camera makes it easier to remove the rear-facing camera, but it is not strictly necessary.

  15. Motorola Droid Turbo Rear Facing Camera Replacement: étape 15, image 1 de 2 Motorola Droid Turbo Rear Facing Camera Replacement: étape 15, image 2 de 2
    • Remove the front-facing camera.

  16. Motorola Droid Turbo Rear Facing Camera Replacement: étape 16, image 1 de 2 Motorola Droid Turbo Rear Facing Camera Replacement: étape 16, image 2 de 2
    • Use the flat end of a spudger to flip up the tan retaining flap on the rear-facing camera ZIF connector.

  17. Motorola Droid Turbo Rear Facing Camera Replacement: étape 17, image 1 de 3 Motorola Droid Turbo Rear Facing Camera Replacement: étape 17, image 2 de 3 Motorola Droid Turbo Rear Facing Camera Replacement: étape 17, image 3 de 3
    • Remove the rear-facing camera.

Conclusion

To reassemble your device, follow these instructions in reverse order.

3 autres ont terminé cette réparation.

Geoff Wacker

Membre depuis le 09/30/13

89 892 Réputation

89 tutoriels rédigés

2 commentaires

Nice tut. However, I couldn't remove the 2 screws on the side of the USB connector. They seem to be rotating loosely with a trembling sound. Any ideas how to remove it?.

vdamiani - Réponse

They’re not turning in the second section. The screw is just stuck in the black piece. Try using very pointed tweezers to help remove the screws. Put the points just underneath the screw head and hold it up as you unscrew it.

Rongwey - Réponse

Ajouter un commentaire

Nombre de vues :

Dernières 24 heures : 0

7 derniers jours : 0

30 derniers jours : 1

Total : 2,037