Introduction
Si votre téléphone ne se charge pas ou ne tient pas la charge, il est peut-être temps de remplacer la batterie. Le remplacement de la batterie est assez simple.
Si votre batterie est gonflée, prenez les précautions appropriées.
Ce dont vous avez besoin
-
-
Vous pouvez retirer la coque extérieure à l'arrière du téléphone à l'aide d'un outil d'ouverture en plastique. Après le retrait, le capot arrière intérieur sera exposé comme indiqué.
-
Cette partie est moyennement difficile, surtout si vous n'avez jamais retiré le capot arrière extérieur avant ce point.
-
Cela peut vous prendre plusieurs essais, mais soyez patient. La couverture est étonnamment flexible, mais pas assez pour résister à beaucoup de pression.
-
-
-
Éteignez le téléphone.
-
Poussez la carte SIM jusqu'à ce qu'elle ressorte.
-
Retirez la carte SIM.
-
Faites attention à ne pas endommager la carte mémoire microSD. Contrairement à la carte SIM, l'enfoncer peut ne pas déclencher le ressort, car il peut ne pas y avoir de mécanisme d'éjection.
-
S'il n'y a pas de mécanisme d'éjection à ressort, il est à espérer que votre carte microSD a une arête / un bord surélevé sur lequel vous pouvez appuyer avec votre ongle ou un outil en plastique / caoutchouc pour faire sortir la carte.
-
-
-
À l'aide d'une tête de tournevis Torx T5, retirez les 14 vis (diamètre 3,5 mm et longueur 5 mm) qui maintiennent la plaque arrière en place.
-
Assurez-vous de garder toutes les vis ensemble, car elles se perdent très facilement.
-
Le tapis de projet magnétique ou un conteneur est un excellent moyen d'empêcher la perte de toutes les petites vis métalliques ainsi que d'autres petites pièces métalliques.
Die Schrauben sind Torx T4!
I used T5 and it worked, but it was a very tight fit. I guess tight fit is better for the screws than loose fit, but still, consider trying a T4 screwdriver.
-
-
-
-
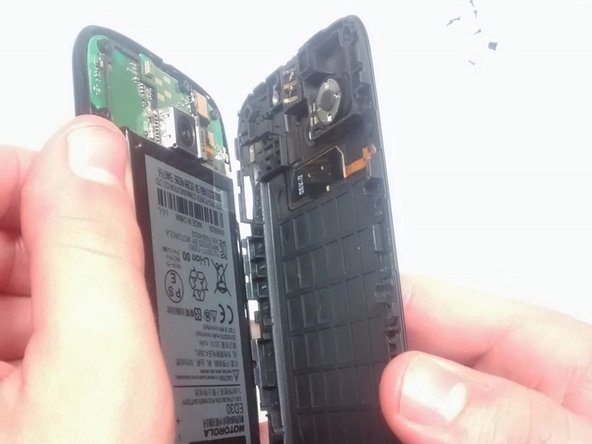
Utilisez l'outil d'ouverture en plastique pour retirer le capot arrière intérieur après avoir retiré toutes les vis.
-
Cela exposera la carte mère et la batterie attachée.
-
Notez qu'une fois la coque arrière intérieure retirée, les boutons de volume et d'alimentation sur le côté peuvent facilement tomber ou être retirés.
-
-
-
Lorsque vous retirez le couvercle intérieur arrière, la batterie sera exposée sur la carte mère. L'étiquette est à l'envers, alors ne vous inquiétez pas.
-
Il est fixé par adhésif et relié à la carte mère par un ruban électrique. Un outil de levier en plastique sera donc nécessaire pour cette tâche.
-
-
-
La batterie est fixée à la carte mère via un ruban orange et une prise.
-
Utilisez un outil de levier plat pour débrancher le ruban de la carte mère. Placez l'outil sous le bord droit et poussez vers le haut. La prise doit se libérer avec une résistance minimale.
Where do I buy the battery Motorola ED 30 for Moto G.
My location Noida 201301,uttarpradesh, India.Request Email ddrakheja@yahoo.com
My Moto g battery requires change.wish to buy one.Request intimate your store in Noida, India.
Thanks.
-
-
-
Le bord droit de la batterie vous donnera le meilleur effet de levier lors du retrait de la batterie de la carte mère.
-
Utilisez l'outil de levier pour soulever le bord de la batterie. N'oubliez pas : la batterie est fixée à l'aide d'un adhésif.
-
Vous rencontrerez beaucoup de résistance dans cette étape. Si la batterie semble trop tirer sur la carte mère, essayez de déplacer l'outil le long des bords pour libérer la batterie.
-
Essayez de ne pas vous précipiter. Il est important de ne rien gâcher lors du retrait de la batterie. La batterie sera libérée, il faudra juste un peu de patience et trouver le bon endroit pour retirer la batterie de la carte mère.
-
-
-
Une fois la batterie retirée, vous pourrez la remplacer en installant la nouvelle batterie sous la caméra arrière (le boîtier argenté en relief sur la carte mère) et en branchant le ruban.
-
Lorsque vous insérez la nouvelle pile, assurez-vous que le couvercle bleu (indiqué dans le cercle orange en haut à gauche) est en place. C'est un protecteur pour les circuits délicats, il est donc important que le couvercle soit à sa place lorsque la batterie est mise en place.
thanks, this was a very good guide and helped me give a new lease of life to an otherwise good phone. My 10yo daughter, who disconnected and reconnected the battery and did most of the screws, says thanks too.
The instructions were good. Didn’t take long to do, once I had the right tools (I bought a Torx T5 driver, as the tool included with the aftermarket battery was the wrong size; the seller credited the cost of it back to my purchase). The connector was the *only* other challenge: getting it properly lined up & seated.
Oh, I didn’t have a spudger handy. I used a plastic knife, worked fine. The adhesive was double-stick tape.
Phone is charging & rebooting right now. Total cost, $13.52, including tool, tax & shipping.
Where did you buy your battery from for such a cheap price?
Also, others claim that it’s a T4 Torx screwdriver, not a T5. Did you T5 still work?
FixWiki -
The T5 worked for me, though it was a very tight fit.
-


Pour remonter votre appareil, suivez ces instructions dans l'ordre inverse.
Pour remonter votre appareil, suivez ces instructions dans l'ordre inverse.
Annulation : je n'ai pas terminé ce tutoriel.
108 autres ont terminé cette réparation.
Merci à ces traducteurs :
100%
[deleted] nous aide à réparer le monde ! Vous voulez contribuer ?
Commencez à traduire ›
Équipe

USF Tampa, Team 1-6, Brown Fall 2014 Membre de l'équipe USF Tampa, Team 1-6, Brown Fall 2014
USFT-BROWN-F14S1G6
4 membres
17 tutoriels rédigés
30 commentaires
Good clear instructions. Thanks.
seemed to work for me. fiddly screws though.
This shows the second gen moto g but the title is for 3rd gen. Is there a tutorial for the 3rd gen?
This is the 3G version (moto g 2013, the all first version) but not the 3rd version :)
Antoine -
It’s none of those, It’s the original NON-LTE 1st gen, and yes the title says 1st gen
01110011 01101000 01110101 01110100 00100000 01110101 01110000 00100000 01101001 01100100 01101001 01101111 01110100 01110011
Nordii -
Great job. Crystal clear instructions.
The youtube presentation includes mention of the plastic pull tab
which might reduce prying.
And I would've like to have seen {which?} buttons are
liable to fall out ("Take note that once inner back cover is removed the two buttons on the side can easily fall out or be removed.")
But TNX...well done!
jamesT
Thank you so much for the clear instructions and clear pictures. Funny enough, the pictures were good enough and this process easy enough that I didn't need the text. I read them anyway at the end. (I know, I know, bad form. lol)
One of the metal plates with holes has moved while i was replacing the battery, Is that important?
Awesome instructions!! Thank you!!!
Haven't tried it yet but am ecstatic that I don't have to buy a whole new phone. Thank you, thank you, THANK YOU!!! Just have to find a plastic pry tool now.
Should the replacement battery have any kind of adhesive to hold it in place like the original?
It's a big pain in the ass. Average time to replace the batter is 1 hour? WTF. My old Motorola Atrix 4g takes me 30 seconds total time to replace the battery. One would;d think that newer androids would be easier not more difficult. Should have bought a different phone. I also have trouble with the phone freezing up and may have to reboot it three or four times a day. What a piece of crap.
Does it matter if I initially didnt re-install the blue cover (rubbery piece) that sits under the battery (to protect the LCD cable underneath) that when putting the battery over it (didnt connect it to motherboard before discovering I forgot to put back the blue cover) it would have damaged the LCD/digitizer in any way? I put my phone back together and when I powered it back on I noticed that there is some distortion on the LCD screen and the touch screen (digitizer) is not working. I'm wondering if just placing the battery over the LCD connector without the blue cover in any way damaged the circuitry, even though the bettery was never connected to the board.
Hey there,
thanks ever so much for this. Saved my ass.
Hardest part was tracking down a battery (same day) - and oddly enough the Torx 5.
Ended up having to by a smart phone tool kit...Oh well...
Thanks again -- and keep that info flowin'!
when the new battery and tools arrive I will follow this guide.
After an hour or two with a hammer and chisel, 4 ,cans of Guinesss. 10 naughty smokes. and 14 Valium. I decided the best bet
is a visit to my local, friendly, pc shop in the morning, yes folks the old 'uns were a lot easier, Progress.. don't mak me laugh!!
But, sincere thanks to the person who posted the info, I am very grateful; If we ever meet, I will invite you to dine with me, LOL;
Eagle...
I broke the battery connection to the motherboard. The soldering has come out. What do I do? Please help asap :(
Precise and concise guide. Very useful and it only took the forecast 20 minutes! Many thanks.
I did it used finger nail, it works.
Instead of the prying to let her use my finger nail and it worked only lost two of the 11 screws,, and it works great.
Is it necessary to recalibrate the battery after replacement?
Thank you very much! Clear and correct instructions!
Vielen Dank, die Anleitung war super.
Do these instructions work for the Moto G 5.1 phone?