Aller au contenu principal

Motorola V551 Circuit Board Replacement

Ce dont vous avez besoin

  1. Motorola V551 Circuit Board Replacement, Battery: étape 1, image 1 de 2 Motorola V551 Circuit Board Replacement, Battery: étape 1, image 2 de 2
    • Press down on the chrome button on the bottom of the chassis. Simultaneously slide the back cover down, away from the phone.

  2. Motorola V551 Circuit Board Replacement: étape 2, image 1 de 1
    • Lever the battery out by pressing upwards on the bottom corners of the battery.

  3. Motorola V551 Circuit Board Replacement, Circuit Board: étape 3, image 1 de 3 Motorola V551 Circuit Board Replacement, Circuit Board: étape 3, image 2 de 3 Motorola V551 Circuit Board Replacement, Circuit Board: étape 3, image 3 de 3
    • Remove the rubber screw covers using a plastic spudger.

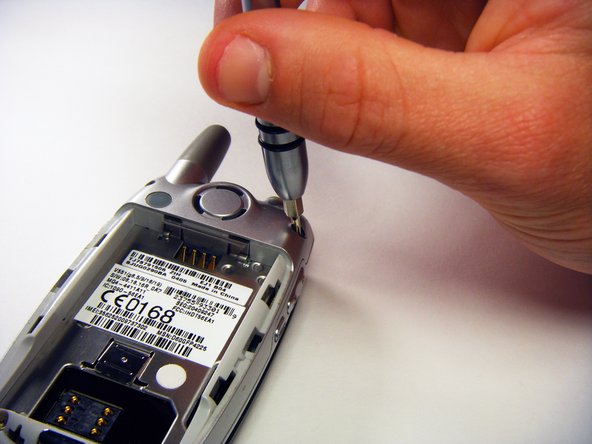
    • Use a T-6 screw bit to remove the screws.

  4. Motorola V551 Circuit Board Replacement: étape 4, image 1 de 1
    • Unscrew the antenna.

  5. Motorola V551 Circuit Board Replacement: étape 5, image 1 de 3 Motorola V551 Circuit Board Replacement: étape 5, image 2 de 3 Motorola V551 Circuit Board Replacement: étape 5, image 3 de 3
    • Use a plastic opening tool to undo the latches at the indicated spots.

    • Dental tools may be used in place of a plastic opening tool, as they are difficult to use.

    • Warning: exercise caution as the plastic can break.

  6. Motorola V551 Circuit Board Replacement: étape 6, image 1 de 2 Motorola V551 Circuit Board Replacement: étape 6, image 2 de 2
    • Remove the circuit board connection (copper flap) by first loosening it with a plastic opening tool.

    • Lift the connection up with your finger.

  7. Motorola V551 Circuit Board Replacement: étape 7, image 1 de 3 Motorola V551 Circuit Board Replacement: étape 7, image 2 de 3 Motorola V551 Circuit Board Replacement: étape 7, image 3 de 3
    • Use your finger to remove the pressure pad from the buttons on the side of the casing.

    • Remove the plastic flap from around the buttons by lifting it up and pulling it out.

    • Gently lift the logic board up.

Conclusion

To reassemble your device, follow these instructions in reverse order.

3 autres ont terminé cette réparation.

gregatron

Membre depuis le 10/29/09

105 Réputation

6 tutoriels rédigés

Équipe

Cal Poly, Team 6-6, Maness Fall 2009 Membre de l'équipe Cal Poly, Team 6-6, Maness Fall 2009

CPSU-MANESS-F09S6G6

4 membres

12 tutoriels rédigés

0 commentaires

Ajouter un commentaire

Nombre de vues :

Dernières 24 heures : 1

7 derniers jours : 1

30 derniers jours : 4

Total : 3,143