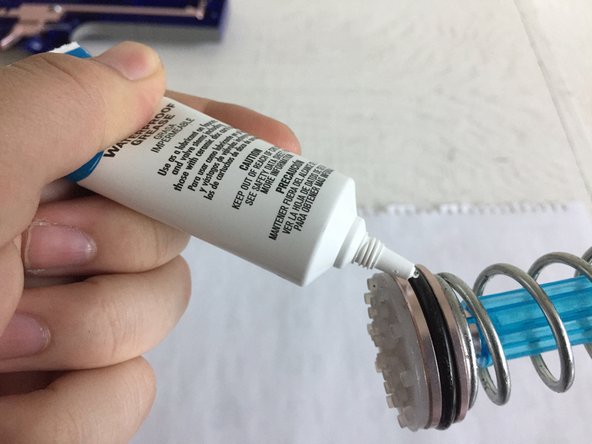
Aller au contenu principal

Nerf N-Strike Longshot O-ring Replacement

Ce dont vous avez besoin

  1. Nerf N-Strike Longshot O-ring Replacement, O-ring: étape 1, image 1 de 2 Nerf N-Strike Longshot O-ring Replacement, O-ring: étape 1, image 2 de 2
    • Caution: Do not disassemble when the blaster is primed (spring potential energy stored). Disassembling while primed will extend the plunger arm, locking the plunger tube in, and releasing the spring disassembled can scatter and damage internal parts.

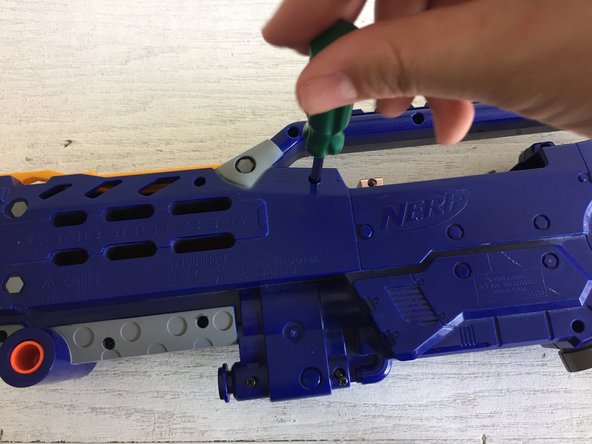
    • You can tell the blaster is not primed when the spring pushes the front pump handle or side handle.

    • If the blaster is primed, you can release the spring tension by pulling the trigger.

  2. Nerf N-Strike Longshot O-ring Replacement: étape 2, image 1 de 2 Nerf N-Strike Longshot O-ring Replacement: étape 2, image 2 de 2
    • Remove the outer barrel attachment and optic.

    • If your optic is attached via a Picatinny rail, also remove the rail by reversing the installation steps.

    • Leave the inner barrel alone as it has no involvement in this fix.

  3. Nerf N-Strike Longshot O-ring Replacement: étape 3, image 1 de 3 Nerf N-Strike Longshot O-ring Replacement: étape 3, image 2 de 3 Nerf N-Strike Longshot O-ring Replacement: étape 3, image 3 de 3
    • Remove the screws from the pump-action handle using a Phillips #00 screwdriver.

    • Skip this part if the handle is not installed.

    • Remove the six screws from the stock using a Phillips #00 screwdriver.

  4. Nerf N-Strike Longshot O-ring Replacement: étape 4, image 1 de 3 Nerf N-Strike Longshot O-ring Replacement: étape 4, image 2 de 3 Nerf N-Strike Longshot O-ring Replacement: étape 4, image 3 de 3
    • Remove all screws holding the blaster shell together using a Phillips #00 screwdriver.

    • Check the pistol grip and stock mount for more screws.

    • Two screws are longer than the rest.

    • Two screws are shorter than the rest.

    • Remember the positions of these screws when reassembling.

    • Consider using a magnet to pick up all loose screws.

    • Lift the top half and set it aside to reveal the internals.

  5. Nerf N-Strike Longshot O-ring Replacement: étape 5, image 1 de 2 Nerf N-Strike Longshot O-ring Replacement: étape 5, image 2 de 2
    • Remove the screws from the arch holding the plunger arm and plunger tube in place.

    • Remove the plunger tube.

    • A spudger can provide leverage to help remove the arch.

    • My part broke due to the high stress of the spring, but there are no consequences if it happens to you.

    • Some models do not have this part. If so, skip this step.

    • The orange nerf rail tooth and corresponding spring may fly out during the fix. If so, neatly set them aside, but make sure to reinstall during reassembly.

  6. Nerf N-Strike Longshot O-ring Replacement: étape 6, image 1 de 2 Nerf N-Strike Longshot O-ring Replacement: étape 6, image 2 de 2
    • Remove the screws connecting the plunger tube end cap to the plunger tube using a Phillips #00 screwdriver.

    • Pull out the plunger to reveal the worn-out O-ring on the plunger head.

    • When reassembling, a strong spring will increase the risk of stripping the screws and difficulty in reassembly. Use a screwdriver slightly bigger than the slot and push hard into the end cap for the best results.

    • You can tell if your O-ring is worn-out when it swells past its advertised dimensions, allowing it to sag or slip.

  7. Nerf N-Strike Longshot O-ring Replacement: étape 7, image 1 de 3 Nerf N-Strike Longshot O-ring Replacement: étape 7, image 2 de 3 Nerf N-Strike Longshot O-ring Replacement: étape 7, image 3 de 3
    • Use a spudger to remove the worn-out O-ring and then install the new one.

    • Consider applying a thin layer of lubricant around the new O-ring for smooth operation.

    • Avoid combining silicone O-rings with silicone lubricant since the lubricant will cause the O-ring to swell and increase the likelihood of slippage. In fact, this error inspired me to create this guide.

  8. Nerf N-Strike Longshot O-ring Replacement: étape 8, image 1 de 3 Nerf N-Strike Longshot O-ring Replacement: étape 8, image 2 de 3 Nerf N-Strike Longshot O-ring Replacement: étape 8, image 3 de 3
    • Reassemble the blaster by reversing steps 2-6, starting at 6 and ending at 2.

    • If the blaster shell halves will not connect, double-check if the plunger tube (red) and the bolt sled (orange) are firmly in place.

Conclusion

With all maintenance completed, the Leviathan is back on the hunt. Good hunting, Nerf snipers.

Jamie Ho

Membre depuis le 04/05/22

157 Réputation

1 tutoriel rédigé

Équipe

CSU Los Angeles, Team 4-95, Briggs Spring 2022 Membre de l'équipe CSU Los Angeles, Team 4-95, Briggs Spring 2022

CSULA-BRIGGS-S22S4G95

1 membre

1 tutoriel rédigé

0 commentaires

Ajouter un commentaire

Nombre de vues :

Dernières 24 heures : 0

7 derniers jours : 9

30 derniers jours : 33

Total : 1,061