Aller au contenu principal

Nikon COOLPIX P7700 LCD Screen Display Replacement

Ce dont vous avez besoin

  1. Nikon COOLPIX P7700 LCD Screen Display Replacement, LCD Screen Display: étape 1, image 1 de 2 Nikon COOLPIX P7700 LCD Screen Display Replacement, LCD Screen Display: étape 1, image 2 de 2
    • Push down and slide the lock of the battery compartment to the unlock position.

    • The battery door should pop open.

    • Remove the battery.

  2. Nikon COOLPIX P7700 LCD Screen Display Replacement: étape 2, image 1 de 1
    • Open the camera LCD screen so it's away from the body of the camera.

  3. Nikon COOLPIX P7700 LCD Screen Display Replacement: étape 3, image 1 de 1
    • Use a Phillips #00 screwdriver to remove the 4.3 screw on both the top and bottom of the screen's casing.

  4. Nikon COOLPIX P7700 LCD Screen Display Replacement: étape 4, image 1 de 2 Nikon COOLPIX P7700 LCD Screen Display Replacement: étape 4, image 2 de 2
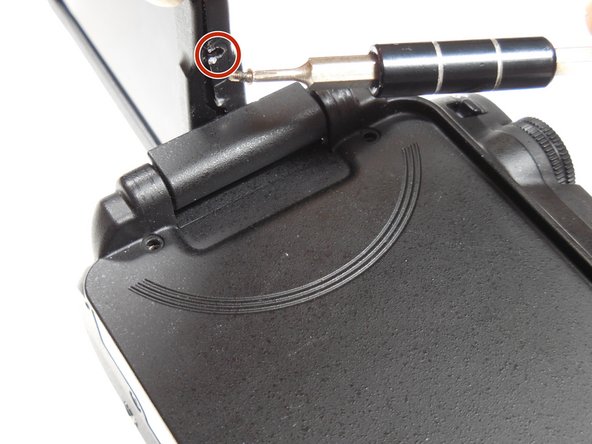
    • Place the camera lens-side down and twist the screen so that it is perpendicular to the camera.

    • Remove the 4.3 mm screw on the side of the casing using the Phillips #00 screwdriver.

    • Twist the screen in the other direction and remove the other 4.3 mm screw.

    • These screws are very brittle! Be careful not to strip the screws. If you find that one has become stripped, follow this guide.

  5. Nikon COOLPIX P7700 LCD Screen Display Replacement: étape 5, image 1 de 1
    • Remove the case from the screen.

  6. Nikon COOLPIX P7700 LCD Screen Display Replacement: étape 6, image 1 de 1
    • Replace the LCD display.

Conclusion

To reassemble your device, follow these instructions in reverse order.

2 autres ont terminé cette réparation.

Matthew Seidel

Membre depuis le 03/11/15

145 Réputation

1 tutoriel rédigé

Équipe

Colorado Springs, Team 2-7, Panko Spring 2015 Membre de l'équipe Colorado Springs, Team 2-7, Panko Spring 2015

UCCS-PANKO-S15S2G7

3 membres

10 tutoriels rédigés

Un commentaire

Do NOT follow this guide. There are numerous details left out of step 6 and there’s no troubleshooting guide. Most importantly, there’s no warning that this kind of repair really isn’t meant to be done by laypeople and that it’s to be done at the user’s own risk. These instructions don’t equip someone for this delicate task that, if done wrongly, can waste a lot of time and damage the camera, as happened in my case.

Alan Green - Réponse

Ajouter un commentaire

Nombre de vues :

Dernières 24 heures : 0

7 derniers jours : 3

30 derniers jours : 17

Total : 1,510