Aller au contenu principal

Nikon COOLPIX S610c Front Casing Replacement

Ce dont vous avez besoin

  1. Nikon COOLPIX S610c Front Casing Replacement, Battery: étape 1, image 1 de 1
    • On the bottom right of the camera, locate the battery flap switch.

  2. Nikon COOLPIX S610c Front Casing Replacement: étape 2, image 1 de 1
    • Move this switch to the right so the battery flap can flip open.

  3. Nikon COOLPIX S610c Front Casing Replacement: étape 3, image 1 de 1
    • Slide the orange switch to the right as shown. Now the battery can be pulled out. Reverse these steps to re-install.

  4. Nikon COOLPIX S610c Front Casing Replacement, Rear Casing: étape 4, image 1 de 1
    • Remove the three 3x3mm screws attached to the rear casing.

  5. Nikon COOLPIX S610c Front Casing Replacement: étape 5, image 1 de 1
    • The panel can be identified by the wifi logo on its upper half on the camera's side.

    • Remove the 5x3mm screw holding down the panel on the side closest to the lens.

  6. Nikon COOLPIX S610c Front Casing Replacement: étape 6, image 1 de 1
    • Pry the panel off from the bottom using your fingernail.

  7. Nikon COOLPIX S610c Front Casing Replacement: étape 7, image 1 de 1
    • Remove the 3x2mm screw underneath the panel near the top of the camera.

  8. Nikon COOLPIX S610c Front Casing Replacement: étape 8, image 1 de 2 Nikon COOLPIX S610c Front Casing Replacement: étape 8, image 2 de 2
    • Remove the 4x3mm on the opposite side near the selector wheel.

    • Remove the 2x2mm and 3x2mm screws underneath the a/v flap.

  9. Nikon COOLPIX S610c Front Casing Replacement: étape 9, image 1 de 2 Nikon COOLPIX S610c Front Casing Replacement: étape 9, image 2 de 2
    • Pry the back panel away from the body of the camera, using the space you just opened up.

    • Be careful not to damage the ribbon cable on the opposite end of the camera.

    • A small piece of the frame of the camera may fall off, but it can be easily put back into place during reassembly.

  10. Nikon COOLPIX S610c Front Casing Replacement: étape 10, image 1 de 2 Nikon COOLPIX S610c Front Casing Replacement: étape 10, image 2 de 2
    • Pry up the plastic ribbon connectors on the body of the camera to release the ribbon cables.

    • The center connector is detached by flipping the black latch up and away from the center of the camera.

    • The smaller connector is detached by flipping the tan latch up and away from the edge of the camera.

  11. Nikon COOLPIX S610c Front Casing Replacement, Front Casing: étape 11, image 1 de 1
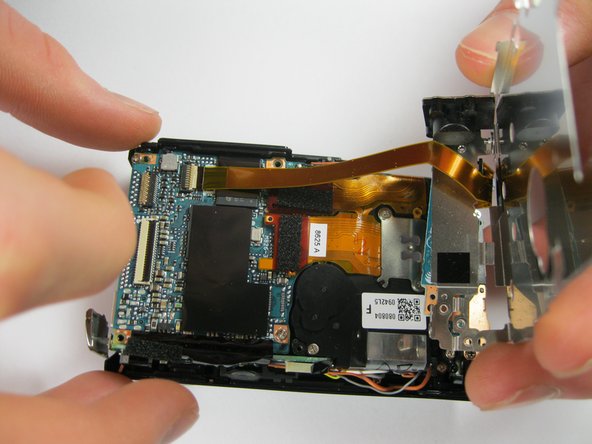
    • Remove the three 3x3mm screws that attach the front casing to the bottom.

  12. Nikon COOLPIX S610c Front Casing Replacement: étape 12, image 1 de 1
    • Remove the two 3x2 screws and two 3.5x2.5 screws attaching the rear panel to the motherboard.

  13. Nikon COOLPIX S610c Front Casing Replacement: étape 13, image 1 de 2 Nikon COOLPIX S610c Front Casing Replacement: étape 13, image 2 de 2
    • Lift the back panel off the motherboard.

    • Be careful not to damage the ribbon cable that attaches the mother board to the rear panel.

  14. Nikon COOLPIX S610c Front Casing Replacement: étape 14, image 1 de 2 Nikon COOLPIX S610c Front Casing Replacement: étape 14, image 2 de 2
    • Detach the ribbon cable from the motherboard by flipping up the latch on the ribbon connector.

    • Note that the white ribbon connector latch flips away from the ribbon cable.

  15. Nikon COOLPIX S610c Front Casing Replacement: étape 15, image 1 de 2 Nikon COOLPIX S610c Front Casing Replacement: étape 15, image 2 de 2
    • Remove the final 4x3mm screw at the top of the camera near the lens.

  16. Nikon COOLPIX S610c Front Casing Replacement: étape 16, image 1 de 2 Nikon COOLPIX S610c Front Casing Replacement: étape 16, image 2 de 2
    • Pry the front casing away from the body of the camera.

    • Be careful not to damage the wires that attach the front panel to the motherboard.

    • Short the leads on the capacitor near the flash to avoid a nasty shock when separating the casing from the body.

  17. Nikon COOLPIX S610c Front Casing Replacement: étape 17, image 1 de 1
    • Unscrew the three 3x2mm screws that attach the cables to the front casing.

Conclusion

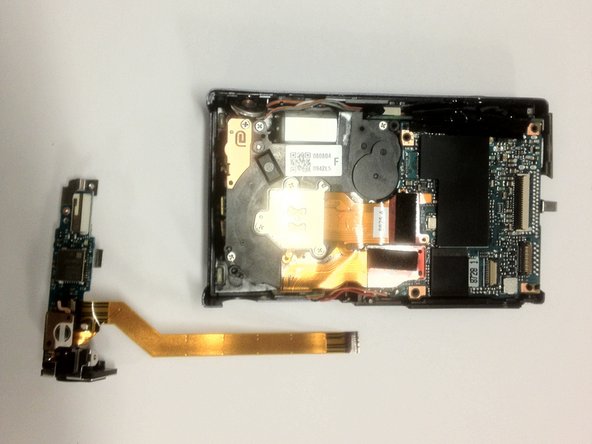
To reassemble your device, follow these instructions in reverse order.

Bryan Bell

Membre depuis le 01/26/12

28 Réputation

1 tutoriel rédigé

Équipe

Cal Poly, Team 9-5, Regan Winter 2012 Membre de l'équipe Cal Poly, Team 9-5, Regan Winter 2012

CPSU-REGAN-W12S9G5

5 membres

12 tutoriels rédigés

0 commentaires

Ajouter un commentaire

Nombre de vues :

Dernières 24 heures : 0

7 derniers jours : 1

30 derniers jours : 2

Total : 1,131