Aller au contenu principal
Pour réparer ensemble - Je crée un compte

Nikon CoolPix P310 Sensor Replacement or Cleaning

Ce dont vous avez besoin

    • Remove all screws from the bottom, sides and top of the camera. All screws don't have the same size, be careful when replacing them.

    • Pull gently but firmly the back cover of the camera to remove it and reveal the inside.

    Demander à FixBot

    Ajouter un commentaire

  1. Nikon CoolPix P310 Sensor Replacement or Cleaning, Removing the button block and screen: étape 2, image 1 de 3 Nikon CoolPix P310 Sensor Replacement or Cleaning, Removing the button block and screen: étape 2, image 2 de 3 Nikon CoolPix P310 Sensor Replacement or Cleaning, Removing the button block and screen: étape 2, image 3 de 3
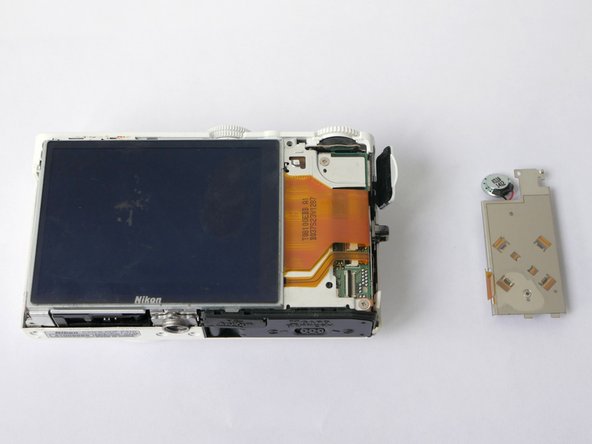
    • Remove the plastic part with all buttons.

    • Lift up the the buttons block from the left side, to access its ZIF connector.

    Demander à FixBot

    Ajouter un commentaire

  2. Nikon CoolPix P310 Sensor Replacement or Cleaning, Removing the button block and screen: étape 3, image 1 de 2 Nikon CoolPix P310 Sensor Replacement or Cleaning, Removing the button block and screen: étape 3, image 2 de 2
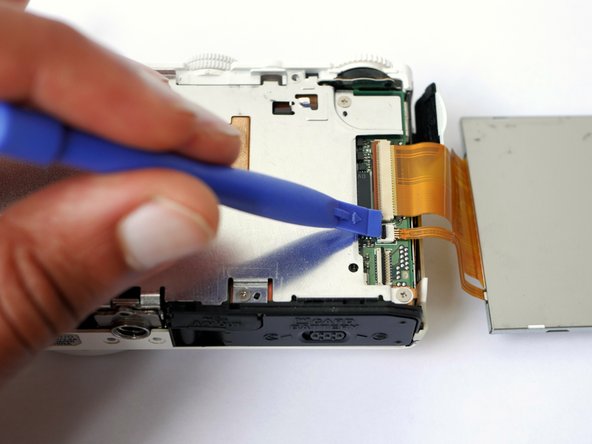
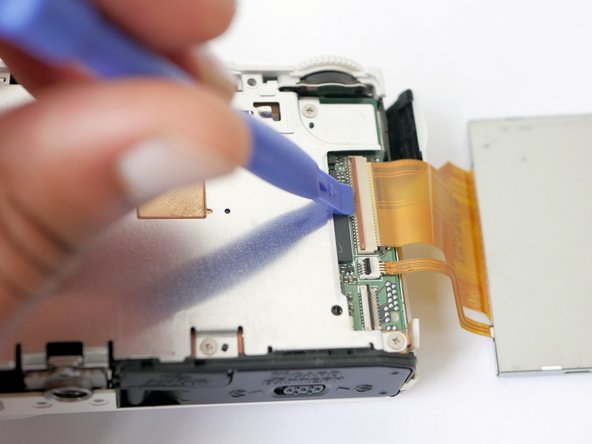
    • With a plastic spudger, open the ZIF connector and release the button block. It opens from the right side - the black part is to be gently lifted up.

    Demander à FixBot

    Ajouter un commentaire

  3. Nikon CoolPix P310 Sensor Replacement or Cleaning, Removing the Screen: étape 4, image 1 de 3 Nikon CoolPix P310 Sensor Replacement or Cleaning, Removing the Screen: étape 4, image 2 de 3 Nikon CoolPix P310 Sensor Replacement or Cleaning, Removing the Screen: étape 4, image 3 de 3
    • Lift up the screen from the left side, to access its two ZIF connectors.

    • Open the small and the large ZIF connectors with a spudger.

    • The small connector is opened by lifting the black part.

    • The large connector is released thanks to the orange part. This longer connector needs to be opened carefully.

    Demander à FixBot

    Ajouter un commentaire

  4. Nikon CoolPix P310 Sensor Replacement or Cleaning, Accessing the main PCB: étape 5, image 1 de 2 Nikon CoolPix P310 Sensor Replacement or Cleaning, Accessing the main PCB: étape 5, image 2 de 2
    • Remove the screws maintaining the last metal protection.

    Demander à FixBot

    Ajouter un commentaire

  5. Nikon CoolPix P310 Sensor Replacement or Cleaning, Releasing the image sensor: étape 6, image 1 de 3 Nikon CoolPix P310 Sensor Replacement or Cleaning, Releasing the image sensor: étape 6, image 2 de 3 Nikon CoolPix P310 Sensor Replacement or Cleaning, Releasing the image sensor: étape 6, image 3 de 3
    • Remove the 3 screws to release the image sensor PCB.

    • Release the ZIF connector lifting it up gently using a plastic spudger.

    • You can then remove the image sensor and clean it. Avoid to scratch the sensor or the inner lens glass, as these would be unrepairable damages.

    Demander à FixBot

    Ajouter un commentaire

Conclusion

To reassemble your device, follow these instructions in reverse order.

Annulation : je n'ai pas terminé ce tutoriel.

Une autre personne a terminé cette réparation.

AlexFixeurs

Membre depuis le 06/20/15

1 657 Réputation

4 tutoriels rédigés

Équipe

Fixeurs Membre de l'équipe Fixeurs

Business

1 membre

7 tutoriels rédigés

0 commentaires de tutoriel

Ajouter un commentaire

Nombre de vues :

Dernières 24 heures : 0

7 derniers jours : 8

30 derniers jours : 47

Total : 1,520