Aller au contenu principal

Nikon CoolPix S600 Motherboard Assembly Replacement

Ce dont vous avez besoin

  1. Nikon CoolPix S600 Motherboard Assembly Replacement, Front and Rear Casing: étape 1, image 1 de 1
    • With the lens facing forward, remove the one 4.2 mm screw on the bottom right hand corner of the camera.

  2. Nikon CoolPix S600 Motherboard Assembly Replacement: étape 2, image 1 de 1
    • Remove the chrome side cover from the body of the camera.

  3. Nikon CoolPix S600 Motherboard Assembly Replacement: étape 3, image 1 de 1
    • Remove the four 3.2 mm screws on the bottom of the camera.

  4. Nikon CoolPix S600 Motherboard Assembly Replacement: étape 4, image 1 de 2 Nikon CoolPix S600 Motherboard Assembly Replacement: étape 4, image 2 de 2
    • Remove the two 3.2 mm screws from the right side of the camera (with lens is facing forward)

    • Remove the one 3.2 mm screw from the left side of the camera (with lens facing foward)

  5. Nikon CoolPix S600 Motherboard Assembly Replacement: étape 5, image 1 de 2 Nikon CoolPix S600 Motherboard Assembly Replacement: étape 5, image 2 de 2
    • Gently separate the back cover from the body of the camera.

    • The back casing will still be connected to the circuit board by a ribbon

  6. Nikon CoolPix S600 Motherboard Assembly Replacement: étape 6, image 1 de 1
    • Use the tweezers to disconnect the ribbon from the circuit board.

  7. Nikon CoolPix S600 Motherboard Assembly Replacement: étape 7, image 1 de 1
    • Remove the one 2.6 mm screw from the left side of the camera (with the lens facing forward)

  8. Nikon CoolPix S600 Motherboard Assembly Replacement: étape 8, image 1 de 2 Nikon CoolPix S600 Motherboard Assembly Replacement: étape 8, image 2 de 2
    • Gently separate the front cover from the body of the camera.

    • The front casing will still be connected to the circuit board by a few wires

  9. Nikon CoolPix S600 Motherboard Assembly Replacement: étape 9, image 1 de 1
    • Remove the two 3.2 mm screws that hold the flash to the front cover.

  10. Nikon CoolPix S600 Motherboard Assembly Replacement: étape 10, image 1 de 3 Nikon CoolPix S600 Motherboard Assembly Replacement: étape 10, image 2 de 3 Nikon CoolPix S600 Motherboard Assembly Replacement: étape 10, image 3 de 3
    • Use the Spudger to remove the copper colored light bulb clip.

    • Remove the front cover entierly from the camera body.

  11. Nikon CoolPix S600 Motherboard Assembly Replacement, Lens Assembly: étape 11, image 1 de 2 Nikon CoolPix S600 Motherboard Assembly Replacement, Lens Assembly: étape 11, image 2 de 2
    • From the top view of the camera, remove the one 5.8 mm screw.

    • From the top view of the camera, remove the one 2.8 mm screw

  12. Nikon CoolPix S600 Motherboard Assembly Replacement: étape 12, image 1 de 1
    • Remove the three 3.4 mm screws from the back side of the camera.

  13. Nikon CoolPix S600 Motherboard Assembly Replacement: étape 13, image 1 de 1
    • Remove the two 3.4 mm screws from the side of the camera.

  14. Nikon CoolPix S600 Motherboard Assembly Replacement: étape 14, image 1 de 1
    • Separate the two metal body pieces from the rest of the camera.

  15. Nikon CoolPix S600 Motherboard Assembly Replacement: étape 15, image 1 de 2 Nikon CoolPix S600 Motherboard Assembly Replacement: étape 15, image 2 de 2
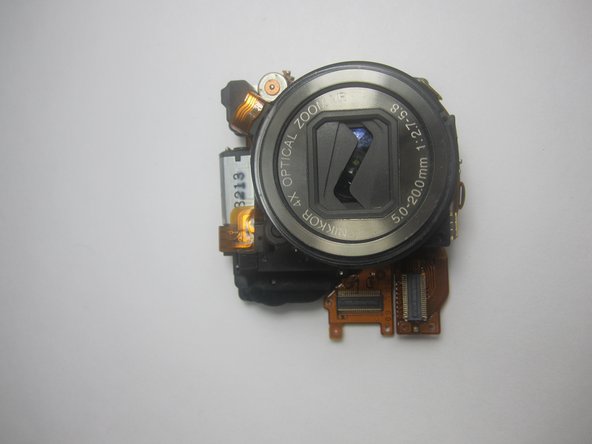
    • Gently remove the two ribbons connecting the lens to the mother board.

  16. Nikon CoolPix S600 Motherboard Assembly Replacement: étape 16, image 1 de 2 Nikon CoolPix S600 Motherboard Assembly Replacement: étape 16, image 2 de 2
    • Gently separate the camera lens from the mother board.

  17. Nikon CoolPix S600 Motherboard Assembly Replacement, Motherboard Assembly: étape 17, image 1 de 1
    • The mother board is permanently fixed to the battery housing.

    • Mother board cannot be taken a part any further.

Conclusion

To reassemble your device, follow these instructions in reverse order.

Une autre personne a terminé cette réparation.

andreas anggasastra

Membre depuis le 09/14/11

116 Réputation

5 tutoriels rédigés

Équipe

Cuesta, Team 1-6, Zipperian Fall 2011 Membre de l'équipe Cuesta, Team 1-6, Zipperian Fall 2011

CUESTA-ZIPPERIAN-F11S1G6

2 membres

6 tutoriels rédigés

0 commentaires

Ajouter un commentaire

Nombre de vues :

Dernières 24 heures : 1

7 derniers jours : 1

30 derniers jours : 2

Total : 1,247