Introduction
In order to reach the touchscreen of the Nintendo 3DS XL you will need to first remove the motherboard and accompanying parts. This guide will help you replace your touchscreen in no time!
Ce dont vous avez besoin
-
-
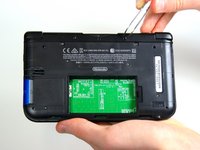
Loosen the two #00 Phillips 4.2 mm-length screws located at the top of the back cover.
-
-
-
Hold the device so that the cover is facing up.
-
Using a plastic opening tool, pry off the cover starting at the top right corner.
-
Hold the edge of the cover to ensure it does not reattach.
-
Look for the small section below the stylus compartment. Pry off the cover at that point if it is still attached.
-
Take off the cover of the device and set it aside.
Note that on the lower side (opposite to the hinges), there are small hooking tabs. These require you to lift the top (screw side) off towards you, then the lower area.
-
-
-
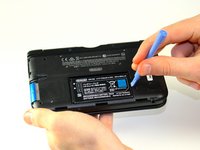
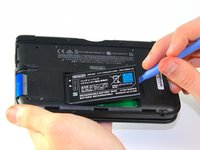
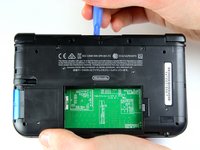
Insert the plastic opening tool into the opening located on the right side of the battery.
-
Pry off the battery from the lower casing.
-
Lift the battery out of the case and set aside.
My 👴 grandpa was helping me 🔧 repair my 3ds xl and ⚡️electrocuted himself with the 🔋battery while we was taking it out with a 🔪 knife. 💀 Rip grandpa 😔
-
-
Outil utilisé dans cette étape :Tweezers$4.99
-
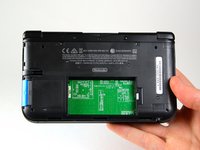
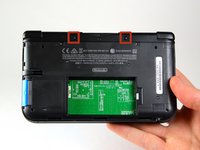
Using tweezers pull out the rubber bumpers that are located at the top of the device on either side of the game cartridge compartment.
I found that the rubber bumps don't move easily, you'll likely have to use a lot of upward force to move them.
I torn one of the bumpers because I used a needle instead.
You do have a pry a bit. I tore one a little but not that big of a deal.
try twisting upward
My 3DS XL is so old that the rubber bumpers were very hard to remove.
So I tried to heat the rubber bumpers a little bit with a hair dryer for 15-20 seconds, with some pauses every 5 seconds in order to avoid overheating or damaging something as a precaution.
It worked well to remove them but the only drawback is that as my rubber bumpers already got damaged and scratched because of my previous attempts without heating first, heating it up after aggravated the scratch damages when I used tweezers.
So I would recommend heating the rubber bumpers moderately first and be gentle when using something that could scratch or damage them.
(Do not take my words for it, it may not work for you)
I was able to remove mine that were being very difficult with some dull tweezers. I used dull ones because I didn't want to scratch anything. First I wedged it between the plastic and the bumper, wiggled it a tiny bit, pulled it out, wedged it again in another spot and continued this until I got it out with my fingernail. Neither the bumper nor my shell were damaged.
-
-
-
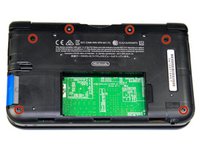
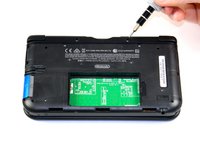
Remove the six 6.2 mm screws using a Phillips #00 screwdriver
#000 ifixit philips screwdriver does not fit the 6.2mm screws. Whats the deal?
I have a 000 Phillips from tekton and it worked just fine.
Megan -
I stripped a good #000 screwdriver, and found that EVERY screw actually fit perfect and snug with a #00 screwdriver. Zero damage to the screws or the screwdriver with the #00.
I bought and used the #00 screwdriver, and it worked perfectly for this.
I had also bought the #000, but I never needed it during the entire operation.
All 6 screws are exactly the same so you don't have to worry about mixing them up.
One of the screws in my 3ds XL seems to have its '+' engraving worn off, i can't seem to unscrew it, though the other 5 unscrewed properly. What should I do?
I stripped a screw in my 3ds xl and don’t know how to get it out. Do I have to use a drill or is there another way?
-
-
-
Remove the 2.3 mm screw located above the game cartridge slot with a Phillips #00 screwdriver.
between these two steps, the bottom two screws are not mentioned. make sure to take those out too ;)
-
-
-
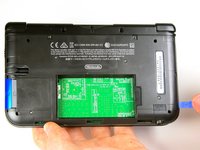
Make sure the SD card has been removed. With a plastic opening tool pry off the lower case starting at the bottom edge and working around the perimeter.
-
Two ribbon cables connect the case to the circuit board. Be careful to not pull the case too hard and rip the ribbon cables.
Make sure that you have removed your SD card, otherwise that'll keep you from completing this step.
-
-
-
Remove the ribbon cables located underneath the left and right bumpers by prying up the base of the cables with a plastic opening tool.
-
Completely remove the lower case from the rest of the device and set aside.
Thank you so much for pointing that out, it was keeping my system from starting up and I thought I blew it!
Yup, that is definitely an upside-down IR board, and will result in a silent post error. It was driving me crazy trying to figure out why the system wouldn't start up.
That's it!! Thanks so much!! I've tinkered around about one month and couldn't get this thing to work...all because I've followed the guide here and looked the picture up twice so I don't put the IR-Board in the wrong way...
Thank you guys so much! I followed everything faithfully and it was DOA on startup. (Black screens, blue light). The IR board was backwards. These pictures need to be fixed. As-is, it shows a broken 3DS.
You should always work on the device in a 3/4 open position- this allows the ribbon cables to have slack and will less likely tear, and is the only position the hinge pin can be removed or installed as it is keyed
-
-
-
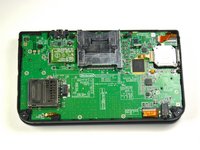
Position the device such that the game cartridge slot is located at the top.
-
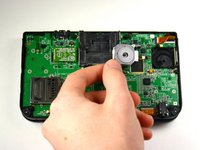
Locate the circle pad on the right side of the device.
-
Remove the two 7.5 mm screws on the upper left and the bottom right corners.
Careful you don’t lose the little washer on the circle pad stem. It’s not held down by anything.
-
-
-
-
Using a plastic opening tool pop off the circle pad joystick.
-
Do not use excessive force with the plastic opening tool. There is a ribbon attaching the circle pad joystick to the motherboard that will remain attached.
I found it easy to put my finger ontop of the board and apply a little pressure. When i popped off the board, my finger stopped it flying off.
I made a small mistake by popping the circle pad joystick and it went flying off and now im stuck trying to put it back in
-
-
-
Using the flat head side of the spudger carefully lift up the retaining flap that attaches the circle pad ribbon to the motherboard.
-
Remove the ribbon and circle pad joystick.
The 'flat head' holds it in place when down, and you can reattach your ribbon cable when it's up, it only needs to be partway in so when you close the flat head, if your joystick board can't move easily in place then you've done it right, it it's too loose, try again to work the ribbon cable under.
The ribbon goes into the left side of the "flat head" right? Not the end that clamps down on the right? I'm having a !&&* of a time sliding the end of the ribbon into the little space between the flat head when it's up and the side of the terminal.
For those of you like me, who got stuck after the last step.
To understand how to actually remove the circle pad, continue with these steps at 21.
Changer le pad circulaire de la Nintendo 3DS
Hope it helps those after me. I almost ripped some cabling inside thinking I had to take out the motherboard.. luckily I didn't.
Just as what monk333y said, follow the Original 3DS steps. They are identical and you don't have to remove anymore big parts. The only annoying part is taking out the circle pad.
I broke the retaining clip. It is not very strong and I used a bit too much force i think in opening the clip or pushing it back down. Thinking of using hot glue or something else to keep the circle pad ribbon in place.
Did the hot glue work? I did the exact same thing now im not sure what to do…
When testing the touchscreen, make sure you install the analog. Otherwise, the screen will act erratic. Thought I broke a brand new part. Just a heads up!
The entire top part of my circle pad had broken off, so I had no problem getting the old one out. I actually had more trouble getting the ribbon cable back into the clip, and the new circle pad attached to the stick, than any other part.
That said, this was way, way easier than I expected it to be.
-
-
-
Position the device such that the game cartridge slot is located at the top.
-
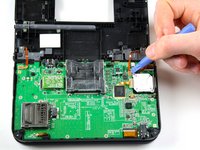
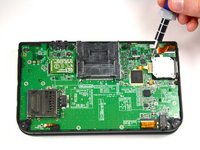
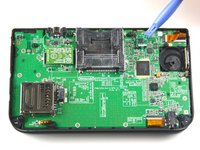
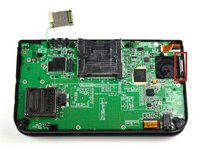
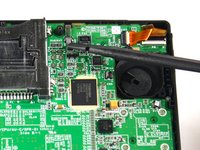
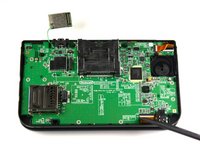
Locate the IR board located on the upper right side of the motherboard.
-
Remove the IR board with a plastic opening tool by inserting the tool below the IR board and gently prying up.
One assumes they forgot to take the photo before removal and quickly put it back on upside down (accidentally) for the purposes of taking the photo.
Removing the IR board is actually a completely unnecessary step. It's absolutely fine to leave the IR board attached to the motherboard, it's then one less loose piece to go missing ;)
The reason they remove these "easily loosable" pieces is because there's an order to put the board back together or the 3DS won't turn on. This is for replacing the motherboard, which most of the time you will buy and it won't come with the microphone, volume or IR board. Use your head kiddo. If it's so easy to loose these pieces, you should keep better track of them. We might as well just not take out any screws as well because those are very easy to loose
You should add this note to the other uses of this picture; I accidentally knocked that chip off and reinstalled it upside down. I was referencing the photos for replacing the joystick.
You skipped removing the microphopne.
I agree my 3dxl the IR board is also part of the motherboard and doesnt come off.
-
-
-
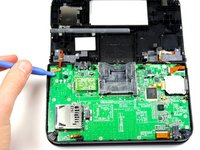
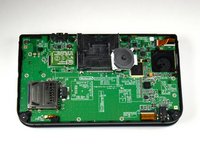
Using a plastic opening tool, pry off the Wi-Fi board.
-
The Wi-Fi board will still be connected by a wire and it is not necessary to completely remove it for this step. Simply place it out of the way for this step.
Component on bottom left was taken off, but not mentioned. Not sure what it does it does, and I'm assuming it's unimportant, but I just wanted to note.
The thing on the bottom left in the little black rubber cover is the mic!
Why not just seperate the wifi board from the antenna now while in your hands? You're going to do it later anyway...
-
-
Outil utilisé dans cette étape :Tweezers$4.99
-
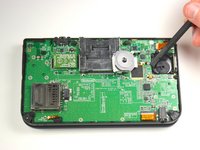
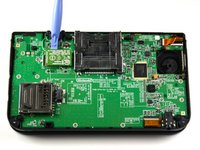
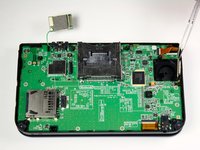
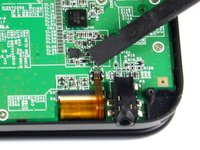
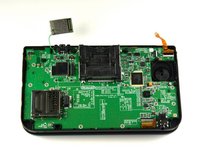
Locate the volume switch on the right side of the motherboard next to the circle pad joystick.
-
Using tweezers, carefully remove the volume board from the casing. It will still be attached to the motherboard by a ribbon cable.
As previously commented, in this step the microphone (lower left corner) was removed.
This is done by opening the grey flap, removing the ribbon from the motherboard and then either remove it or just let it sit in it’s place.
In my experience the motherboard will go around it easily.
-
-
-
Using the flat head side of the spudger carefully lift up the flap that attaches the volume board ribbon to the motherboard.
-
Remove the volume board and set aside.
This step proved to be unnecessary. It's perfectly fine to leave it attached, and again it's one less small fiddly piece to go missing.
What if I pushed flap too hard and detached and cant find. Now I unable to secure in. Is there a part for this?
Its is the small grey flap that holds in the ribbon.
-
-
-
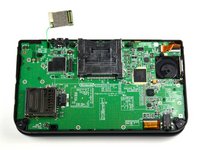
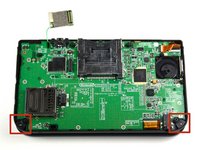
Remove the black plastic pieces from the lower left and right hand corners with either your fingers or tweezers.
-
You can also remove these pieces easily by carefully lifting up the 3DS and holding it upside-down. They normally fall right out, but don't lose them!
Does anything happen if you lose them or not, that last part made me a little worried?
You won't be able to attach a lanyard to the console anymore, and the uncovered holes will provide egress to the inside of the console for dust and debris and whatnot, but that's about it
Jodjuya -
-
-
-
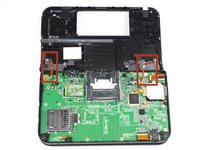
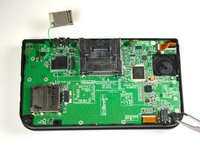
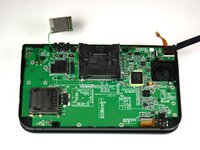
Using the flat head side of the spudger carefully lift up the flap that attaches the two smaller ribbons to the motherboard.
-
These flaps are located on the top right and bottom right side of the motherboard.
-
Remove the ribbons from the flap.
For the first picture on step 17, (the one at the top of the board) what does that cable connect to? My clip broke.
MMM as far as I can tell it looks like it's for the touch screen as it plugs into p13 and is the same plug type as p10, p12 and p17 and a couple others. Could be wrong though :)
Connor -
-
-
-
Using the flat head side of the spudger carefully lift up the flaps that attach the wider ribbons to the motherboard.
-
Remove the ribbons from the opened flaps.
Had some trouble with this: Not exactly sure why, but when after successfully replacing the screen and beginning to resemble, while reinserting the wide ribbon for the lower LCD (p8) it seems that the white locking clip unhinged itself from the connector, and bent some of the pins. The ribbon now won't fully insert.. Can't figure out if I've somehow completely ruined my 3ds. Mostly concerned about my save data that's not on my sdcard.
-
-
-
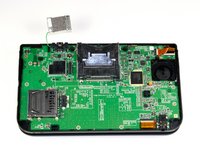
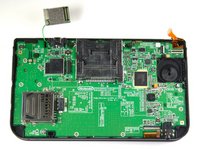
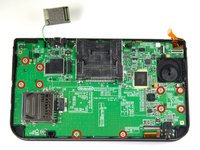
Remove ten 3.0 mm screws that are located around the face of the motherboard.
I took a micrometer to these screws, they are not 5.5 mm long.
These screws are 3.0mm long.
Fair warning- the xl shown here doesn't seem to have a microphone, but there is probably one on your board. in the bottom left, lift up the flap that attaches the ribbon to the motherboard and remove it. gently pull out the microphone and set aside. I almost tore out my mic while doing this the first time.
-
-
-
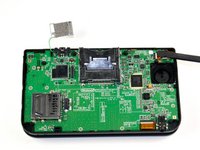
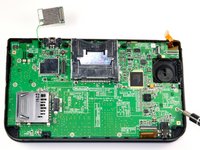
Carefully lift the board straight up just enough to clear the two plastic mounts located near the top corners of the cartridge slot.
-
Gently flip the motherboard over the top side.
Laying it down like this puts too much stress on the ribbon cable. I find it better to release the connector while the board is tilted at a 90 degree angle to the body of the 3DS. Less chance of damage to the top screen cable that way.
Add to this step, during reassembly: make sure the volume slider and wi-fi sliders are lined up correctly with their outer switches.
-
-
-
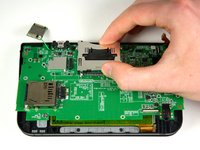
Using the flat head side of the spudger carefully lift up the flap that attaches the wider ribbon on the upper right side to the motherboard.
-
Remove the ribbon from the opened flap.
-
Set the motherboard aside.
So I tore this wire is this the visual or something?? Please help
How do you get this cable back in? It is way too short...
Tweezers, steady hand, and a little luck.
When fixing, I can't put the 2 wires in the connector. HELP!
Don't unplug this cable. Just leave the motherboard flat and don't move it while replacing the face button(s). This thing is way too hard to get back in.
It's hard to put it back but it's doable if you spend a lot of time, it took me around an hour and a half, also make sure you put it well because the first time, it was not fully inserted and the screen was flickering with gray lines so after I reinserted it worked fine.
-
-
-
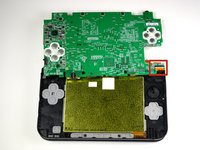
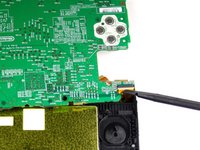
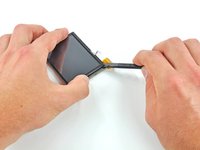
Open the device's hinge.
-
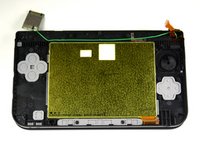
Gently press upward on the touchscreen until it separates from the casing.
Hi everybody,
Just to comment that they have some adhesive double tape between the LCD/touchscreen and the case. So be careful too.
I found that using a spudger to wedge it worked for me.
-
-
-
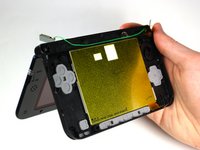
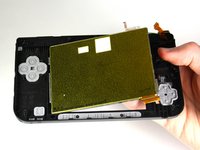
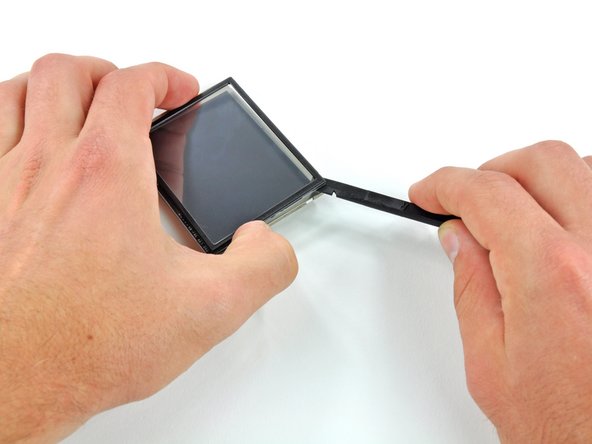
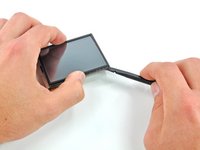
Starting at the bottom right corner, insert the flat end of a spudger between the touch digitizer and LCD frame and gently pry the touchscreen off the LCD.
-
Insert the spudger into the top right corner between the two pieces and pry the touch digitizer off the LCD frame.
-


To reassemble your device, follow these instructions in reverse order.
To reassemble your device, follow these instructions in reverse order.
Annulation : je n'ai pas terminé ce tutoriel.
65 autres ont terminé cette réparation.
Équipe

Cal Poly, Team 9-13, Regan Spring 2014 Membre de l'équipe Cal Poly, Team 9-13, Regan Spring 2014
CPSU-REGAN-S14S9G13
5 membres
44 tutoriels rédigés
24 commentaires
what if you need to replace the screen on the top housing? what is it called.
Is the bottom LCD screen of the Nintendo 3ds xl, the same as the one in the NEW Nintendo 3ds xl?
Looking for what part to buy.
Bit old, but did you figure out the answer which to buy?
White -
Very detailed and easy to use step by step thanks. However, after reassembly after I switch the power button on it starts and then a flash and it trips out? Obviously a fault somewhere but not sure where to start.? Any thoughts appreciated.
That's to do with a part this tutorial skips: you need to put some insulation between the new screen and the motherboard. That's what that orange film is on the back of the screen in the photos. When replacing, you can easily (carefully) remove that film and stick it onto the back of the new screen, no problem. Or you can put some other sort of adhesive to create some insulation between the screen and motherboard. Hope this helps.
where can i get replacement adhesive tape? my touchscreen is fine, but the system was previously owned by a child so the adhesive lining is filled with food bits and whatnot, tried google but can't find anything so far.
Thank you so much for this tutorial! I was able to fix my DS thanks to this after I dropped it and the touchscreen became weird. The problem I was having was a black touch screen with a glitched line across it that still responded to touch. I could tap on things on the touchscreen and the top screen would respond, but there were no images on the touchscreen. This was exactly what I needed and I recommend it to anyone with similar problems.
So I was trying to fix my 3ds xl (2015) the other day and the problem was when I would flip my 3ds open it would make a pop sound and shut off. I went in following instructions on how to assemble it and all that. Afterward I didn't fix it so I just decided I'll save for a new one. In doing all this I created another problem. My bottom LCD displays but it will not respond to touch. Does this mean I need a new bottom LCD? I have a lot of games and data I don't want to lose just because my bottom screen won't respond. In order to keep it all I need to do a system transfer which I can only do in system settings which requires touch to navigate. Can anyone help?
It's the older 3ds xl model not the New Nintendo 3ds
Spencer -
The re-attachment of that first cable was a challenge, trying to wrestle the chassis, motherboard, and ribbon cable. I've written a short guide that makes it much easier, accessible here:
I broke the plastic touchscreen on the bottom screen. (Not the LCD) So basically the plastic part has a dent in it, and it’s always tapping in one place. Now I would’ve gotten it fixed by now, but the problem is I have the new 2015 3ds xl, so I’m not 100% sure if this guide will work. If someone could confirm for me, that would be very appreciated! :)
how do take the hinge off
This is not helpful I need one that is kid friendly usually I can fix anything as a 12yr old girl but this was confusing.
Thanks a lot. This was a really detailed guide which got my 3ds working in no time at all. Reassembling the ribbon cables is probably the hardest thing to do on this small project.
Thank you very much, my daughters 3DS XL is working again!
During the reassembly the white locker of the ribbon cable from step 18/pic. 2 jumped out. This was nearly the death of the Nintendo… To get it back on the two rows of the maybe 100 pins I needed 3 trys of around 15 min. each before stopping the repair for this day and beeing very frustrated. This thing was way too small for human Hands ;-)
The 4th try was successfull, but the locker lost the two guiding side-pieces. After closing it, I taped it down and it’s working!
So be carefull with this while reassembling :-)
Does the digitizer need replaced too?
Not always, I've found that if you don't damage the ribbon cable then you can reuse the digitizer.
Extremely confused, how does the mid-frame come into play here? Yes it houses the digitizer but how do you join that with the LCD screen? The actually replacement was poorly detailed here as well. This seems to be the only real guide for the bottom screen, an actual video needs to be made, one that notes the differences of the LCD and digitizer.
so i tried to fix my touch screen because it as off, ant when i put it back together, the touch screen turns on, but now it dosent even register that i tap it at all. is htere some thing i did wrong?
Thanks for putting this together. I had been a while since the last time I replaced a 3DS lower LCD and definitely needed a refresher. Appreciate the effort that went in to this. Many thanks!
the link for the bottom touchscreen lcd on this guide is different from the one that you need to install, when looking for screens for old/o3ds please make sure to get the screen with 1 wire on the top side, 2 on the bottom, and a golden plate, not silver. I've had to return several parts due to this error and me not noticing right away
When doing step 18, the white part of the wide ribbon attachment came off. Does it reconnect or will it need to be soldered and replaced?
Note: If your top or bottom screen was working before disassembly and doesn't work after reassembly, then it's likely that the connector is loose or dirty or damaged or not clipped or PLACED UPSIDE-DOWN. I had this issue with my Super3DS XL(2015) and it turns out that the reason why my top screen wasn't working after put together, was because I had the top LCD connector upside-down. After I correctly put the connector in, It worked again!
justjustintuber - Réponse
what type screwdriver do i use?!? its so small!!!!
Matthew - Réponse
I had success using a #00 Phillips head
Jake S -
Can't clip the front of the back cover back in
Macro Man - Réponse
I had trouble too, but got past it by slipping the bottom edge into the three indents first then easing the rest of the cover on!
Issu -
I found these were actually #00
Demosthien - Réponse
The screws in the 1st picture are stripped. What screwdriver head do I use?
Adric101 - Réponse
The official battery replacement guide by Nintendo says the screws should indeed be removed by a Phillips #00 screwdriver, so I've edited the guide to reflect that.
They are actually JIS screws though so they could be stripped by that screwdriver
MightyOak - Réponse