Cette version peut contenir des modifications incorrectes. Passez au dernier aperçu vérifié.
Ce dont vous avez besoin
-
Cette étape n’est pas traduite. Aidez à la traduire
-
Remove the expansion pack cover by pushing in the tab and pulling out.
-
-
Cette étape n’est pas traduite. Aidez à la traduire
-
Lever the expansion pack out using a metal spudger.
-
-
Cette étape n’est pas traduite. Aidez à la traduire
-
Remove the six screws on the bottom side indicated in the example with a gamebit head or screwdriver.
-
-
Cette étape n’est pas traduite. Aidez à la traduire
-
Remove the fourteen screws indicated in the example using the larger Phillips screwdriver.
-
-
-
Cette étape n’est pas traduite. Aidez à la traduire
-
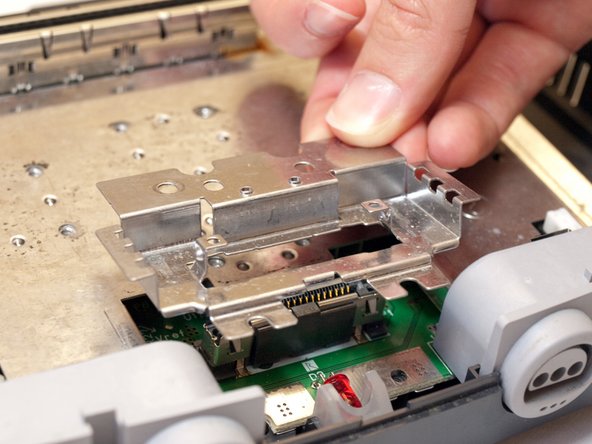
Remove the metal plate indicated in the example by sliding it back and then lifting it up.
-
-
Cette étape n’est pas traduite. Aidez à la traduire
-
Remove the two screws indicated in the example using the smaller Phillips screwdriver.
-
-
Cette étape n’est pas traduite. Aidez à la traduire
-
Remove the screw to the right of the LED light using the larger Phillips screwdriver.
-
-
Cette étape n’est pas traduite. Aidez à la traduire
-
Remove the small metal bracket from the back of the expansion pack slot.
-
-
Cette étape n’est pas traduite. Aidez à la traduire
-
Remove the small metal bracket from the front of the expansion pack slot with the metal spudger.
-
-
Cette étape n’est pas traduite. Aidez à la traduire
-
Remove the small metal bracket behind the expansion slot using the spudger.
-
-
Cette étape n’est pas traduite. Aidez à la traduire
-
Remove the seven screws indicated in the example using the larger Phillips screwdriver.
-
-
Cette étape n’est pas traduite. Aidez à la traduire
-
Lift off and remove the metal plate as indicated in the example.
-
-
Cette étape n’est pas traduite. Aidez à la traduire
-
Remove the four screws indicated using the #1 Phillips screwdriver.
-


Annulation : je n'ai pas terminé ce tutoriel.
23 autres ont terminé cette réparation.

Équipe

Cal Poly, Team 5-4, Regan Fall 2009 Membre de l'équipe Cal Poly, Team 5-4, Regan Fall 2009
CPSU-REGAN-F09S5G4
7 membres
15 tutoriels rédigés