Aller au contenu principal

Ce tutoriel a des changements plus récents. Passer à la dernière version non vérifiée.

Nintendo DSi XL Right Shoulder Button Replacement

Ce dont vous avez besoin

  1. Nintendo DSi XL Right Shoulder Button Replacement, Battery: étape 1, image 1 de 2 Nintendo DSi XL Right Shoulder Button Replacement, Battery: étape 1, image 2 de 2
    • Remove the two Phillips screws securing the battery cover to the back of the handheld console.

    • Lift the battery cover off the back of the DSi XL.

  2. Nintendo DSi XL Right Shoulder Button Replacement: étape 2, image 1 de 1
    • Lift the battery from the DSi XL.

  3. Nintendo DSi XL Right Shoulder Button Replacement, Lower Case: étape 3, image 1 de 3 Nintendo DSi XL Right Shoulder Button Replacement, Lower Case: étape 3, image 2 de 3 Nintendo DSi XL Right Shoulder Button Replacement, Lower Case: étape 3, image 3 de 3
    • Remove the four rubber screw covers on the lower case by prying them up with a push pin.

  4. Nintendo DSi XL Right Shoulder Button Replacement: étape 4, image 1 de 1
    • Remove the following seven Phillips screws that secure the lower case to the rest of the DSi XL:

    • Four silver 5.3 mm screws

    • Two black 5.3 mm screws

    • One black 2.5 mm screw

  5. Nintendo DSi XL Right Shoulder Button Replacement: étape 5, image 1 de 3 Nintendo DSi XL Right Shoulder Button Replacement: étape 5, image 2 de 3 Nintendo DSi XL Right Shoulder Button Replacement: étape 5, image 3 de 3
    • Turn the DSi XL over, and open the display.

    • Insert a spudger between the upper and lower case at the bottom left corner of the DSi.

    • Slide the spudger along the bottom edge of the upper case to release the latches securing the upper case to the lower case.

  6. Nintendo DSi XL Right Shoulder Button Replacement: étape 6, image 1 de 2 Nintendo DSi XL Right Shoulder Button Replacement: étape 6, image 2 de 2
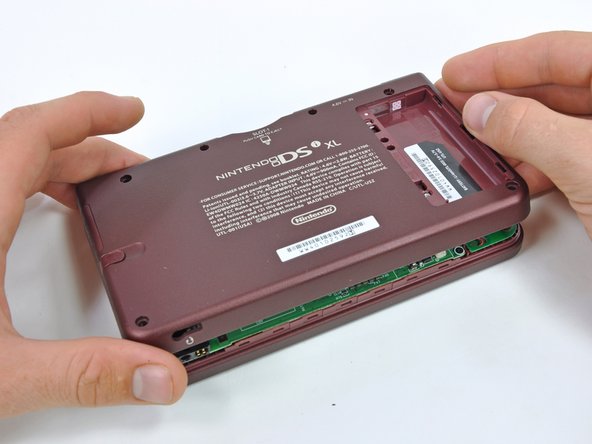
    • Close the display and turn the DSi XL over.

    • Lift the lower case from the front edge.

    • Rotate the lower case away from the DSi.

    • The lower case cannot be completely removed yet, since it is still connected to the motherboard.

  7. Nintendo DSi XL Right Shoulder Button Replacement: étape 7, image 1 de 2 Nintendo DSi XL Right Shoulder Button Replacement: étape 7, image 2 de 2
    • Using a spudger, pry the SD card/right shoulder button connector off its socket.

    • Pry the volume button/left shoulder button connector off its socket on the motherboard with a spudger.

  8. Nintendo DSi XL Right Shoulder Button Replacement, Right Shoulder Button: étape 8, image 1 de 3 Nintendo DSi XL Right Shoulder Button Replacement, Right Shoulder Button: étape 8, image 2 de 3 Nintendo DSi XL Right Shoulder Button Replacement, Right Shoulder Button: étape 8, image 3 de 3
    • Remove the two gold 4.0 mm Phillips screws securing the right shoulder button assembly to the back case.

    • Lift the right shoulder button assembly from the back case.

    • The components of the right shoulder button assembly:

    • Right shoulder button

    • Shoulder button spring

    • Retaining pin

    • Right shoulder button holding panel

Conclusion

To reassemble your device, follow these instructions in reverse order.

Une autre personne a terminé cette réparation.

Brett Hartt

Membre depuis le 04/12/10

127 870 Réputation

143 tutoriels rédigés

Équipe

iFixit Membre de l'équipe iFixit

Staff

135 membres

16 718 tutoriels rédigés

0 commentaires

Ajouter un commentaire

Nombre de vues :

Dernières 24 heures : 6

7 derniers jours : 14

30 derniers jours : 92

Total : 9,216