Aller au contenu principal

Nintendo NES Advantage Joystick Panel Replacement

Ce dont vous avez besoin

  1. Nintendo NES Advantage Joystick Panel Replacement, Back Panel: étape 1, image 1 de 1
    • Remove the four sticky pads from the bottom of the device.

    • If the pads are stuck, use a spudger to remove them.

  2. Nintendo NES Advantage Joystick Panel Replacement: étape 2, image 1 de 2 Nintendo NES Advantage Joystick Panel Replacement: étape 2, image 2 de 2
    • Remove the six 8 mm screws from the bottom of the device with a Phillips #0 screwdriver.

    • Use your hands to pull the back panel away from the controller.

  3. Nintendo NES Advantage Joystick Panel Replacement, Joystick Panel: étape 3, image 1 de 1
    • Remove the four 12 mm screws from the small square panel on the right with a Phillips #0 screwdriver.

    • While removing the last (fourth) screw, apply downward pressure on the panel. This will make it easier to remove the last screw because of the joystick spring on the other side of this panel.

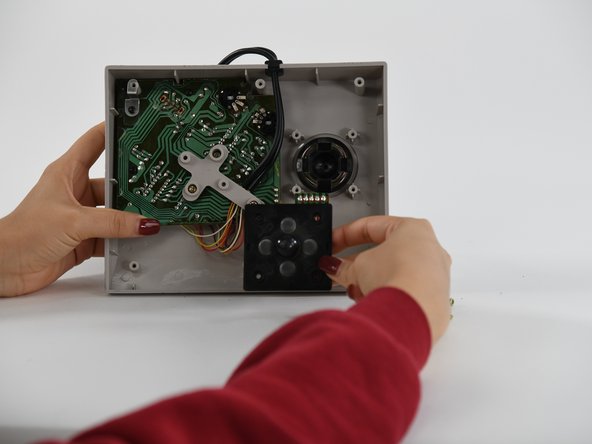
  4. Nintendo NES Advantage Joystick Panel Replacement: étape 4, image 1 de 2 Nintendo NES Advantage Joystick Panel Replacement: étape 4, image 2 de 2
    • Remove the small square panel.

    • This panel is connected with wires to the main circuit board. To replace the joystick panel, you will need to desolder the wires. To learn more about soldering, refer to our Comment souder et dessouder des connexions guide.

Conclusion

To reassemble your device, follow these instructions in reverse order.

Alex E. Parker

Membre depuis le 09/01/22

100 Réputation

1 tutoriel rédigé

Équipe

0 commentaires

Ajouter un commentaire

Nombre de vues :

Dernières 24 heures : 0

7 derniers jours : 0

30 derniers jours : 3

Total : 291