Introduction
Les boutons et la croix directionnelle de la manette Nintendo Switch Pro sont les principaux capteurs de la manette. Les boutons peuvent devoir être remplacés s'ils ne répondent pas, veuillez consulter notre guide de dépannage pour plus d'informations.
Lors du démontage, faites attention aux arêtes vives, il y a quelques morceaux de plastique exposés qui pourraient vous couper.
Ce dont vous avez besoin
-
-
Retournez la manette de sorte que les autocollants soient face au plafond.
-
Utilisez un tournevis JIS 00 pour retirer les deux vis noires de 8,4 mm qui fixent les poignées, situées aux extrémités des poignées.
-
-
-
Utilisez un tournevis JIS 00 pour retirer les quatre vis argentées de 6,8 mm de long qui fixent la coque arrière en plastique transparent.
-
-
-
Soulevez délicatement la coque plastique transparente à l'aide de votre ongle.
-
-
-
Retirer la batterie lithium-ion en soulevant son côté gauche avec un ongle ou un outil d'ouverture en plastique.
-
-
-
-
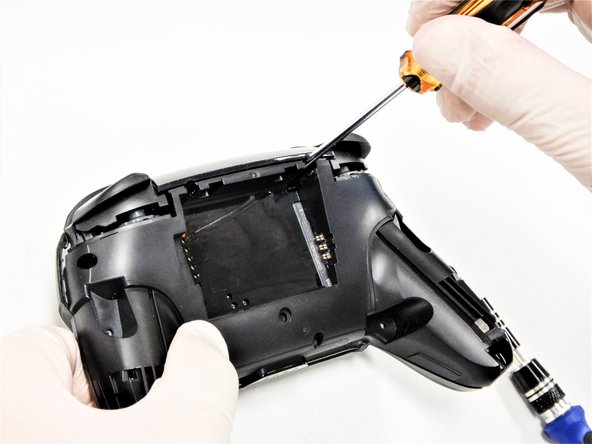
À l'aide d'un tournevis cruciforme, retirez les cinq vis de 5 mm à l'arrière du contrôleur.
-
Les deux vis du boîtier situées au-dessus des poignées et l'unique vis du boîtier située sous la baie de la batterie ont un logement peu profond. Ces trois vis peuvent être facilement retirées.
-
Les deux vis du boîtier adjacentes aux boutons de déclenchement ZR et ZL ont un logement profond. Utilisez une rallonge ou un tournevis cruciforme avec une tige plus longue pour atteindre ces vis.
the 2 screws up at the top are unreachable with the standard fixit kit just a heads up
Seconded. the screws are located too deep below the plastic slot, and the bit holding bulge is too wide for the small aperture (similarly with the flexible extension). the bit length is too shallow to reach.
An alternative driver with a much narrower & longer shaft is required, which will likely not come with interchangeable bits.
I would say it is possible to reach the top left screw, just not the top right - there is a gap in the top left that allows you to slightly bend the standard driver outward to turn it while still making adequate contact.
An update: I was actually able to remove the top right one in a really hacky way - inserting the Phillips #0 bit into the #4 hex bit, and then using that in the standard driver. This added just enough length to successfully reach and make full contact with the screw!
Using the #4 hex bit as an extension was the exact "hack" I needed to get rid of the drift finally. Thank you. You're a lifesaver.
Das #4 Hex Bit als Verlängerung für das Kreuzschlitz Bit zu nutzen ist zwar etwas eng, aber es erspart einem wirklich einen zusätzlichen Schraubendreher.
-
-
-
Retirez délicatement le couvercle en plastique du contrôleur.
Didn't realize there is adhesive holding the front cover onto the unit. It's located inside of the handles. Just a bit of force there helped, just be careful of the cable.
-
-
-
Utilisez la pointe d'un médiator pour ouvrir le volet noir du connecteur ZIF en le poussant vers le haut.
Having just completed this repair, I noted that this ribbon cable can disconnect on either side. It is easier to disconnect and reconnect from the other side than what is shown in my experience.
@acestronautical is right! much easier to remove the ribbon cable from the button board, connect to the base board and then connect back to the button board. Thank you @acestronautical
-
-
-
Utilisez vos doigts ou une pince à bec émoussé pour déconnecter le câble d'interconnexion de son connecteur.
You don't need to disconnect this as long as you are fine with keeping it close by so as not to rip the ribbon cable.
-
-
-
Retirez les deux vis de 6.8 mm sur le circuit imprimé supérieur à l'aide d'un tournevis cruciforme.
-
-
-
Utilisez un spudger pour relever la languette de verrouillage du connecteur ZIF.
-
-
-
Retirez la nappe noire de son connecteur.
What do I do if the connector snaps off? Is it fixable with solder or electrical tape or should I give up hope?
This ribbon cable is difficult to reconnect, quality tweezers are required. I was unable to slide the ribbon cable in to where I could no longer see the traces. Take note of how much ribbon cable is exposed before disconnecting so that you can have an easier time judging when the cable is fully inserted upon reconnecting.
-
-
-
Utilisez un tournevis cruciforme pour retirer les deux vis de 5 mm fixant le circuit imprimé.
There’s one more screw - in this picture, on the left. The junction of the body and left grip, right behind the ABXY buttons.
Hi @mattrausch, thanks for your comment. You're right, the circuit board is held by two screws. I've updated this step.
-
-
-
Utilisez vos doigts ou une paire de pinces brucelles pour retirer le(s) bouton(s) que vous souhaitez remplacer.
-


Pour remonter votre appareil, suivez ces instructions dans le sens inverse.
Pour remonter votre appareil, suivez ces instructions dans le sens inverse.
Annulation : je n'ai pas terminé ce tutoriel.
20 autres ont terminé cette réparation.
Merci à ces traducteurs :
100%

Benoit74 nous aide à réparer le monde ! Vous voulez contribuer ?
Commencez à traduire ›

Équipe

Cal Poly, Team S11-G2, Regan Fall 2019 Membre de l'équipe Cal Poly, Team S11-G2, Regan Fall 2019
CPSU-REGAN-F19S11G2
5 membres
42 tutoriels rédigés
3 commentaires
On re-assembly, you may have trouble getting the top circuit board and shoulder button support structure to snap into place. It’s easiest to get the circuit board around the right analog stick hole, and push it all the way down until it is in place, then to secure the shoulder button support structure.
Make sure the “Home” button clear plastic light spreader (a clear irregular circle-shaped piece) is in place on top of the home button assembly, or it will give the home button a “sunken” appearance.
Worked well, thank you. Had a gooey X button that needed to be cleaned.
Be carefull, these screws are super easy to strip even with the right tools.
Lukas Eberharter - Réponse
I tried editing these instructions after I had trouble with stripping screws, but it doesn't seem to take. The issue is that these are JIS and not Phillips screws. They are VERY similar looking but a Phillips head screwdriver will strip the screws.
Isaac Webb - Réponse
I tried using a Philips #00 screwdriver but it didn’t work
vincent ingrassia - Réponse