Aller au contenu principal
Pour réparer ensemble - Je crée un compte

Nintendo Wii Remote & Wii Nunchuk Accessory Disassembly/Reassembly

Ce dont vous avez besoin

    1. Nintendo Wii Remote & Wii Nunchuk Accessory Disassembly/Reassembly, Nintendo Wii Remote and Wii Nunchuck: étape 1, image 1 de 3 Nintendo Wii Remote & Wii Nunchuk Accessory Disassembly/Reassembly, Nintendo Wii Remote and Wii Nunchuck: étape 1, image 2 de 3 Nintendo Wii Remote & Wii Nunchuk Accessory Disassembly/Reassembly, Nintendo Wii Remote and Wii Nunchuck: étape 1, image 3 de 3
      • Remove the battery cover from the remote and batteries inside.

      • Unscrew the four visible Y1 tri-point screws on the remote.

      Demander à FixBot

      Ajouter un commentaire

    2. Nintendo Wii Remote & Wii Nunchuk Accessory Disassembly/Reassembly: étape 2, image 1 de 3 Nintendo Wii Remote & Wii Nunchuk Accessory Disassembly/Reassembly: étape 2, image 2 de 3 Nintendo Wii Remote & Wii Nunchuk Accessory Disassembly/Reassembly: étape 2, image 3 de 3
      • Use a pry tool to gently pry apart the white tabs near the top of the controller.

      • Once you open up the remote, the two halves of the Wii remote should be separated.

      • There is a high chance that some of the plastic tabs may break off during the process, but the remote will still be able to be reassembled later without them.

      Demander à FixBot

      Ajouter un commentaire

    3. Nintendo Wii Remote & Wii Nunchuk Accessory Disassembly/Reassembly: étape 3, image 1 de 2 Nintendo Wii Remote & Wii Nunchuk Accessory Disassembly/Reassembly: étape 3, image 2 de 2
      • Use a pry tool or your fingers to remove the speaker piece from the remote.

      • Avoid puncturing the speaker! Although this won't outright break the speaker, the quality of the Wii remote's sound will become worse if punctured.

      Demander à FixBot

      Ajouter un commentaire

    4. Nintendo Wii Remote & Wii Nunchuk Accessory Disassembly/Reassembly: étape 4, image 1 de 1
      • Simply remove the rest of the buttons and the conductive rubber pad button contacts.

      • Make sure to keep the buttons organized and close by, as they are very small and can easily be lost.

      Demander à FixBot

      Ajouter un commentaire

    5. Nintendo Wii Remote & Wii Nunchuk Accessory Disassembly/Reassembly: étape 5, image 1 de 3 Nintendo Wii Remote & Wii Nunchuk Accessory Disassembly/Reassembly: étape 5, image 2 de 3 Nintendo Wii Remote & Wii Nunchuk Accessory Disassembly/Reassembly: étape 5, image 3 de 3
      • Go back to the side of the remote with the motherboard.

      • Gently lift and remove it from the base.

      • Be gentle while pulling out the motherboard, making sure not to rip the wires from the rumble motor.

      Demander à FixBot

      Ajouter un commentaire

    6. Nintendo Wii Remote & Wii Nunchuk Accessory Disassembly/Reassembly: étape 6, image 1 de 2 Nintendo Wii Remote & Wii Nunchuk Accessory Disassembly/Reassembly: étape 6, image 2 de 2
      • Pull out the IR sensor screen.

      Demander à FixBot

      Ajouter un commentaire

    7. Nintendo Wii Remote & Wii Nunchuk Accessory Disassembly/Reassembly: étape 7, image 1 de 3 Nintendo Wii Remote & Wii Nunchuk Accessory Disassembly/Reassembly: étape 7, image 2 de 3 Nintendo Wii Remote & Wii Nunchuk Accessory Disassembly/Reassembly: étape 7, image 3 de 3
      • Find the white tabs facing where the IR sensor screen was.

      • Place a tool under one tab and push up until both tabs pop out of place to remove the B trigger button.

      Demander à FixBot

      Ajouter un commentaire

    8. Nintendo Wii Remote & Wii Nunchuk Accessory Disassembly/Reassembly: étape 8, image 1 de 2 Nintendo Wii Remote & Wii Nunchuk Accessory Disassembly/Reassembly: étape 8, image 2 de 2
      • Use a tool and place it under the rumble motor. Gently lift and remove it from the plastic housing.

      • Be careful while unseating the rumble motor so that the wires don't rip.

      Demander à FixBot

      Ajouter un commentaire

    9. Nintendo Wii Remote & Wii Nunchuk Accessory Disassembly/Reassembly: étape 9, image 1 de 2 Nintendo Wii Remote & Wii Nunchuk Accessory Disassembly/Reassembly: étape 9, image 2 de 2
      • To remove the plastic housing, you have to locate the two white tabs. Use your thumbs to gently pull them apart so that the plastic housing is removed from the motherboard.

      • Remove the rubber button from the plastic housing.

      Demander à FixBot

      Ajouter un commentaire

    10. Nintendo Wii Remote & Wii Nunchuk Accessory Disassembly/Reassembly: étape 10, image 1 de 2 Nintendo Wii Remote & Wii Nunchuk Accessory Disassembly/Reassembly: étape 10, image 2 de 2
      • All the pieces of the Wii remote are now disassembled.

      • Please check the photos on the left to make sure you have every single piece.

      Demander à FixBot

      Ajouter un commentaire

    11. Nintendo Wii Remote & Wii Nunchuk Accessory Disassembly/Reassembly: étape 11, image 1 de 3 Nintendo Wii Remote & Wii Nunchuk Accessory Disassembly/Reassembly: étape 11, image 2 de 3 Nintendo Wii Remote & Wii Nunchuk Accessory Disassembly/Reassembly: étape 11, image 3 de 3
      • Now the Wii remote will be reassembled.

      • Return the the buttons back to their original locations, and then place the corresponding rubber pad button contacts on top of the buttons.

      Demander à FixBot

      Ajouter un commentaire

    12. Nintendo Wii Remote & Wii Nunchuk Accessory Disassembly/Reassembly: étape 12, image 1 de 1
      • Place the rubber pad button contact for the B trigger button on the plastic housing.

      • Align the two white tabs with the two indents on the sides and slide the plastic housing into place on the motherboard.

      • Seat the rumble motor back to its original location.

      • Make sure your are putting the white plastic housing on the correct side of the motherboard, as shown in Step 8.

      Demander à FixBot

      Ajouter un commentaire

    13. Nintendo Wii Remote & Wii Nunchuk Accessory Disassembly/Reassembly: étape 13, image 1 de 2 Nintendo Wii Remote & Wii Nunchuk Accessory Disassembly/Reassembly: étape 13, image 2 de 2
      • Return the IR sensor screen to its location and slide it back into place.

      • Make sure the sensor screen is facing the correct direction.

      Demander à FixBot

      Ajouter un commentaire

    14. Nintendo Wii Remote & Wii Nunchuk Accessory Disassembly/Reassembly: étape 14, image 1 de 2 Nintendo Wii Remote & Wii Nunchuk Accessory Disassembly/Reassembly: étape 14, image 2 de 2
      • Place the B trigger button back in its location and press the two white tabs into place so that it makes a click.

      Demander à FixBot

      Ajouter un commentaire

    15. Nintendo Wii Remote & Wii Nunchuk Accessory Disassembly/Reassembly: étape 15, image 1 de 3 Nintendo Wii Remote & Wii Nunchuk Accessory Disassembly/Reassembly: étape 15, image 2 de 3 Nintendo Wii Remote & Wii Nunchuk Accessory Disassembly/Reassembly: étape 15, image 3 de 3
      • Lay the motherboard on top of the back side of the remote and push down gently until the motherboard is flush with the top edge of the Wii remote.

      • Make sure the rumble motor is facing down while putting it back in place.

      Demander à FixBot

      Ajouter un commentaire

    16. Nintendo Wii Remote & Wii Nunchuk Accessory Disassembly/Reassembly: étape 16, image 1 de 3 Nintendo Wii Remote & Wii Nunchuk Accessory Disassembly/Reassembly: étape 16, image 2 de 3 Nintendo Wii Remote & Wii Nunchuk Accessory Disassembly/Reassembly: étape 16, image 3 de 3
      • Face the bottom half of the Wii remote, with the motherboard side facing downwards, towards the top half of the Wii remote with the rubber pad button contacts facing upwards.

      • Align the sides and press together until all clips click into place.

      • Tighten all four Y1 tri-point screws.

      Demander à FixBot

      Ajouter un commentaire

    17. Nintendo Wii Remote & Wii Nunchuk Accessory Disassembly/Reassembly, Now Wii Nunchuk Disassembly: étape 17, image 1 de 2 Nintendo Wii Remote & Wii Nunchuk Accessory Disassembly/Reassembly, Now Wii Nunchuk Disassembly: étape 17, image 2 de 2
      • There are two small Y1 tri-point screws that need to be loosened on the bottom of the remote.

      Demander à FixBot

      Ajouter un commentaire

    18. Nintendo Wii Remote & Wii Nunchuk Accessory Disassembly/Reassembly: étape 18, image 1 de 2 Nintendo Wii Remote & Wii Nunchuk Accessory Disassembly/Reassembly: étape 18, image 2 de 2
      Outil utilisé dans cette étape :
      iFixit Opening Picks (Set of 6)
      $4.95
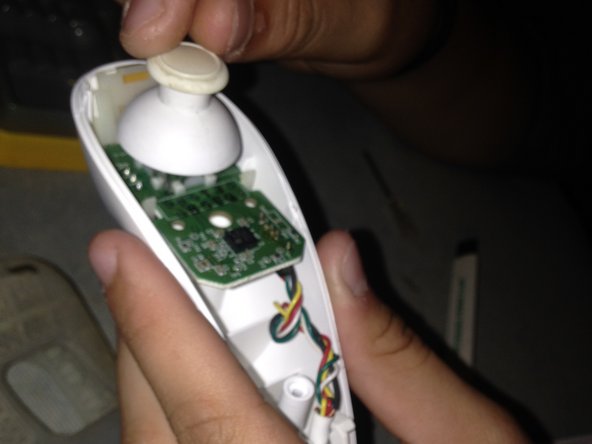
      • Once the screws are removed, you can remove the top half of the chassis off.

      • You may use an opening tool to assist with this step, such as the iFixit opening pick as an example.

      • Next gently pull off the thumb stick.

      Demander à FixBot

      Ajouter un commentaire

    19. Nintendo Wii Remote & Wii Nunchuk Accessory Disassembly/Reassembly: étape 19, image 1 de 2 Nintendo Wii Remote & Wii Nunchuk Accessory Disassembly/Reassembly: étape 19, image 2 de 2
      • The cable that plugs into the Wii remote needs to be removed from the whole nunchuk by pulling upwards on the strain relief boot.

      • The cable and circuit board assembly can still function when plugged into a Wii remote without the nunchuck's controller housing.

      Demander à FixBot

      Ajouter un commentaire

    20. Nintendo Wii Remote & Wii Nunchuk Accessory Disassembly/Reassembly: étape 20, image 1 de 2 Nintendo Wii Remote & Wii Nunchuk Accessory Disassembly/Reassembly: étape 20, image 2 de 2
      • Flip the wires over and remove the white conductive rubber pad button contact for the C and Z trigger buttons.

      • This will make it easier to slide the daughter board out from the white plastic housing cage for the C and Z trigger buttons in the next step.

      Demander à FixBot

      Ajouter un commentaire

    21. Nintendo Wii Remote & Wii Nunchuk Accessory Disassembly/Reassembly: étape 21, image 1 de 2 Nintendo Wii Remote & Wii Nunchuk Accessory Disassembly/Reassembly: étape 21, image 2 de 2
      • Then, remove the plastic housing cage that connects the C and Z button daughterboard to the Wii nunchuck's motherboard by unhooking the clips that hold onto the motherboard.

      Demander à FixBot

      Ajouter un commentaire

    22. Nintendo Wii Remote & Wii Nunchuk Accessory Disassembly/Reassembly, Wii nunchuck reassembly: étape 22, image 1 de 3 Nintendo Wii Remote & Wii Nunchuk Accessory Disassembly/Reassembly, Wii nunchuck reassembly: étape 22, image 2 de 3 Nintendo Wii Remote & Wii Nunchuk Accessory Disassembly/Reassembly, Wii nunchuck reassembly: étape 22, image 3 de 3
      • Begin reassembly by mounting the white plastic housing cage back onto the motherboard.

      • Slide the daughterboard for the C and Z buttons upwards into the plastic housing cage. Make sure not to force the daughterboard during this process to prevent breaking it.

      • Then slide the white conductive rubber pad button contact for the C and Z buttons on top of the daughterboard.

      Demander à FixBot

      Ajouter un commentaire

    23. Nintendo Wii Remote & Wii Nunchuk Accessory Disassembly/Reassembly: étape 23, image 1 de 2 Nintendo Wii Remote & Wii Nunchuk Accessory Disassembly/Reassembly: étape 23, image 2 de 2
      • Seat the motherboard assembly, with the complete C and Z button housing cage, and Wii nunchuck cable back into the bottom half of the Wii nunchuck.

      • Seat the Wii nunchuck cable into the bottom half of the Wii remote.

      • Take care when putting the wires for the Wii nunchuck cable back in the Wii remote's bottom half of the remote casing, because they can easily fall out if not seated correctly.

      Demander à FixBot

      Ajouter un commentaire

    24. Nintendo Wii Remote & Wii Nunchuk Accessory Disassembly/Reassembly: étape 24, image 1 de 2 Nintendo Wii Remote & Wii Nunchuk Accessory Disassembly/Reassembly: étape 24, image 2 de 2
      • Then press the analog stick onto the Wii nunchuck's analog stick stem to reattach it.

      Demander à FixBot

      Ajouter un commentaire

    25. Nintendo Wii Remote & Wii Nunchuk Accessory Disassembly/Reassembly: étape 25, image 1 de 1
      • Lastly push the top half of the Wii nunchuck back on top of the bottom half of the remote. Screw the two Y1 tri-wing screws on the bottom half of the remote to complete the reassembly.

      Demander à FixBot

      Ajouter un commentaire

Conclusion

To reassemble your device, follow these instructions in reverse order.

Annulation : je n'ai pas terminé ce tutoriel.

25 autres ont terminé cette réparation.

Linda Bowers

Membre depuis le 10/24/16

907 Réputation

1 tutoriel rédigé

8 commentaires de tutoriel

Great guide! I took one of my remotes apart some years ago. Now, with fresh tri-wing driver in hand, I am ready to reassemble the thing. Problem: where to solder the green ground? It currently is fused to the nunchuk connector housing, but where does the other end go??? Wish I'd noted that, back then

K. Lehnert - Réponse Partager

Very accurate guide! I was able to clear debris between the buttons with ease.

Aiden - Réponse Partager

Hello do you have tutorials for unassembly nunchuck's connector please?

Patrick WAI KHAI SONE - Réponse Partager

You have to unsolder the cable if you want to replace it. See this replacement cable for the Wii nunchucks, where the description says at the bottom:

Tai Lam - Réponse Partager

Thank you ! My A button registered the click half the time : turns out it had corrosion, now it works like a charm !

CreaZyp! - Réponse Partager

Ajouter un commentaire

Nombre de vues :

Dernières 24 heures : 7

7 derniers jours : 56

30 derniers jours : 304

Total : 51,458