Aller au contenu principal

Nokia 6086 Vibrator Replacement

Ce dont vous avez besoin

  1. Nokia 6086 Vibrator Replacement, Battery: étape 1, image 1 de 1
    • Turn off the phone.

    • Check if there is a microSD card in the slot behind the door on the side. If so, remove it by first pushing it in, then pulling it out.

    • Position the phone so that the back side is in view.

  2. Nokia 6086 Vibrator Replacement: étape 2, image 1 de 3 Nokia 6086 Vibrator Replacement: étape 2, image 2 de 3 Nokia 6086 Vibrator Replacement: étape 2, image 3 de 3
    • Remove the back battery cover.

    • Apply pressure on the cover while simultaneously sliding the cover downward.

  3. Nokia 6086 Vibrator Replacement: étape 3, image 1 de 3 Nokia 6086 Vibrator Replacement: étape 3, image 2 de 3 Nokia 6086 Vibrator Replacement: étape 3, image 3 de 3
    • Insert the iPod opening tool between the base of the phone and the phone battery.

    • Position the phone so that the battery won't fall out of the phone.

    • The battery lifts out of the phone fast and easily.

    • Carefully lift the battery out of the phone.

  4. Nokia 6086 Vibrator Replacement, Upper Back Cover: étape 4, image 1 de 1
    • Turn the phone so that the back of the phone is facing forward.

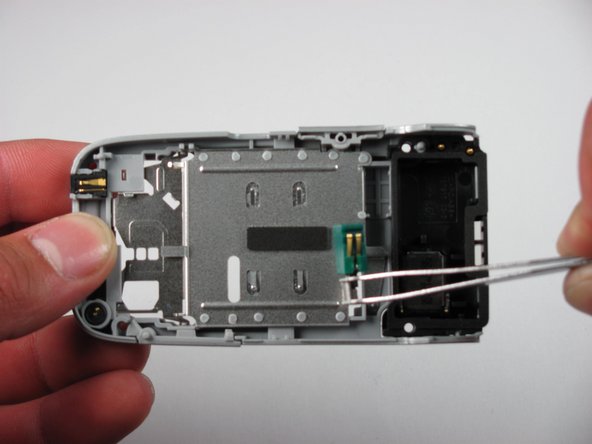
    • The picture to the left shows the location of the plastic tabs that attach to the upper cover of the phone.

    • In this picture, the upper cover has already been removed.

  5. Nokia 6086 Vibrator Replacement: étape 5, image 1 de 2 Nokia 6086 Vibrator Replacement: étape 5, image 2 de 2
    • Place the iPod opening tool under the tabs near the top of the phone.

    • Slide the iPod Opening Tool upwards.

    • This will pop the tabs and release the upper part of the phone.

    • Repeat for the left and the right sides.

  6. Nokia 6086 Vibrator Replacement: étape 6, image 1 de 2 Nokia 6086 Vibrator Replacement: étape 6, image 2 de 2
    • Place the iPod opening tool at the top area of the bottom section of the phone (indicated in picture).

    • Lift the iPod opening tool to pop open the clips.

    • This will release the upper back cover of the phone.

    • Repeat for the left and the right sides.

  7. Nokia 6086 Vibrator Replacement: étape 7, image 1 de 3 Nokia 6086 Vibrator Replacement: étape 7, image 2 de 3 Nokia 6086 Vibrator Replacement: étape 7, image 3 de 3
    • Push upward on the top back cover using two thumbs.

    • This will remove the top back cover from the phone.

  8. Nokia 6086 Vibrator Replacement, Base of The Phone: étape 8, image 1 de 2 Nokia 6086 Vibrator Replacement, Base of The Phone: étape 8, image 2 de 2
    • Locate the four screws.

    • Remove the screws using a T6 Torx screwdriver.

  9. Nokia 6086 Vibrator Replacement: étape 9, image 1 de 2 Nokia 6086 Vibrator Replacement: étape 9, image 2 de 2
    • Turn the phone over.

    • Gently pull apart the phone.

    • Start at the bottom of the phone and pull outward.

    • There are plastic catches on the middle of each side. These should pop free as you pull.

    • Be careful, the phone will separate into two sections.

  10. Nokia 6086 Vibrator Replacement: étape 10, image 1 de 2 Nokia 6086 Vibrator Replacement: étape 10, image 2 de 2
    • The phone should now be in two different sections.

    • 1) The logic board and the back cover

    • 2) The keypad and the rest of the phone

  11. Nokia 6086 Vibrator Replacement, Vibrator: étape 11, image 1 de 3 Nokia 6086 Vibrator Replacement, Vibrator: étape 11, image 2 de 3 Nokia 6086 Vibrator Replacement, Vibrator: étape 11, image 3 de 3
    • Remove the logic board from the bottom casing.

  12. Nokia 6086 Vibrator Replacement: étape 12, image 1 de 1
    • The logic board should be fully detached from the phone.

    • The turquoise colored vibrator should now be visible.

  13. Nokia 6086 Vibrator Replacement: étape 13, image 1 de 2 Nokia 6086 Vibrator Replacement: étape 13, image 2 de 2
    • Place the tweezers at the base of the vibrator.

    • Squeeze the tweezers while simultaneously lifting them up to remove the vibrator.

  14. Nokia 6086 Vibrator Replacement: étape 14, image 1 de 1
    • The vibrator should be detached from the phone.

Conclusion

To reassemble your device, follow these instructions in reverse order.

Caitlin Rahm

Membre depuis le 04/15/10

78 Réputation

4 tutoriels rédigés

Équipe

Cal Poly, Team 26-30, Regan Spring 2010 Membre de l'équipe Cal Poly, Team 26-30, Regan Spring 2010

CPSU-REGAN-S10S26G30

4 membres

17 tutoriels rédigés

0 commentaires

Ajouter un commentaire

Nombre de vues :

Dernières 24 heures : 0

7 derniers jours : 1

30 derniers jours : 2

Total : 1,128