Aller au contenu principal

Nvidia Shield Pro Android TV Controller Motherboard Replacement

Ce dont vous avez besoin

  1. Nvidia Shield Pro Android TV Controller Motherboard Replacement, Bluetooth Controller Thumbsticks: étape 1, image 1 de 3 Nvidia Shield Pro Android TV Controller Motherboard Replacement, Bluetooth Controller Thumbsticks: étape 1, image 2 de 3 Nvidia Shield Pro Android TV Controller Motherboard Replacement, Bluetooth Controller Thumbsticks: étape 1, image 3 de 3
    • Remove the six T6 Torx screws from the back of the controller.

  2. Nvidia Shield Pro Android TV Controller Motherboard Replacement: étape 2, image 1 de 1
    • Gently pry open the top frame of the cover with a plastic opening tool.

  3. Nvidia Shield Pro Android TV Controller Motherboard Replacement: étape 3, image 1 de 2 Nvidia Shield Pro Android TV Controller Motherboard Replacement: étape 3, image 2 de 2
    • Gently pull the wire connector directly out of its socket, separating the two halves of the controller.

  4. Nvidia Shield Pro Android TV Controller Motherboard Replacement: étape 4, image 1 de 2 Nvidia Shield Pro Android TV Controller Motherboard Replacement: étape 4, image 2 de 2
    • Remove the two T6 Torx screws.

  5. Nvidia Shield Pro Android TV Controller Motherboard Replacement: étape 5, image 1 de 2 Nvidia Shield Pro Android TV Controller Motherboard Replacement: étape 5, image 2 de 2
    • Remove the guard piece that secures the thumb-sticks to the controller.

    • Apply vertical pressure with two fingers to carefully pop off the thumb-stick(s) in need of repair.

    • Replace it by sliding a new thumb-stick onto the plastic post that secured the old one.

  6. Nvidia Shield Pro Android TV Controller Motherboard Replacement, Triggers: étape 6, image 1 de 3 Nvidia Shield Pro Android TV Controller Motherboard Replacement, Triggers: étape 6, image 2 de 3 Nvidia Shield Pro Android TV Controller Motherboard Replacement, Triggers: étape 6, image 3 de 3
    • Use a Torx T6 screwdriver to remove the two 7 mm screws from the triggers (one on each trigger).

    • Use a Torx T5 screwdriver to remove the two 5 mm screws securing the motherboard.

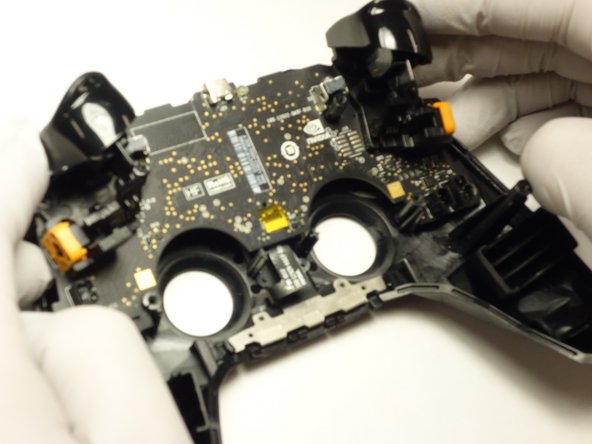
    • Gently lift the motherboard from the controller housing.

  7. Nvidia Shield Pro Android TV Controller Motherboard Replacement: étape 7, image 1 de 3 Nvidia Shield Pro Android TV Controller Motherboard Replacement: étape 7, image 2 de 3 Nvidia Shield Pro Android TV Controller Motherboard Replacement: étape 7, image 3 de 3
    • Use a Torx T5 screwdriver to remove the two 5 mm screws from the motherboard.

    • Carefully pull the trigger directly out of its socket.

  8. Nvidia Shield Pro Android TV Controller Motherboard Replacement, Controller Motherboard: étape 8, image 1 de 1
    • After removing the triggers, your motherboard is completely separate and ready to be replaced.

Conclusion

Your motherboard is ready to be replaced.

Aidan Shelton

Membre depuis le 02/11/22

73 Réputation

1 tutoriel rédigé

0 commentaires

Ajouter un commentaire

Nombre de vues :

Dernières 24 heures : 0

7 derniers jours : 4

30 derniers jours : 11

Total : 213