Aller au contenu principal
Nvidia Shield Pro Android TV Controller Triggers Replacement

Nvidia Shield Pro Android TV Controller Triggers Replacement

Jared Campbell

Jared Campbell et 3 autres contributeurs

Dernière mise à jour le October 17, 2024

30 minutes
Modérée

Every gamer knows how important triggers are for our gaming experience. So, if your Nvidia Shield Pro Android TV Controller triggers are sticking or aren't functioning properly, then you need to replace your controllers’ triggers. Luckily, you're in the right place, this is an easy to follow guide and there are no special skills required. The goal of this guide is for you to be able to properly replace the controllers’ triggers, so you can go back to enjoying your games. Although, please be cautious when disconnecting the wires and gently apply pressure to thumbsticks when removing so nothing gets damaged. Lastly, Two different screwdrivers will be used, so if you're unfamiliar with them, then please refer to this link for Screwdriver Best Practices.

Ce dont vous avez besoin

Outils

  1. Nvidia Shield Pro Android TV Controller Triggers Replacement, Thumbsticks: étape 1, image 1 de 3 Nvidia Shield Pro Android TV Controller Triggers Replacement, Thumbsticks: étape 1, image 2 de 3 Nvidia Shield Pro Android TV Controller Triggers Replacement, Thumbsticks: étape 1, image 3 de 3
    • Remove the six T6 Torx screws from the back of the controller.

  2. Nvidia Shield Pro Android TV Controller Triggers Replacement: étape 2, image 1 de 1
    • Gently pry open the top frame of the cover with a plastic opening tool.

  3. Nvidia Shield Pro Android TV Controller Triggers Replacement: étape 3, image 1 de 2 Nvidia Shield Pro Android TV Controller Triggers Replacement: étape 3, image 2 de 2
    • Gently pull the wire connector directly out of its socket, separating the two halves of the controller.

  4. Nvidia Shield Pro Android TV Controller Triggers Replacement: étape 4, image 1 de 2 Nvidia Shield Pro Android TV Controller Triggers Replacement: étape 4, image 2 de 2
    • Remove the two T6 Torx screws.

  5. Nvidia Shield Pro Android TV Controller Triggers Replacement: étape 5, image 1 de 2 Nvidia Shield Pro Android TV Controller Triggers Replacement: étape 5, image 2 de 2
    • Remove the guard piece that secures the thumb-sticks to the controller.

    • Apply vertical pressure with two fingers to carefully pop off the thumb-stick(s) in need of repair.

    • Replace it by sliding a new thumb-stick onto the plastic post that secured the old one.

  6. Nvidia Shield Pro Android TV Controller Triggers Replacement, Triggers: étape 6, image 1 de 3 Nvidia Shield Pro Android TV Controller Triggers Replacement, Triggers: étape 6, image 2 de 3 Nvidia Shield Pro Android TV Controller Triggers Replacement, Triggers: étape 6, image 3 de 3
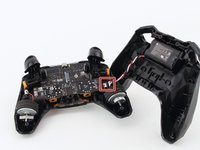
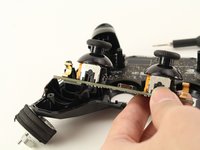
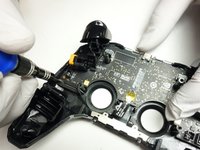
    • Use a Torx T6 screwdriver to remove the two 7 mm screws from the triggers (one on each trigger).

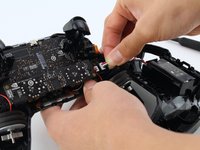
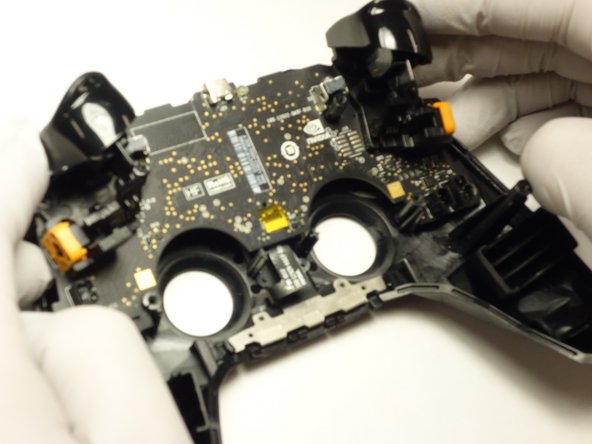
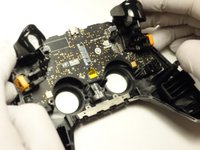
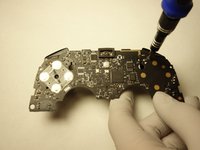
    • Use a Torx T5 screwdriver to remove the two 5 mm screws securing the motherboard.

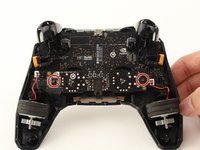
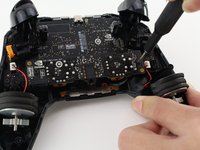
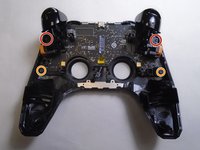
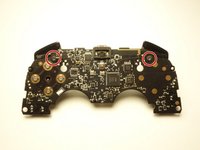
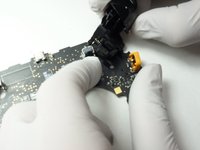
    • Gently lift the motherboard from the controller housing.

  7. Nvidia Shield Pro Android TV Controller Triggers Replacement: étape 7, image 1 de 3 Nvidia Shield Pro Android TV Controller Triggers Replacement: étape 7, image 2 de 3 Nvidia Shield Pro Android TV Controller Triggers Replacement: étape 7, image 3 de 3
    • Use a Torx T5 screwdriver to remove the two 5 mm screws from the motherboard.

    • Carefully pull the trigger directly out of its socket.

Conclusion

To reassemble your device, follow these instructions in reverse order.

Jared Campbell

Membre depuis le 02/16/22

85 Réputation

1 tutoriel rédigé

Un commentaire

how do you put the shoulder buttons back in. They fell out when I was trying to replace the battery

demarko9999 - Réponse

Ajouter un commentaire

Nombre de vues :

Dernières 24 heures : 0

7 derniers jours : 1

30 derniers jours : 6

Total : 356