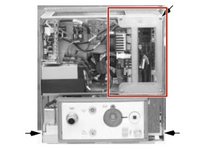
Aller au contenu principal

Ohmeda Engström Vent Engine Replacement

Matériel médical
Ni iFixit ni ce tutoriel de réparation ne sont approuvés par ou affiliés au fabricant de ce dispositif médical.

Ce dont vous avez besoin

  1. Ohmeda Engström Vent Engine Replacement, Vent Engine: étape 1, image 1 de 1
    • With the main chassis separated from the cart, position the device upright with the monitor centered to prevent any tipping.

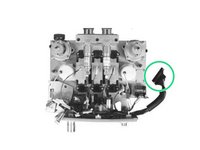
    • Disconnect any external connectors as well as the display connector.

    • Make sure you are working in a clean and dust-free environment to avoid introducing any unwanted debris to the inside of the device.

  2. Ohmeda Engström Vent Engine Replacement: étape 2, image 1 de 2 Ohmeda Engström Vent Engine Replacement: étape 2, image 2 de 2
    • Push down on the small grey tab below the exhalation valve.

    • While holding the tab down, you should be able to pull and extract the exhalation valve from the device.

  3. Ohmeda Engström Vent Engine Replacement: étape 3, image 1 de 1
    • There are four Phillips screws to be removed at each corner of the back of the device.

    • Once the screws are removed, slide the housing along with display to reveal the main chassis.

  4. Ohmeda Engström Vent Engine Replacement: étape 4, image 1 de 2 Ohmeda Engström Vent Engine Replacement: étape 4, image 2 de 2
    • Remove the circuit board retainer in the upper right by unscrewing the four screws (M4-0.7 x 12mm Phillips) that hold it in place.

    • Disconnect the connectors coming from the vent engine to the circuitry.

    • Avoid any unnecessary contact with circuit board components.

  5. Ohmeda Engström Vent Engine Replacement: étape 5, image 1 de 1
    • The vent engine is held in place by two screws on each side of the device. Unscrew all four and remove the vent engine.

    • Install the new vent engine and screw into place.

    • Connect the vent engine connectors to the circuit board and reinstall the circuit board retainer.

Conclusion

To reassemble your device, follow these instructions in reverse order.

Jonathan Honrada

Membre depuis le 04/10/20

136 Réputation

1 tutoriel rédigé

Équipe

Cal Poly, Team S7-G6, Paton Spring 2020 Membre de l'équipe Cal Poly, Team S7-G6, Paton Spring 2020

CPSU-PATON-S20S7G6

3 membres

3 tutoriels rédigés

0 commentaires

Ajouter un commentaire

Nombre de vues :

Dernières 24 heures : 1

7 derniers jours : 1

30 derniers jours : 7

Total : 205