Aller au contenu principal

Olympus Pen E-PL7 Back Case Replacement

Ce dont vous avez besoin

  1. Olympus Pen E-PL7 Back Case Replacement, Back Case: étape 1, image 1 de 1
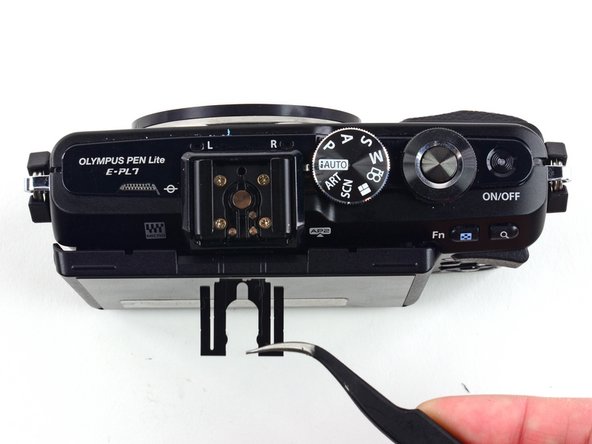
    • Use a Phillips #00 screwdriver to remove the six 2 mm screws on the bottom of the camera.

  2. Olympus Pen E-PL7 Back Case Replacement: étape 2, image 1 de 1
    • Remove the two 4 mm reverse threaded Phillips screws from the bottom of the camera.

    • Reverse threaded screws tighten counter clockwise and loosen clockwise.

  3. Olympus Pen E-PL7 Back Case Replacement: étape 3, image 1 de 1
    • Remove the two 4 mm Phillips screws under the HDMI port cover.

  4. Olympus Pen E-PL7 Back Case Replacement: étape 4, image 1 de 1
    • Use a Phillips #00 screwdriver to remove the 5 mm screw near the left hand grip.

  5. Olympus Pen E-PL7 Back Case Replacement: étape 5, image 1 de 1
    • Use a Phillips #00 screwdriver to remove the 5 mm screw near the right hand grip.

  6. Olympus Pen E-PL7 Back Case Replacement: étape 6, image 1 de 1
    • Flip open the LCD.

    • Use a Phillips #00 screwdriver to remove the 2 mm screw beneath the LCD assembly.

  7. Olympus Pen E-PL7 Back Case Replacement: étape 7, image 1 de 1
    • Use a Phillips #00 screwdriver to remove the four 6.3 mm screws from the lens mount.

  8. Olympus Pen E-PL7 Back Case Replacement: étape 8, image 1 de 1
    • Remove the lens mount with tweezers.

  9. Olympus Pen E-PL7 Back Case Replacement: étape 9, image 1 de 1
    • Use tweezers to remove the inner metal ring.

  10. Olympus Pen E-PL7 Back Case Replacement: étape 10, image 1 de 2 Olympus Pen E-PL7 Back Case Replacement: étape 10, image 2 de 2
    • Use tweezers to remove the two springs lying beneath the inner metal ring.

  11. Olympus Pen E-PL7 Back Case Replacement: étape 11, image 1 de 1
    • Use a Phillips #00 screwdriver to remove the three 5 mm screws.

  12. Olympus Pen E-PL7 Back Case Replacement: étape 12, image 1 de 1
    • Remove the two 4 mm Phillips screws.

  13. Olympus Pen E-PL7 Back Case Replacement: étape 13, image 1 de 3 Olympus Pen E-PL7 Back Case Replacement: étape 13, image 2 de 3 Olympus Pen E-PL7 Back Case Replacement: étape 13, image 3 de 3
    • Press and hold the lens release button while using tweezers to remove the lens hook.

    • Use tweezers to remove the spring underneath the lens hook.

  14. Olympus Pen E-PL7 Back Case Replacement: étape 14, image 1 de 3 Olympus Pen E-PL7 Back Case Replacement: étape 14, image 2 de 3 Olympus Pen E-PL7 Back Case Replacement: étape 14, image 3 de 3
    • Use tweezers to remove the metal clip from the external flash mount.

  15. Olympus Pen E-PL7 Back Case Replacement: étape 15, image 1 de 1
    • Use a Phillips #00 screwdriver to remove the four 4 mm screws from the external flash port.

  16. Olympus Pen E-PL7 Back Case Replacement: étape 16, image 1 de 2 Olympus Pen E-PL7 Back Case Replacement: étape 16, image 2 de 2
    • Remove the second external flash clip with tweezers.

  17. Olympus Pen E-PL7 Back Case Replacement: étape 17, image 1 de 2 Olympus Pen E-PL7 Back Case Replacement: étape 17, image 2 de 2
    • Remove the external flash port casing to expose five more screws.

  18. Olympus Pen E-PL7 Back Case Replacement: étape 18, image 1 de 1
    • Use a Phillips #00 screwdriver to remove the two 6.4 mm screws.

    • Remove the 2 mm Phillips screw.

  19. Olympus Pen E-PL7 Back Case Replacement: étape 19, image 1 de 1
    • Remove the two 3.8 mm Phillips screws from the sides of the external flash connector.

  20. Olympus Pen E-PL7 Back Case Replacement: étape 20, image 1 de 1
    • Gently pull the back case away from the camera.

    • Do not attempt to remove the back case, as it is attached to the camera by a ribbon cable.

  21. Olympus Pen E-PL7 Back Case Replacement: étape 21, image 1 de 3 Olympus Pen E-PL7 Back Case Replacement: étape 21, image 2 de 3 Olympus Pen E-PL7 Back Case Replacement: étape 21, image 3 de 3
    • To remove the ribbon holding the back case to the camera, use the pointed end of a spudger to flip back the top bar on top of the ZIF connector.

  22. Olympus Pen E-PL7 Back Case Replacement: étape 22, image 1 de 3 Olympus Pen E-PL7 Back Case Replacement: étape 22, image 2 de 3 Olympus Pen E-PL7 Back Case Replacement: étape 22, image 3 de 3
    • Use tweezers to pull the ribbon out of the connector.

    • Remove the back case.

Conclusion

To reassemble your device, follow these instructions in reverse order.

3 autres ont terminé cette réparation.

Kelsea Weber

Membre depuis le 11/12/15

19 867 Réputation

32 tutoriels rédigés

Équipe

iFixit Membre de l'équipe iFixit

Staff

135 membres

16 817 tutoriels rédigés

Un commentaire

Loads of screws that don’t need to be removed just to remove the rear case.

Omit step 3,

Omit steps 6 to 13

Omit step 18

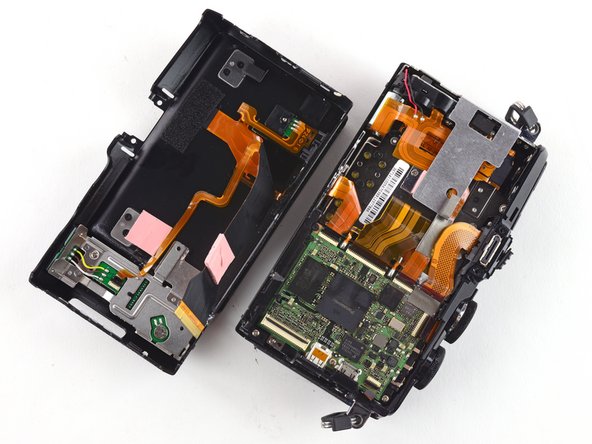
Take great care not to pull on ribbon cables

Rod Heeley - Réponse

Ajouter un commentaire

Nombre de vues :

Dernières 24 heures : 0

7 derniers jours : 10

30 derniers jours : 29

Total : 3,227