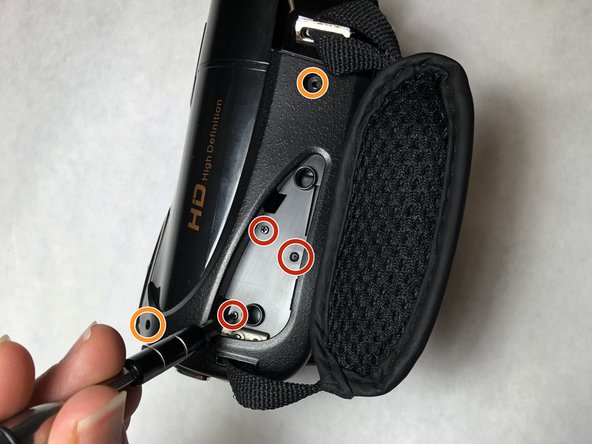
Aller au contenu principal

Ordro HDV-D395 Lens Replacement

Ce dont vous avez besoin

  1. Ordro HDV-D395 Lens Replacement, Lens: étape 1, image 1 de 2 Ordro HDV-D395 Lens Replacement, Lens: étape 1, image 2 de 2
    • Pull the slider labeled open, on the bottom right, to unlock the battery.

  2. Ordro HDV-D395 Lens Replacement: étape 2, image 1 de 1
    • Pull battery out of slot.

  3. Ordro HDV-D395 Lens Replacement: étape 3, image 1 de 1
    • Remove the three screws (length 7.7 mm) from the bottom of the outer case using a JIS000 screwdriver.

  4. Ordro HDV-D395 Lens Replacement: étape 4, image 1 de 2 Ordro HDV-D395 Lens Replacement: étape 4, image 2 de 2
    • Remove plastic casing hiding screws from the strap side of the casing.

    • Unscrew the three screws (length 4.75 mm) using a PH000 screwdriver.

    • Unscrew the two screws (length 6.4 mm) using a JIS000 screwdriver.

  5. Ordro HDV-D395 Lens Replacement: étape 5, image 1 de 1
    • Unscrew the four screws (2.9 mm length) from the screen side of the casing using a JIS000 screwdriver.

  6. Ordro HDV-D395 Lens Replacement: étape 6, image 1 de 1
    • Remove both side casings by gripping the sides with your hands and pulling gently.

  7. Ordro HDV-D395 Lens Replacement: étape 7, image 1 de 3 Ordro HDV-D395 Lens Replacement: étape 7, image 2 de 3 Ordro HDV-D395 Lens Replacement: étape 7, image 3 de 3
    • Although it requires extra steps, it is advised that you remove the motherboard and screen to ensure that nothing is damaged in the process of replacing the lens.

    • Unscrew the seven screws (length 4.22 mm) from the motherboard using a PH000 screwdriver.

    • Pull out or desolder all connected cords from motherboard.

  8. Ordro HDV-D395 Lens Replacement: étape 8, image 1 de 2 Ordro HDV-D395 Lens Replacement: étape 8, image 2 de 2
    • Remove top of the casing to reveal the screws on lens.

    • Unscrew the four screws (size 4.90 mm) using a PH00 screwdriver.

  9. Ordro HDV-D395 Lens Replacement: étape 9, image 1 de 3 Ordro HDV-D395 Lens Replacement: étape 9, image 2 de 3 Ordro HDV-D395 Lens Replacement: étape 9, image 3 de 3
    • Pull out lens.

    • Remove cord from lens.

Conclusion

To reassemble your device, follow these instructions in reverse order.

Nathan Mcintyre

Membre depuis le 11/05/18

303 Réputation

2 tutoriels rédigés

Équipe

IUPUI, Team S1-G3, Baechle Fall 2018 Membre de l'équipe IUPUI, Team S1-G3, Baechle Fall 2018

IUPUI-BAECHLE-F18S1G3

3 membres

3 tutoriels rédigés

0 commentaires

Ajouter un commentaire

Nombre de vues :

Dernières 24 heures : 0

7 derniers jours : 2

30 derniers jours : 2

Total : 224