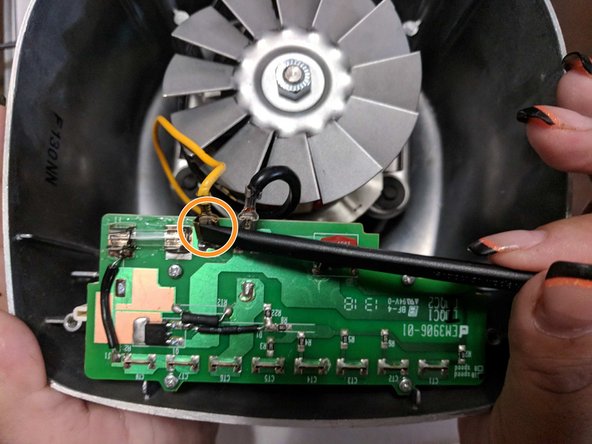
Aller au contenu principal

Oster BLSTSS-PZO Circuitboard Replacement

Ce dont vous avez besoin

  1. Oster BLSTSS-PZO Circuitboard  Replacement, Circuitboard: étape 1, image 1 de 1
    • Use the prying tools to open the four plastic screw holes on the bottom of the blender.

  2. Oster BLSTSS-PZO Circuitboard  Replacement: étape 2, image 1 de 1
    • Use the Phillips #1 Screwdriver to unscrew the four 16 mm screws and remove the plastic bottom.

  3. Oster BLSTSS-PZO Circuitboard  Replacement: étape 3, image 1 de 1
    • Gently remove the circuit board.

  4. Oster BLSTSS-PZO Circuitboard  Replacement: étape 4, image 1 de 2 Oster BLSTSS-PZO Circuitboard  Replacement: étape 4, image 2 de 2
    • Use the spudger to detach the black wire from the circuit board.

    • Repeat for yellow wire.

  5. Oster BLSTSS-PZO Circuitboard  Replacement: étape 5, image 1 de 3 Oster BLSTSS-PZO Circuitboard  Replacement: étape 5, image 2 de 3 Oster BLSTSS-PZO Circuitboard  Replacement: étape 5, image 3 de 3
    • Use the Phillips #1 to remove the four 8mm screws.

    • Use the medal spudger to detach the circuit board from the buttons.

    • Gently pull and release circuit board from buttons.

Conclusion

To reassemble your device, follow these instructions in reverse order.

Une autre personne a terminé cette réparation.

Tristian Cruz

Membre depuis le 09/20/17

263 Réputation

2 tutoriels rédigés

Équipe

0 commentaires

Ajouter un commentaire

Nombre de vues :

Dernières 24 heures : 1

7 derniers jours : 5

30 derniers jours : 11

Total : 505