Aller au contenu principal

PDP Victrix Pro BFG Headphone Jack Replacement

Ce dont vous avez besoin

  1. PDP Victrix Pro BFG Headphone Jack Replacement, Headphone Jack: étape 1, image 1 de 1
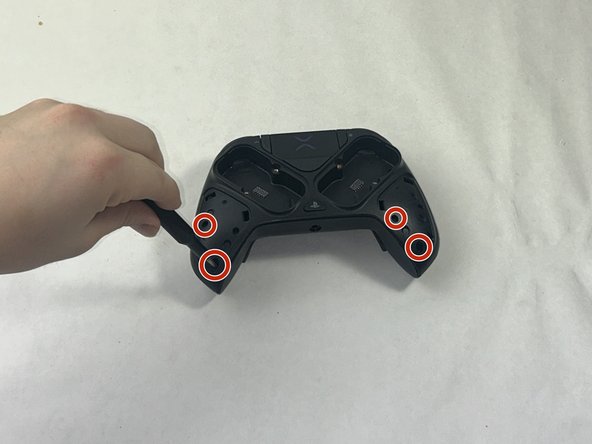
    • Use the purple Module Swap Tool that comes with the device to remove the 4 hex screws.

    • Remove the joystick/button modules from the controller.

  2. PDP Victrix Pro BFG Headphone Jack Replacement: étape 2, image 1 de 1
    • Remove the two screws from the module compartments.

  3. PDP Victrix Pro BFG Headphone Jack Replacement: étape 3, image 1 de 2 PDP Victrix Pro BFG Headphone Jack Replacement: étape 3, image 2 de 2
    • Using the iFixit opening tool, gently pry open the two side grips.

    • Using the screwdriver tool with a head of around 2 mm, remove the screws located in the bottom outside corners.

  4. PDP Victrix Pro BFG Headphone Jack Replacement: étape 4, image 1 de 1
    • Flip the controller to the other side so the label on the bottom is facing upwards.

    • On the label, there is a circular icon; this shows the location of a single screw.

    • Using the same screwdriver head setting from the previous step, remove the screw.

  5. PDP Victrix Pro BFG Headphone Jack Replacement: étape 5, image 1 de 1
    • Flip the controller so the charging port of the controller is facing you.

    • Using a spudger, carefully pry open the front component.

  6. PDP Victrix Pro BFG Headphone Jack Replacement: étape 6, image 1 de 1
    • Flip the controller so it is upside-down, but the charging port is still facing you.

    • In the center of the now exposed part, there will be a hidden silver screw.

    • Use the flexible piece attached to the screwdriver to remove this screw.

    • Now that everything is loosened, gently pry open the controller along the grooves.

  7. PDP Victrix Pro BFG Headphone Jack Replacement: étape 7, image 1 de 1
    • Using the screwdriver tool with a smaller head, remove the three screws from each trigger.

    • Remove the triggers.

  8. PDP Victrix Pro BFG Headphone Jack Replacement: étape 8, image 1 de 1
    • Using the screwdriver, remove the two screws in the bottom two corners.

    • Using the halberd spudger, carefully pry the circuit board open.

  9. PDP Victrix Pro BFG Headphone Jack Replacement: étape 9, image 1 de 1
    • Using a soldering iron, desolder the headphone jack and resolder a new one in its place.

Conclusion

To reassemble your device, follow these instructions in reverse order.

Ryan Brise

Membre depuis le 03/20/24

169 Réputation

1 tutoriel rédigé

Équipe

UMass Dartmouth, Team 1-1, Santin Spring 2024 Membre de l'équipe UMass Dartmouth, Team 1-1, Santin Spring 2024

UMASSD-SANTIN-S24S1G1

3 membres

3 tutoriels rédigés

0 commentaires

Ajouter un commentaire

Nombre de vues :

Dernières 24 heures : 0

7 derniers jours : 3

30 derniers jours : 24

Total : 45