Aller au contenu principal

Packard Bell ms-Hera c Disassembly

Ce dont vous avez besoin

  1. Packard Bell ms-Hera c Disassembly, Unscrew the lid: étape 1, image 1 de 3 Packard Bell ms-Hera c Disassembly, Unscrew the lid: étape 1, image 2 de 3 Packard Bell ms-Hera c Disassembly, Unscrew the lid: étape 1, image 3 de 3
    • Remove the battery.

    • Unscrew the red marked screws with a Phillips screwdriver.

    • Remove the DVD reader.

  2. Packard Bell ms-Hera c Disassembly, Disconnect the keyboard: étape 2, image 1 de 3 Packard Bell ms-Hera c Disassembly, Disconnect the keyboard: étape 2, image 2 de 3 Packard Bell ms-Hera c Disassembly, Disconnect the keyboard: étape 2, image 3 de 3
    • Pry in the red marked spots to release the keyboard

    • Unplug the keyboard connector.

  3. Packard Bell ms-Hera c Disassembly, Unplug the cables: étape 3, image 1 de 3 Packard Bell ms-Hera c Disassembly, Unplug the cables: étape 3, image 2 de 3 Packard Bell ms-Hera c Disassembly, Unplug the cables: étape 3, image 3 de 3
    • Unplug the 3 connectors on the motherboard

    • Remove the 2 screws holding the display in place

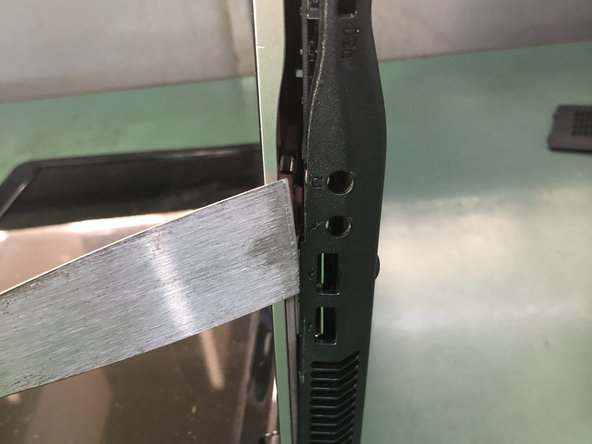
    • Use a thin tool to pry up the back cover of the laptop on the side

  4. Packard Bell ms-Hera c Disassembly, Unscrew the motherboard: étape 4, image 1 de 3 Packard Bell ms-Hera c Disassembly, Unscrew the motherboard: étape 4, image 2 de 3 Packard Bell ms-Hera c Disassembly, Unscrew the motherboard: étape 4, image 3 de 3
    • Remove the back cover.

    • Remove the HDD.

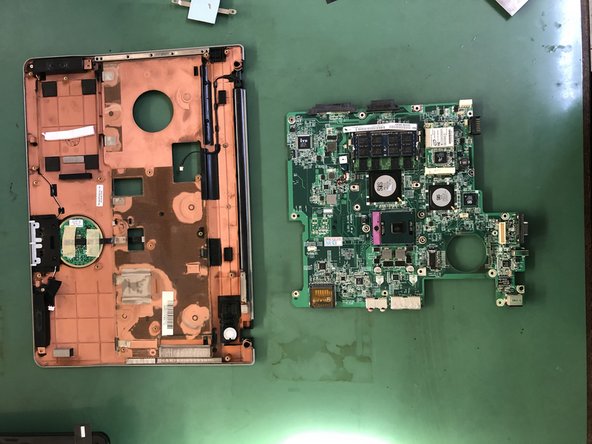
    • Remove the screws that hold the motherboard.

  5. Packard Bell ms-Hera c Disassembly, Remove the display: étape 5, image 1 de 3 Packard Bell ms-Hera c Disassembly, Remove the display: étape 5, image 2 de 3 Packard Bell ms-Hera c Disassembly, Remove the display: étape 5, image 3 de 3
    • Remove the marked screws and connectors.

    • Disconnect the display connector.

    • Remove the display.

  6. Packard Bell ms-Hera c Disassembly, Remove the heatsink: étape 6, image 1 de 3 Packard Bell ms-Hera c Disassembly, Remove the heatsink: étape 6, image 2 de 3 Packard Bell ms-Hera c Disassembly, Remove the heatsink: étape 6, image 3 de 3
    • Remove the cooling fan.

    • Remove the heatsink.

    • Remove the screws on the connector.

  7. Packard Bell ms-Hera c Disassembly, Remove the motherboard: étape 7, image 1 de 2 Packard Bell ms-Hera c Disassembly, Remove the motherboard: étape 7, image 2 de 2
    • Remove the screws to remove the motherboard.

Conclusion

To reassemble your device, follow these instructions in reverse order.

Une autre personne a terminé cette réparation.

Merci à ces traducteurs :

it en

100%

Ces traducteurs nous aident réparer le monde ! Vous voulez contribuer ?
Commencez à traduire ›

Smilzo

Membre depuis le 11/09/13

11 276 Réputation

39 tutoriels rédigés

0 commentaires

Ajouter un commentaire

Nombre de vues :

Dernières 24 heures : 1

7 derniers jours : 9

30 derniers jours : 36

Total : 1,080