Cette version peut contenir des modifications incorrectes. Passez au dernier aperçu vérifié.
Ce dont vous avez besoin
-
Cette étape n’est pas traduite. Aidez à la traduire
-
Place the Palm IIIx face down on a flat surface.
-
-
Cette étape n’est pas traduite. Aidez à la traduire
-
Push down and lift up the battery cover to remove it.
-
-
Cette étape n’est pas traduite. Aidez à la traduire
-
Using a Phillips #00 screwdriver, remove the four screws that hold the back cover in place.
-
-
-
Cette étape n’est pas traduite. Aidez à la traduire
-
Hold the device on its side, positioning your hands as shown.
-
Remove the back cover by pushing in with your thumbs and pulling outward with the rest of your fingers.
-
-
Cette étape n’est pas traduite. Aidez à la traduire
-
Hold the screen and front cover on its side, facing the screen inward as shown.
-
Position your hands so that you can push the screen outward with your thumbs.
-
Remove the screen by pushing outward with your thumbs. Use your index fingers to hold the front cover in place.
-
-
Cette étape n’est pas traduite. Aidez à la traduire
-
Position the device with the screen facing down.
-
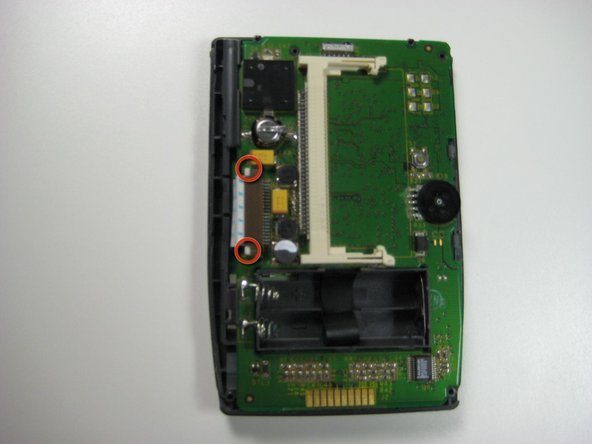
Locate the white ribbon wire on the left hand side of the device.
-
On either side of the ribbon wire are two white clasps. Gently push the two clasps away from the board (to the left).
-
-
Cette étape n’est pas traduite. Aidez à la traduire
-
Detach the ribbon wire by gently pulling it out of its connector.
-
-
Cette étape n’est pas traduite. Aidez à la traduire
-
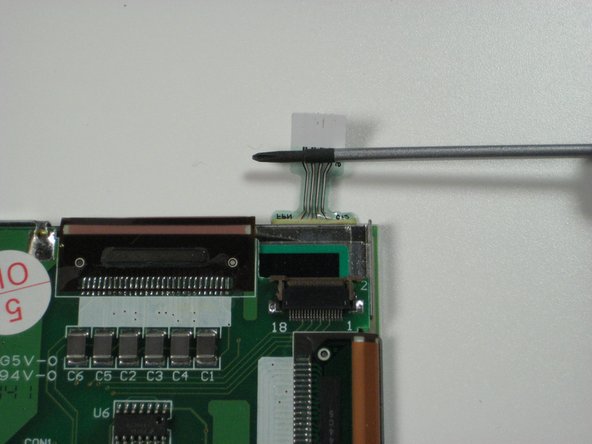
On the back of the screen near the top right corner is a plastic filament:
-
Gently lift up on the two brown clasps on either side of the filament connector as shown.
-
Using a thin, blunt object (a toothpick works well), slide it under the plastic filament and lift up to detach the filament from its connector.
-
-
Cette étape n’est pas traduite. Aidez à la traduire
-
Insert a spudger tool between the metal backing and the glass cover piece, as shown.
-
Run the spudger along the edge of the screen until the screen is lifted and can be removed.
-
Replace or clean as needed.
-
Annulation : je n'ai pas terminé ce tutoriel.
Une autre personne a terminé cette réparation.


