Aller au contenu principal

Panasonic KX-E603 Printwheel Replacement

  1. Panasonic KX-E603 Printwheel Replacement, Ink Cartridge: étape 1, image 1 de 2 Panasonic KX-E603 Printwheel Replacement, Ink Cartridge: étape 1, image 2 de 2
    • Open the lid of the typewriter.

  2. Panasonic KX-E603 Printwheel Replacement: étape 2, image 1 de 2 Panasonic KX-E603 Printwheel Replacement: étape 2, image 2 de 2
    • To release the green locking lever, pull it towards you.

  3. Panasonic KX-E603 Printwheel Replacement: étape 3, image 1 de 2 Panasonic KX-E603 Printwheel Replacement: étape 3, image 2 de 2
    • Gently lift to remove the old ink cartridge.

  4. Panasonic KX-E603 Printwheel Replacement, Printwheel: étape 4, image 1 de 2 Panasonic KX-E603 Printwheel Replacement, Printwheel: étape 4, image 2 de 2
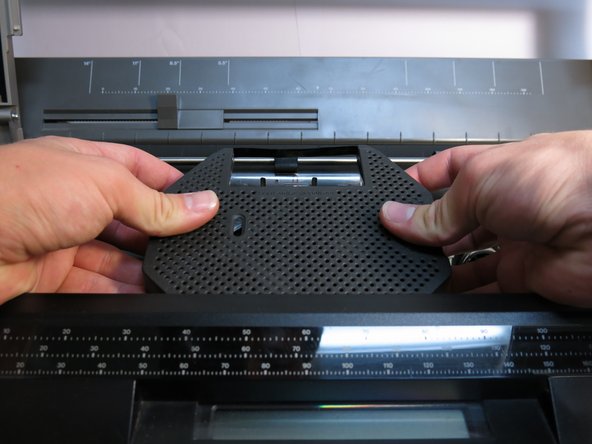
    • Firmly grasp either one, or both of the plastic printwheel ends protruding from the carriage as seen.

    • Gently lift the printwheel while slightly pushing forward to remove the printwheel from its housing.

Conclusion

To reassemble your device, follow these steps in reverse using your new printwheel.

Lindsay Stratis

Membre depuis le 04/08/15

491 Réputation

4 tutoriels rédigés

Équipe

Cal Poly, Team 17-1, Forte Spring 2015 Membre de l'équipe Cal Poly, Team 17-1, Forte Spring 2015

CPSU-FORTE-S15S17G1

4 membres

6 tutoriels rédigés

0 commentaires

Ajouter un commentaire

Nombre de vues :

Dernières 24 heures : 0

7 derniers jours : 0

30 derniers jours : 2

Total : 390