Aller au contenu principal

Parrot AR.Drone 2.0 Central Cross Replacement

Ce dont vous avez besoin

Vidéo d'introduction

  1. Parrot AR.Drone 2.0 Central Cross Replacement, Mainboard and Navigation Board: étape 1, image 1 de 1
    • Remove the foam body.

  2. Parrot AR.Drone 2.0 Central Cross Replacement: étape 2, image 1 de 2 Parrot AR.Drone 2.0 Central Cross Replacement: étape 2, image 2 de 2
    • Disconnect the battery by pulling the two red wires apart.

    • Remove the battery by releasing the battery retaining straps.

  3. Parrot AR.Drone 2.0 Central Cross Replacement: étape 3, image 1 de 2 Parrot AR.Drone 2.0 Central Cross Replacement: étape 3, image 2 de 2
    • Turn the drone upside down.

    • The cover is held on by plastic tape. Peel off the tape and use a spudger to remove the back cover.

  4. Parrot AR.Drone 2.0 Central Cross Replacement: étape 4, image 1 de 3 Parrot AR.Drone 2.0 Central Cross Replacement: étape 4, image 2 de 3 Parrot AR.Drone 2.0 Central Cross Replacement: étape 4, image 3 de 3
    • Using a spudger, separate the connector for the downward camera.

    • Remove the camera from the body by pulling it off the foam body.

  5. Parrot AR.Drone 2.0 Central Cross Replacement: étape 5, image 1 de 2 Parrot AR.Drone 2.0 Central Cross Replacement: étape 5, image 2 de 2
    • Use a spudger to release the black retaining clip. Then disconnect the connector to the sensors.

    • Use tweezers to carefully remove the ribbon from the connector.

  6. Parrot AR.Drone 2.0 Central Cross Replacement: étape 6, image 1 de 1
    • Remove the four 8mm torx screws with a T6 bit.

    • Remove the four 8mm philips head screws with a PH00 bit.

  7. Parrot AR.Drone 2.0 Central Cross Replacement: étape 7, image 1 de 2 Parrot AR.Drone 2.0 Central Cross Replacement: étape 7, image 2 de 2
    • Carefully pull the secondary board from the mainboard.

  8. Parrot AR.Drone 2.0 Central Cross Replacement: étape 8, image 1 de 3 Parrot AR.Drone 2.0 Central Cross Replacement: étape 8, image 2 de 3 Parrot AR.Drone 2.0 Central Cross Replacement: étape 8, image 3 de 3
    • Turn the drone right side up

    • Remove the USB connector from the battery retaining straps.

  9. Parrot AR.Drone 2.0 Central Cross Replacement: étape 9, image 1 de 1
    • Release the rubber clip holding the USB and battery power cable to the body.

  10. Parrot AR.Drone 2.0 Central Cross Replacement: étape 10, image 1 de 2 Parrot AR.Drone 2.0 Central Cross Replacement: étape 10, image 2 de 2
    • Avoid using sharp tools near the battery.

    • Push the USB and power cable through the battery panel.

  11. Parrot AR.Drone 2.0 Central Cross Replacement: étape 11, image 1 de 2 Parrot AR.Drone 2.0 Central Cross Replacement: étape 11, image 2 de 2
    • Turn the drone upside down again.

    • Use a spudger to release the connector and carefully remove the ribbon.

  12. Parrot AR.Drone 2.0 Central Cross Replacement: étape 12, image 1 de 2 Parrot AR.Drone 2.0 Central Cross Replacement: étape 12, image 2 de 2
    • Lift the mainboard up so that you can access the back.

    • Disconnect the first connector with the white wires using a nylon spudger.

    • Disconnect the second connector with the red and black wires using a spudger.

  13. Parrot AR.Drone 2.0 Central Cross Replacement: étape 13, image 1 de 1
    • The mainboard is now fully detached and can be removed.

  14. Parrot AR.Drone 2.0 Central Cross Replacement, Central Cross: étape 14, image 1 de 1
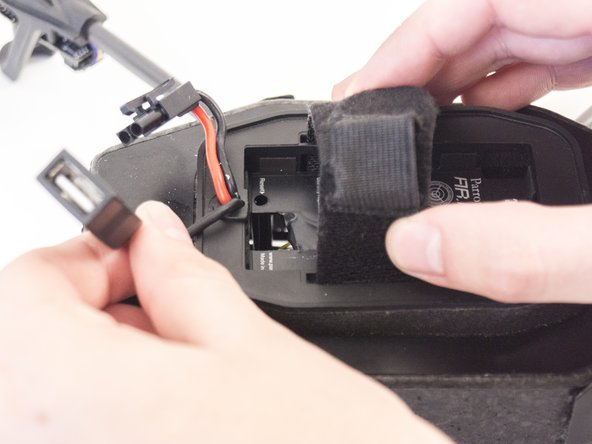
    • Using a nylon spudger, peel off the four pieces of plastic securing the frame to the body.

  15. Parrot AR.Drone 2.0 Central Cross Replacement: étape 15, image 1 de 1
    • Carefully maneuver the four arms of the drone’s central cross until it detaches from the body by pulling apart the foam surrounding the arms.

  16. Parrot AR.Drone 2.0 Central Cross Replacement: étape 16, image 1 de 1
    • The central cross can now be removed and replaced.

Conclusion

To reassemble your device, follow these instructions in reverse order.

4 autres ont terminé cette réparation.

David Hoyt

Membre depuis le 04/09/10

4 023 Réputation

43 tutoriels rédigés

Équipe

Cal Poly, Team 25-89, Amido Spring 2010 Membre de l'équipe Cal Poly, Team 25-89, Amido Spring 2010

CPSU-AMIDO-S10S25G89

4 membres

63 tutoriels rédigés

2 commentaires

If the crossbones are off just a bit would that effect the flight?

John Wurst - Réponse

So once I have removed the central cross, how do I put it all back together again?? I feel as though this is letting your guide down!!!!

Jacob Kenworthy - Réponse

Ajouter un commentaire

Nombre de vues :

Dernières 24 heures : 0

7 derniers jours : 1

30 derniers jours : 7

Total : 6,137