Cette version peut contenir des modifications incorrectes. Passez au dernier aperçu vérifié.
Ce dont vous avez besoin
-
Cette étape n’est pas traduite. Aidez à la traduire
-
Disconnect the battery by pulling the two red wires apart.
-
Remove the battery by releasing the battery retaining straps.
-
-
Cette étape n’est pas traduite. Aidez à la traduire
-
Turn the drone upside down.
-
The cover is held on by plastic tape. Peel off the tape and use a spudger to remove the back cover.
-
-
Cette étape n’est pas traduite. Aidez à la traduire
-
Using a spudger, separate the connector for the downward camera.
-
Remove the camera from the body by pulling it off the foam body.
-
-
Cette étape n’est pas traduite. Aidez à la traduire
-
Use a spudger to release the black retaining clip. Then disconnect the connector to the sensors.
-
Use tweezers to carefully remove the ribbon from the connector.
-
-
Cette étape n’est pas traduite. Aidez à la traduire
-
Remove the four 8mm torx screws with a T6 bit.
-
Remove the four 8mm philips head screws with a PH00 bit.
-
-
-
Cette étape n’est pas traduite. Aidez à la traduire
-
Carefully pull the secondary board from the mainboard.
-
-
Cette étape n’est pas traduite. Aidez à la traduire
-
Turn the drone right side up
-
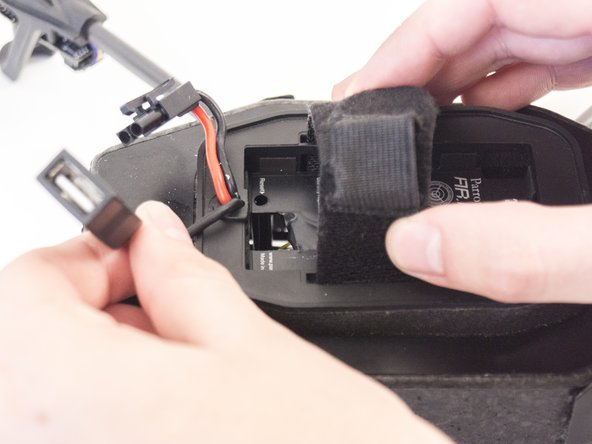
Remove the USB connector from the battery retaining straps.
-
-
Cette étape n’est pas traduite. Aidez à la traduire
-
Release the rubber clip holding the USB and battery power cable to the body.
-
-
Cette étape n’est pas traduite. Aidez à la traduire
-
Push the USB and power cable through the battery panel.
-
-
Cette étape n’est pas traduite. Aidez à la traduire
-
Turn the drone upside down again.
-
Use a spudger to release the connector and carefully remove the ribbon.
-
-
Cette étape n’est pas traduite. Aidez à la traduire
-
Lift the mainboard up so that you can access the back.
-
Disconnect the first connector with the white wires using a nylon spudger.
-
Disconnect the second connector with the red and black wires using a spudger.
-
-
Cette étape n’est pas traduite. Aidez à la traduire
-
The mainboard is now fully detached and can be removed.
-
-
Cette étape n’est pas traduite. Aidez à la traduire
-
Using a nylon spudger, peel off the four pieces of plastic securing the frame to the body.
-
-
Cette étape n’est pas traduite. Aidez à la traduire
-
Carefully maneuver the four arms of the drone’s central cross until it detaches from the body by pulling apart the foam surrounding the arms.
-
-
Cette étape n’est pas traduite. Aidez à la traduire
-
The central cross can now be removed and replaced.
-


Annulation : je n'ai pas terminé ce tutoriel.
4 autres ont terminé cette réparation.

Équipe

Cal Poly, Team 25-89, Amido Spring 2010 Membre de l'équipe Cal Poly, Team 25-89, Amido Spring 2010
CPSU-AMIDO-S10S25G89
4 membres
63 tutoriels rédigés
2 commentaires
If the crossbones are off just a bit would that effect the flight?
So once I have removed the central cross, how do I put it all back together again?? I feel as though this is letting your guide down!!!!