Aller au contenu principal

Philips BiPAP S/T Humidifier Replacement

Matériel médical
Ni iFixit ni ce tutoriel de réparation ne sont approuvés par ou affiliés au fabricant de ce dispositif médical.

Ce dont vous avez besoin

  1. Philips BiPAP S/T Humidifier Replacement, Humidifier: étape 1, image 1 de 1
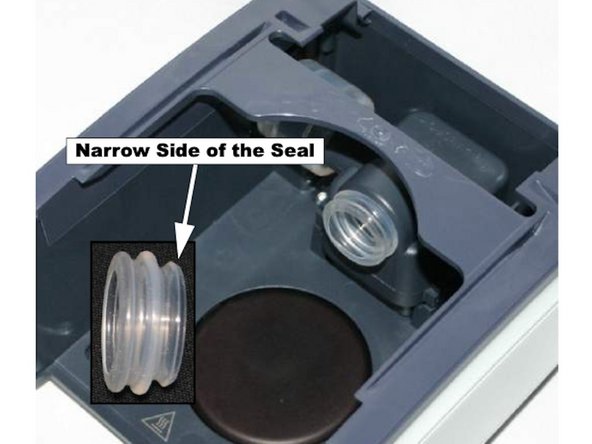
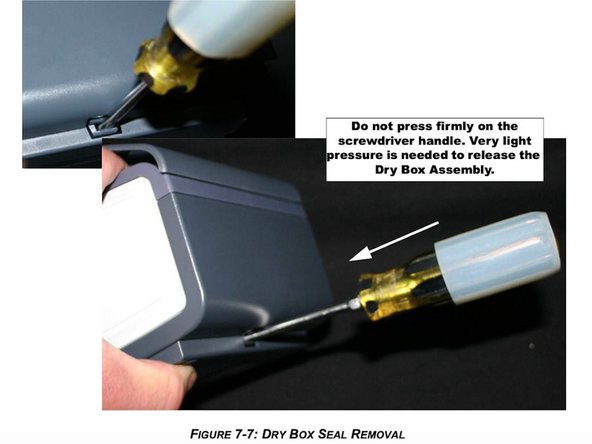
    • Remove the Water Chamber Assembly.

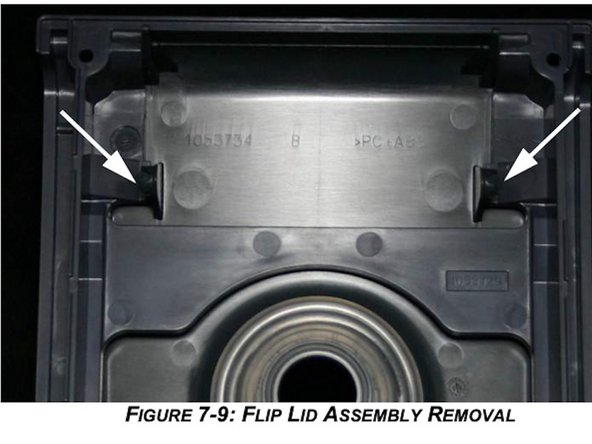
    • Gently squeeze the latch on the Flip Lid Assembly to release it.

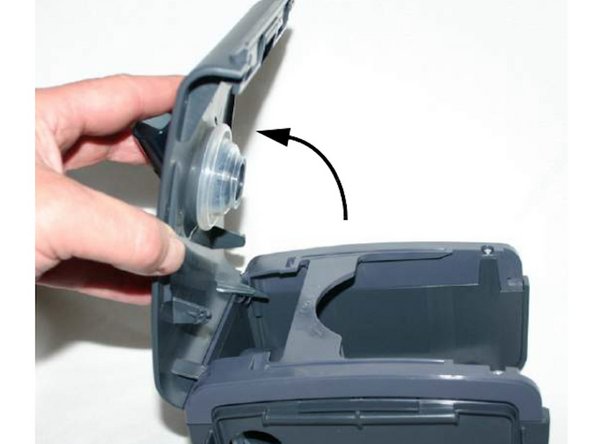
    • Lift the Flip Lid Assembly.

    • Pull the Humidifier Tank Assembly out of the Humidifier.

  2. Philips BiPAP S/T Humidifier Replacement: étape 2, image 1 de 1
    • Remove the Tank Top Seal from the Flip Lid Assembly.

    • If this is the source of the error, put in a new one.

  3. Philips BiPAP S/T Humidifier Replacement: étape 3, image 1 de 2 Philips BiPAP S/T Humidifier Replacement: étape 3, image 2 de 2
    • Remove the Dry Box Seal.

    • If this is the source of error, place this part with a new one.

    • When replacing, ensure that the narrow end of the seal is inserted into the Dry Box.

  4. Philips BiPAP S/T Humidifier Replacement: étape 4, image 1 de 2 Philips BiPAP S/T Humidifier Replacement: étape 4, image 2 de 2
    • Remove the Dry Box Assembly.

    • Insert a flat blade screwdriver into the hole located on the back of the Humidifier and lightly press inward to release the Dry Box Assembly.

    • Do not press firmly on the screwdriver as damage may occur.

    • Remove the Inlet Seal from the Dry Box Assembly

  5. Philips BiPAP S/T Humidifier Replacement: étape 5, image 1 de 3 Philips BiPAP S/T Humidifier Replacement: étape 5, image 2 de 3 Philips BiPAP S/T Humidifier Replacement: étape 5, image 3 de 3
    • Remove the Flip Lid Assembly.

    • Use a screwdriver to push in on the latches that secure the Flip Lid Assembly to the Humidifier Top Housing.

    • Bend the Flip Lid Assembly completely backwards until it is removed.

    • For Heated Tube devices, remove the wire harness from the base.

  6. Philips BiPAP S/T Humidifier Replacement: étape 6, image 1 de 1
    • Use a T8 Torx screwdriver to remove the four #4 x 1/2" screws that secure the Top Housing to the Humidifier Bottom Housing

  7. Philips BiPAP S/T Humidifier Replacement: étape 7, image 1 de 1
    • Slide the Outside Cover out of the Bottom Housing.

  8. Philips BiPAP S/T Humidifier Replacement: étape 8, image 1 de 1
    • Remove the Left Side Panel.

    • Use a T15 Torx screwdriver to remove the four #6 x 1/4" screws that secure the Bottom Housing to the Lower Base Assembly.

  9. Philips BiPAP S/T Humidifier Replacement: étape 9, image 1 de 2 Philips BiPAP S/T Humidifier Replacement: étape 9, image 2 de 2
    • Remove the Heater Plate Assembly.

    • The Heater Plate Assembly is secured by two small tabs.

    • Once replaced, secure the Bottom Housing to the Lower Base using the four #6 x 1/4" screws.

    • Be sure the Heater Plate Spring is properly seated under the Heater Plate.

Conclusion

To reassemble your device, follow these instructions in reverse order.

Courtney Huitt

Membre depuis le 04/07/20

169 Réputation

1 tutoriel rédigé

Équipe

Cal Poly, Team S7-G3, Paton Spring 2020 Membre de l'équipe Cal Poly, Team S7-G3, Paton Spring 2020

CPSU-PATON-S20S7G3

3 membres

3 tutoriels rédigés

0 commentaires

Ajouter un commentaire

Nombre de vues :

Dernières 24 heures : 0

7 derniers jours : 1

30 derniers jours : 4

Total : 278