Aller au contenu principal

Philips Emerson CoughAssist CA Series Disassembly

Matériel médical
Ni iFixit ni ce tutoriel de réparation ne sont approuvés par ou affiliés au fabricant de ce dispositif médical.

Ce dont vous avez besoin

  1. Philips Emerson CoughAssist CA Series Disassembly, Philips Emerson CoughAssist CA Series Disassembly: étape 1, image 1 de 1
    • First, remove the two 16mm pan head screws (1) directly under the front panel of the ventilator. (Page 3).

    • Next, remove the two 16mm flat head screws (3) from the back panel of the ventilator. (Page 3).

    • Lift off the top cover (2) of the device. (Page 3).

  2. Philips Emerson CoughAssist CA Series Disassembly: étape 4, image 1 de 2 Philips Emerson CoughAssist CA Series Disassembly: étape 4, image 2 de 2
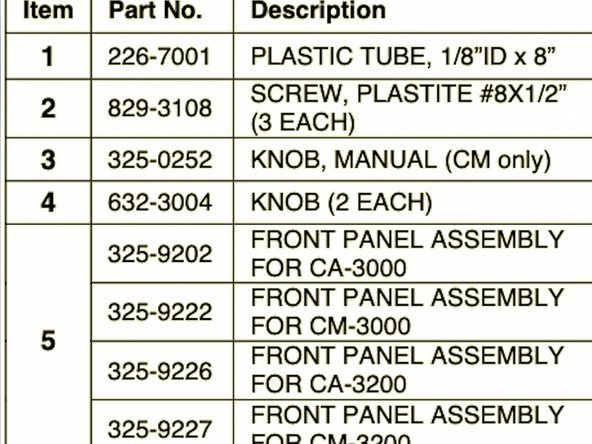
    • Now remove the "Inhale flow" control knob (4) and "Inhale pressure" knob (4), by loosening the setscrew on each before pulling off. If you have a CM model, carefully remove the Manual Control Lever (3) by prying it off with the screwdriver. (Page 3).

  3. Philips Emerson CoughAssist CA Series Disassembly: étape 5, image 1 de 1
    • Unscrew the three 12.7mm plastite screws ( 2) holding the panel assembly to the lower housing. A long Phillips screwdriver is very helpful for access to the three screws. (Page 3)

    • The front control panel (5) should now be loose. Carefully slide it forwards to remove. (Page 4).

Conclusion

To reassemble your device, follow these instructions in reverse order.

Zachary Stednitz

Membre depuis le 04/07/20

292 Réputation

2 tutoriels rédigés

Équipe

Cal Poly, Team S11-G18, Paton Spring 2020 Membre de l'équipe Cal Poly, Team S11-G18, Paton Spring 2020

CPSU-PATON-S20S11G18

3 membres

3 tutoriels rédigés

0 commentaires

Ajouter un commentaire

Nombre de vues :

Dernières 24 heures : 1

7 derniers jours : 1

30 derniers jours : 13

Total : 239