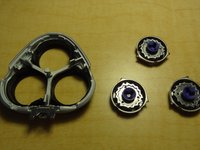
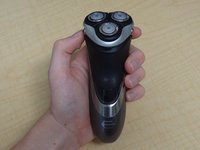
Aller au contenu principal

Philips Norelco Shaver Head Blade Replacement

Ce dont vous avez besoin

  1. Philips Norelco Shaver Head Blade Replacement, Philips Norelco Shaver Head Blade: étape 1, image 1 de 2 Philips Norelco Shaver Head Blade Replacement, Philips Norelco Shaver Head Blade: étape 1, image 2 de 2
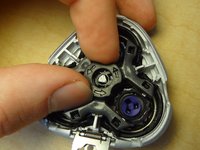
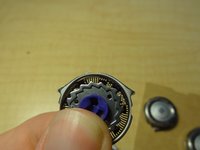
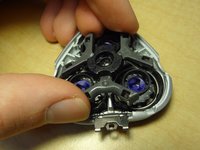
    • Begin by pressing the small button beneath the head to allow it to open.

  2. Philips Norelco Shaver Head Blade Replacement: étape 2, image 1 de 2 Philips Norelco Shaver Head Blade Replacement: étape 2, image 2 de 2
    • Grasp the sides of the head and pull straight up to detach it from the body.

  3. Philips Norelco Shaver Head Blade Replacement: étape 3, image 1 de 2 Philips Norelco Shaver Head Blade Replacement: étape 3, image 2 de 2
    • To unlock, rotate the center locking mechanism counter-clockwise.

  4. Philips Norelco Shaver Head Blade Replacement: étape 4, image 1 de 1
    • Lift the locking mechanism straight up, freeing the blades.

  5. Philips Norelco Shaver Head Blade Replacement: étape 5, image 1 de 3 Philips Norelco Shaver Head Blade Replacement: étape 5, image 2 de 3 Philips Norelco Shaver Head Blade Replacement: étape 5, image 3 de 3
    • Carefully push the blades out from behind.

    • Although the blades are covered, they can fall apart, exposing sharp edges. Always use care when handling.

  6. Philips Norelco Shaver Head Blade Replacement: étape 6, image 1 de 3 Philips Norelco Shaver Head Blade Replacement: étape 6, image 2 de 3 Philips Norelco Shaver Head Blade Replacement: étape 6, image 3 de 3
    • Insert the new blades, making sure to face the side with the two tabs towards the center of the head.

    • Although the blades are covered, they can fall apart, exposing sharp edges. Always use care when handling.

  7. Philips Norelco Shaver Head Blade Replacement: étape 7, image 1 de 3 Philips Norelco Shaver Head Blade Replacement: étape 7, image 2 de 3 Philips Norelco Shaver Head Blade Replacement: étape 7, image 3 de 3
    • Line up the locking mechanism with the new blades, then rotate the center clockwise to lock down.

  8. Philips Norelco Shaver Head Blade Replacement: étape 8, image 1 de 3 Philips Norelco Shaver Head Blade Replacement: étape 8, image 2 de 3 Philips Norelco Shaver Head Blade Replacement: étape 8, image 3 de 3
    • Push the head back onto the body, then close it up. Your shaver is good to go!

Ligne d'arrivée

16 autres ont terminé cette réparation.

Austin Fisher

Membre depuis le 09/29/15

518 Réputation

1 tutoriel rédigé

Équipe

Cal Poly, Team 10-1, Green Fall 2015 Membre de l'équipe Cal Poly, Team 10-1, Green Fall 2015

CPSU-GREEN-F15S10G1

4 membres

6 tutoriels rédigés

9 commentaires

This is a good guide thank you.

Replacing these shaver batteries would be a good guide: does anyone know how to do this?

Richard - Réponse

Very well done - better than a video because you don’t need to continually stop, restart and rewind to catch specific details.

Clif T - Réponse

The only problem I had was to insert the hinge into the body. Didn't want to push too hard as I was worried I could snap off some plastic parts. Once I had pushed the OLD unit on and off a couple of times the new one went in quite easily ( although the old unit was much more free than the new unit). Many thanks for your instructions - most useful!

Mike L. 14 March 2022

mike lowe - Réponse

How do you change the trimmer blade on back of it ? Or can you ?

Melanie Gettys - Réponse

Clear and simple tutorial. Excellent!

Greg Fullmer - Réponse

Ajouter un commentaire

Nombre de vues :

Dernières 24 heures : 6

7 derniers jours : 47

30 derniers jours : 290

Total : 45,927