Aller au contenu principal

Philips Sonicare 9350 Battery Replacement

Ce dont vous avez besoin

  1. Philips Sonicare 9350 Battery Replacement, Head removal: étape 1, image 1 de 2 Philips Sonicare 9350 Battery Replacement, Head removal: étape 1, image 2 de 2
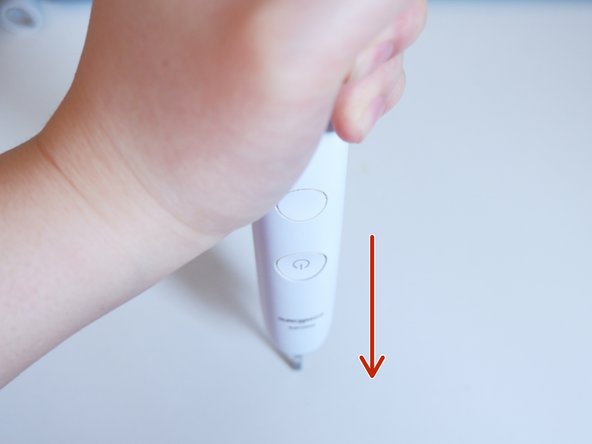
    • Remove the toothbrush head.

    • Use a screwdriver to pry gently around the bottom of the toothbrush.

  2. Philips Sonicare 9350 Battery Replacement, Remove the bottom: étape 2, image 1 de 3 Philips Sonicare 9350 Battery Replacement, Remove the bottom: étape 2, image 2 de 3 Philips Sonicare 9350 Battery Replacement, Remove the bottom: étape 2, image 3 de 3
    • After the bottom of the toothbrush is pried loose, remove it from the base of the brush.

  3. Philips Sonicare 9350 Battery Replacement: étape 3, image 1 de 3 Philips Sonicare 9350 Battery Replacement: étape 3, image 2 de 3 Philips Sonicare 9350 Battery Replacement: étape 3, image 3 de 3
    • Use a spudger to open the two clasps inside the toothbrush handle in a downward motion.

    • Turn the toothbrush upside down and push down on a hard surface—this will slide the toothbrush's internal body out.

  4. Philips Sonicare 9350 Battery Replacement, Extract the internals: étape 4, image 1 de 2 Philips Sonicare 9350 Battery Replacement, Extract the internals: étape 4, image 2 de 2
    • Pull out the internals of the toothbrush.

  5. Philips Sonicare 9350 Battery Replacement, Access the battery: étape 5, image 1 de 2 Philips Sonicare 9350 Battery Replacement, Access the battery: étape 5, image 2 de 2
    • Open the protective cover of the battery.

    • Check the battery model.

    • In this case, the model is a Sony 680mhA lithium battery.

  6. Philips Sonicare 9350 Battery Replacement, Desolder both terminals: étape 6, image 1 de 3 Philips Sonicare 9350 Battery Replacement, Desolder both terminals: étape 6, image 2 de 3 Philips Sonicare 9350 Battery Replacement, Desolder both terminals: étape 6, image 3 de 3
    • Open the protection cover of the circuit board.

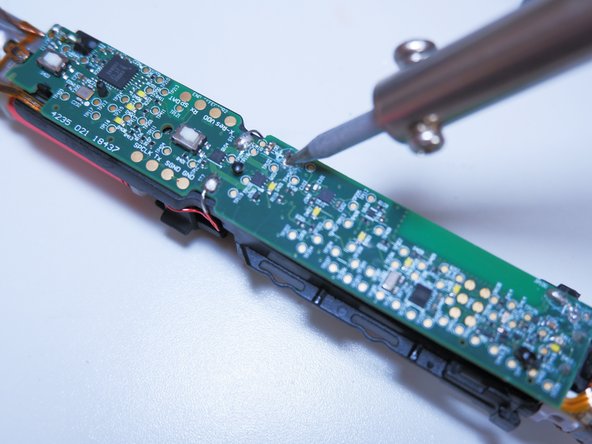
    • Find the welding points of the positive and negative electrodes of the battery and use the soldering iron to desolder.

    • The battery will fall off after desoldering as shown in the figure.

    • Be careful not to touch other parts of the circuit board when desoldering.

  7. Philips Sonicare 9350 Battery Replacement, Install a new battery: étape 7, image 1 de 3 Philips Sonicare 9350 Battery Replacement, Install a new battery: étape 7, image 2 de 3 Philips Sonicare 9350 Battery Replacement, Install a new battery: étape 7, image 3 de 3
    • Use a spudger to pry the battery out at a 45 degree angle.

    • After successfully removing the battery, install the new battery using the reverse procedure.

    • Always use ESD safe tools when working on a circuit board or with batteries such as a nylon spudger.

Conclusion

To reassemble your device, follow these instructions in reverse order.

4 autres ont terminé cette réparation.

Dongyi Lin

Membre depuis le 05/10/21

245 Réputation

1 tutoriel rédigé

Équipe

York University, Team S1-G16, O'Regan Summer 2021 Membre de l'équipe York University, Team S1-G16, O'Regan Summer 2021

YORK-O'REGAN-SU21S1G16

1 membre

3 tutoriels rédigés

Un commentaire

All good advice and it works too. Ignore Philips advice that the battery is not replaceable. It is, with correct knowledge and understanding. Thanks for posting.

Shreds - Réponse

Ajouter un commentaire

Nombre de vues :

Dernières 24 heures : 10

7 derniers jours : 72

30 derniers jours : 329

Total : 8,661