Cette version peut contenir des modifications incorrectes. Passez au dernier aperçu vérifié.
Ce dont vous avez besoin
-
-
Utilisez la pointe d'un spudger pour retirer la vis-mère en caoutchouc noir du côté de la PS3.
-
-
-
Enlevez la vis torx de sécurité T10 de 8.5 mm de la plaque à puce.
How to Delid and fix the Yellow Light of Death for good (NEC TOKIN Replacement) https://gbatemp.net/threads/how-to-delid...
-
-
-
Tirez la plaque à puce vers la baie du disque dur, puis soulevez-la pour la retirer de la PS3.
How to Delid and fix the Yellow Light of Death for good (NEC TOKIN Replacement) https://gbatemp.net/threads/how-to-delid...
-
-
-
different in mine too, Model: CECHP01
mine does not have one at all
1How to Delid and fix the Yellow Light of Death for good (NEC TOKIN Replacement) https://gbatemp.net/threads/how-to-delid...
Did not find in my CECHH01
I don’t have this bracket, where I can get it ?
-
-
Enlevez les vis suivantes :
-
Six vis Phillips de 52 mm
-
Une vis Phillips 30 mm
2 more smaller screws (don't know what size...small) just below the top middle screw and top right screw (in the picture). Look for the arrows...
can confirm, might be the backwards compatibles only
This usually isn't needed as you can additionally unclip the card reader by pushing the tabs out while lifting the top, They are located at the bottom of the screw holes with the arrows pointing at them
after you remove the screws, you may have to push a tab to take the cover off if you meet resistance on one side of the cover. Here is a link to a video that explains it, saved me lots of trouble:
Thanks @ericksi33, this really helped me out.
hogurt -
1st attempt, fan loud. Ps3 lasted about 2 wks. 2nd attempt noticed very poor contact between heatsink & cpu,gpu when taking it apart. Research - Found a better way to apply thermal past. I personally disapprove of guide on this. A small bit about the size of a grain of rice in center of cpu is plenty. Clamp the heat sinks back on. Then take it apart & check contact area. Thermal paste should have spread to about the size of a quarter.(more is better. Less then a nickel size is poor contact) possibly weak clamps. Carefully applied pressure onto the cpu & gpu, pressing them into the heatsinks before clamping heatsink clamps on. Achieved greater then quarter sized thermal past spread. Fan silent in comparison & ps3 lasted about a yr. Rarely did I ever hear the fan go to high and get loud after that. About to begin my third fix on this same ps3. One of the first 80g backwards compatible. other then those notes and that this guide was for a different model ps3 (minor differences) I liked this guide. easy to follow.
Although the battery is described as proprietary, it looks like it is the common CR2032 lithium coin battery that is used in calculators and some computers. I haven't had to replace mine but I suspect under the heatshrink cover is a battery holder which will allow the coin battery to be removed and replaced. Then wrap with electrical tape and reinstall.
I tried this with the heatgun and it ruined my PS3. The CPU and GPU are NOW RUINED!!! It did not work for and made things worst!!! I sent it to a place to get reballed and they said the HEATGUN had overheated my processor and killed them!!! So think twice about doing this. Just because it is already broken, DON'T THINK YOU CAN'T MAKE IT WORST!
Why would you try it with a heat gun, no were is it mentioned to do that
2How to Delid and fix the Yellow Light of Death for good (NEC TOKIN Replacement) https://gbatemp.net/threads/how-to-delid...
I felt more comfortable with #2 screwdrivers.
-
-
-
Soulevez le couvercle supérieur par le bord arrière et faites-le pivoter vers l'avant de la PS3.
-
Enlevez le couvercle supérieur.
-
Un crochet en plastique se trouve dans un trou dans le coin supérieur arrière droit. Éloignez délicatement le crochet en plastique de l'arrière de la machine en poussant un peu avec une spatule, pour dégager la partie arrière droite du boîtier.
Disconnect the memory card ribbon cable.
The top would hardly budge on the left back corner and was stuck on the right back corner. There is a plastic hook that needs to be unfastened to lift the top off. It is located in a hole on the top back corner on the right hand side, so the corner straight across the on off button. Just gently push the plastic hook a bit front the rear of the machine with a spudger. It gives easily and the top will be free to lift off after that.
I can confirm on CECHH01.
Some more details here as well.
The newer model without SACD support appears to have added that clip to the back right that needs to be pressed to release the top shell.
If equipped with the card reader you can either have to disconnect the ribbon cable or unclip the reader from the top shell after lifting it up to get finger or tool in there to push clip to side and release reader from top shell. Note: if you failed to remove the card reader screws in the previous step these clips can break.
The original 60GB with the CF card reader on the front has a button protruding out. This will make it difficult to remove the top. You need to unscrew the memory card reader so it can come out easily.
Wow, this needs more attention. This isn't explained in any disassembly guide I've seen. You also need to be cognizant of the card reader cable when you're lifting off the lid.
I didn't have trouble during disassembly, but reassembly was tough. I loosened the card reader screws by 1 turn and used a small gauge wire to lasso the button and ran it through the CF hole.
-
-
Cette étape n’est pas traduite. Aidez à la traduire
-
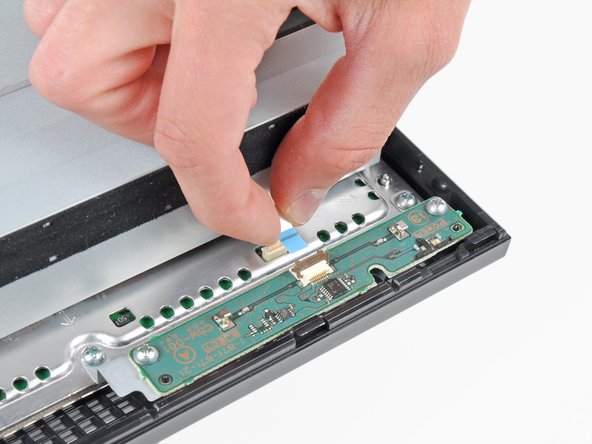
Use your fingernail to flip up the retaining flap on the control board ribbon cable socket.
-
Pull the control board ribbon cable out of its socket.
-
-
Cette étape n’est pas traduite. Aidez à la traduire
-
Remove the two 12 mm Phillips screws securing the control board to the lower case.
-


Annulation : je n'ai pas terminé ce tutoriel.
17 autres ont terminé cette réparation.

2 commentaires
Could anyone tell me if they would have the connection pin of this board, as I would like to fit it into a motherboard.
Fake repair. Real fault: How to Delid and fix the Yellow Light of Death for good (NEC TOKIN Replacement) https://gbatemp.net/threads/how-to-delid...
Player - Réponse