Aller au contenu principal

Polk Omni S2 Motherboard Replacement

Ce dont vous avez besoin

  1. Polk Omni S2 Motherboard Replacement, Front Cover: étape 1, image 1 de 1
    • Pry off the grille by pulling on the top middle part of it.

    • Remove the grille carefully, but note that it takes a large amount of force to remove. If it seems like you're bending the grille too much, try pulling on it from the bottom instead.

  2. Polk Omni S2 Motherboard Replacement: étape 2, image 1 de 3 Polk Omni S2 Motherboard Replacement: étape 2, image 2 de 3 Polk Omni S2 Motherboard Replacement: étape 2, image 3 de 3
    • Remove the eight 12 mm screws securing the front cover using a Phillips #1 screwdriver.

    • Like the grille, pull from the top middle of the gray cover and slowly remove it from the speaker, like separating a sub roll.

    • Be careful of the wires between the cover and the motherboard. If you pull the cover apart too far, you might damage these wires.

  3. Polk Omni S2 Motherboard Replacement: étape 3, image 1 de 3 Polk Omni S2 Motherboard Replacement: étape 3, image 2 de 3 Polk Omni S2 Motherboard Replacement: étape 3, image 3 de 3
    • Remove the two square cotton pieces.

    • Unplug these three wires plugged into the motherboard by gently pulling and wiggling the wires until they're unplugged. Grip the wires close to the end to avoid damaging them.

  4. Polk Omni S2 Motherboard Replacement, Motherboard: étape 4, image 1 de 1
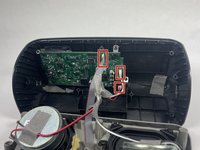
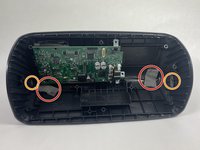
    • Use a Phillips #1 screwdriver to remove the four 9.5 mm screws.

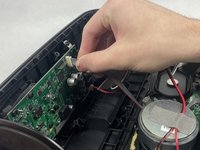
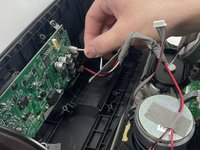
    • Use a Phillips #1 screwdriver to remove the 9.5 mm screws with washers.

    • Be careful not to lose the washers when removing the screws, and make sure they go back where they belong when reassembling.

  5. Polk Omni S2 Motherboard Replacement: étape 5, image 1 de 2 Polk Omni S2 Motherboard Replacement: étape 5, image 2 de 2
    • Remove these two pieces of tape holding down black wires by peeling very slowly. You can use a spudger to pry them off and avoid tearing them.

    • Remove these two taped down metallic strips by peeling very slowly. Again, a spudger helps to ensure the tape isn't damaged.

    • Don't worry too much about bending the strips a little bit — they bend back easily.

  6. Polk Omni S2 Motherboard Replacement: étape 6, image 1 de 1
    • Carefully remove the motherboard.

Conclusion

To reassemble your device, follow these instructions in reverse order.

Une autre personne a terminé cette réparation.

PaulSM

Membre depuis le 10/16/24

258 Réputation

2 tutoriels rédigés

Équipe

UMass Dartmouth, Team 1-4, Konn Fall 2024 Membre de l'équipe UMass Dartmouth, Team 1-4, Konn Fall 2024

UMASSD-KONN-F24S1G4

4 membres

7 tutoriels rédigés

0 commentaires

Ajouter un commentaire

Nombre de vues :

Dernières 24 heures : 0

7 derniers jours : 1

30 derniers jours : 3

Total : 78