Aller au contenu principal

Power Mac G4 MDD System Fans Replacement

Ce dont vous avez besoin

  1. Power Mac G4 MDD System Fans Replacement, Case: étape 1, image 1 de 2 Power Mac G4 MDD System Fans Replacement, Case: étape 1, image 2 de 2
    • The Power Mac G4 MDD: the last, and the fastest G4-based Mac. This computer boasted up to a Dual 1.42GHz PowerPC G4 CPU (though I have a single 1.25GHz).

    • Two USB 1.1 Ports

    • Assorted Audio

    • Video (ADC & DVI)

    • Networking (RJ-45 Ethernet/56k Modem)

    • Some later model MDD's (such as the dual 1.42GHz) Have a FireWire 800 Port Here:

  2. Power Mac G4 MDD System Fans Replacement: étape 2, image 1 de 3 Power Mac G4 MDD System Fans Replacement: étape 2, image 2 de 3 Power Mac G4 MDD System Fans Replacement: étape 2, image 3 de 3
    • Unplug the computer.

    • Unplug the power supply and all external connections from the computer.

    • Pull on the side lever and lower the side of the case.

  3. Power Mac G4 MDD System Fans Replacement, Hard Drives: étape 3, image 1 de 1
    • The hard drive cages are located here.

  4. Power Mac G4 MDD System Fans Replacement: étape 4, image 1 de 3 Power Mac G4 MDD System Fans Replacement: étape 4, image 2 de 3 Power Mac G4 MDD System Fans Replacement: étape 4, image 3 de 3
    • Cage 1

    • Start by removing this screw.

    • Remove the ATA-66/ IDE ribbon cable from the motherboard.

  5. Power Mac G4 MDD System Fans Replacement: étape 5, image 1 de 2 Power Mac G4 MDD System Fans Replacement: étape 5, image 2 de 2
    • Now, remove the power connection from the drives.

  6. Power Mac G4 MDD System Fans Replacement: étape 6, image 1 de 3 Power Mac G4 MDD System Fans Replacement: étape 6, image 2 de 3 Power Mac G4 MDD System Fans Replacement: étape 6, image 3 de 3
    • Push this tab down, and pull the cage toward you.

    • Now, you can set cage 1 aside.

  7. Power Mac G4 MDD System Fans Replacement: étape 7, image 1 de 2 Power Mac G4 MDD System Fans Replacement: étape 7, image 2 de 2
    • Cage 2:

    • Remove this Phillips screw:

    • Disconnect this IDE ribbon cable from the logic board.

  8. Power Mac G4 MDD System Fans Replacement: étape 8, image 1 de 2 Power Mac G4 MDD System Fans Replacement: étape 8, image 2 de 2
    • It's likely that there is a cable clip holding the ribbon cable to the case.

    • To remove it, push the end, and it should pop up.

  9. Power Mac G4 MDD System Fans Replacement: étape 9, image 1 de 3 Power Mac G4 MDD System Fans Replacement: étape 9, image 2 de 3 Power Mac G4 MDD System Fans Replacement: étape 9, image 3 de 3
    • With the ribbon cable clip free, pull this tab towards you, slide the cage up until it hits the platform under the power supply, and pull it away.

    • Now, set the cage on top of the CPU, and remove the power connectors.

  10. Power Mac G4 MDD System Fans Replacement: étape 10, image 1 de 2 Power Mac G4 MDD System Fans Replacement: étape 10, image 2 de 2
    • Once the cables are free, set the drive cage aside.

    • To remove the hard drives from the cages, remove the four screws on the sides of the cage that are connected to the drives, then slide the drives out.

    • The two cages are cross compatible and can be put in either location.

    • The MDD does not have a 128GB drive limit like older Macs. My MDD has 3 drives (a 400GB Hitatchi Deskstar, 40GB Seagate Barracuda 7200.7, and a 30GB Quantum Fireball LCT).

    • Note the ID jumpers on the two drive set. One is set to Master, the other to slave. A single drive can be set to Cable Select.

    Thanks - excellent tutorial!

    Question: If you have a single internal drive, and a connected extrenal drive via firewire or usb, what jumper setting should be set for the internal drive and the external drive? Booting into Mac OS 9 natively (not via Classic) on the internal drive seems to be sensitive to the jumper settings and I’m having issues getting it to work.

    LTG Seb - Réponse

    LTG: The jumper settings on the internal drives make no difference for any external drives. The jumper settings are to distinguish between Master and Slave drives when there are two drives connected to one ATA/IDE ribbon cable. Since the ATA/IDE drive ribbon cables are purely internal to the Mac, they have no connection to any external drives.

    johnsawyercjs -

    I ran my MDD with 3-750GB IDE HD’s. When they got flakey I replaced them with 2TB SATA drives in the back cage with a cheap SATA to PATA adapter and they formatted out to 1.8TB. I then cloned (CCC) the boot drive to one of the 1.8TB drives. It boots to the new drive and every thing seems to operate like normal. I don’t know how big we can go but we know that a MDD will handle at least 2TB HD’s and I have 5TB in my iMac 15,1

    Glenn Stettler - Réponse

    Glenn: you might get some extra speed from those SATA drives if you install a SATA card into one of the PCI slots (if you can still find one), and connect the drives to it. I ran a couple SATA drives in my MDD this way for years, before the MDD’s power supply burned out.

    johnsawyercjs -

    This is an amazing blog. This is my computer, I think a 2004 model. I have a question though; I bought a 1 TB 3.5’ SATA WD Black Performance Hard Drive and have 2 weeks to return it. It appears I need a bridge adapter from the old IDE ATA to the newer SATA, will this adapter work? :

    https://www.amazon.com/QNINE-Adapter-Dri...

    My dilemma: My hard drive is clicking like crazy (freezing) and I use this machine paired to my old Digidesign DigiRack 001 recording system. It’s proprietary and not forward compatible to anything other than OS 10.3.2 and I need to desperately clone this old Toshiba 80g hard drive in order to keep functioning on this version of Protools.

    Carlos Branham, Jr. - Réponse

    Correction: My G4 must not be the MMD version. Doesn’t have all those peripherals in the rear. Wish I could add a photo. I’m thinking it was build in 2003.

    Carlos Branham, Jr. -

  11. Power Mac G4 MDD System Fans Replacement, Optical Drive Cage: étape 11, image 1 de 2 Power Mac G4 MDD System Fans Replacement, Optical Drive Cage: étape 11, image 2 de 2
    • Start removing the optical drive cage by removing its back cover.

  12. Power Mac G4 MDD System Fans Replacement: étape 12, image 1 de 3 Power Mac G4 MDD System Fans Replacement: étape 12, image 2 de 3 Power Mac G4 MDD System Fans Replacement: étape 12, image 3 de 3
    • Now, remove the IDE and power cables from the drives.

  13. Power Mac G4 MDD System Fans Replacement: étape 13, image 1 de 3 Power Mac G4 MDD System Fans Replacement: étape 13, image 2 de 3 Power Mac G4 MDD System Fans Replacement: étape 13, image 3 de 3
    • Remove these two Phillips screws:

    • Pull the cage away from the front until it is free.

    • Slide the cage towards you, and out of the Mac.

  14. Power Mac G4 MDD System Fans Replacement: étape 14, image 1 de 2 Power Mac G4 MDD System Fans Replacement: étape 14, image 2 de 2
    • To remove the drive(s) from the cage, remove the two screws on each side of the drive(s), then pull the drive out of the cage.

    • My MDD has a 3rd party 22X SuperDrive, for burning DVD's in Leopard (Thank You Generic Drive Support!)

  15. Power Mac G4 MDD System Fans Replacement, System Fan: étape 15, image 1 de 2 Power Mac G4 MDD System Fans Replacement, System Fan: étape 15, image 2 de 2
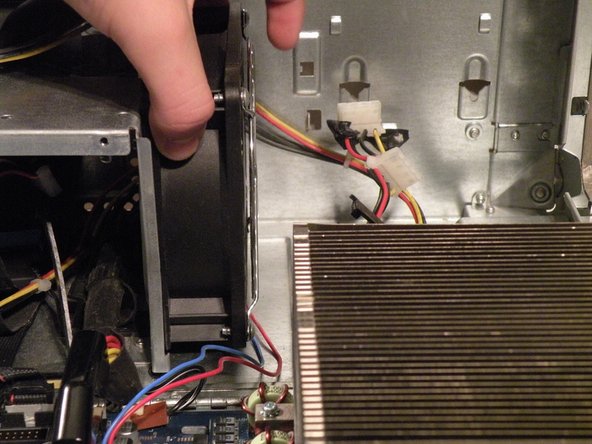
    • You may find removing the system fan is unnecessary to remove the power supply cable from behind it, but if you're unfamiliar with how the power supply cable is situated behind the fan, this step is useful in seeing this.

    • Disconnect the optical drive IDE/ATA-33 cable from the logic board.

    • Disconnect the system fan 2-wire power cable connector from the logic board.

  16. Power Mac G4 MDD System Fans Replacement: étape 16, image 1 de 3 Power Mac G4 MDD System Fans Replacement: étape 16, image 2 de 3 Power Mac G4 MDD System Fans Replacement: étape 16, image 3 de 3
    • Grab the system fan by its sides and pull it up and out. The system fan is very large and loud, compared to standard sized fans.

Conclusion

To reassemble your device, follow these instructions in reverse order.

11 autres ont terminé cette réparation.

Chris Green

Membre depuis le 10/11/09

36 978 Réputation

49 tutoriels rédigés

Équipe

Master Techs Membre de l'équipe Master Techs

Community

322 membres

2 520 tutoriels rédigés

Un commentaire

(y)

Das waren halt noch service- und support-freundliche Macs …

office - Réponse

Ajouter un commentaire

Nombre de vues :

Dernières 24 heures : 1

7 derniers jours : 7

30 derniers jours : 26

Total : 17,407