Aller au contenu principal

PowerBook G3 Pismo PRAM Battery Replacement

Ce dont vous avez besoin

  1. PowerBook G3 Pismo PRAM Battery Replacement, Keyboard: étape 1, image 1 de 1
    • Turn the keyboard locking screw so that it is parallel to the space bar.

    • Pull the keyboard release tabs toward you and lift up on the keyboard until it pops free.

    • Lift the keyboard out by pulling it up and away from you. Rest the keyboard, face down, on top of the track pad.

  2. PowerBook G3 Pismo PRAM Battery Replacement: étape 2, image 1 de 1
    • Pull the keyboard ribbon straight up from the logic board. Place the keyboard aside.

    • The connector may be tight. Gently rock the connector from side to side while pulling directly upward to free it. You can use this technique on many of the cards and cables you'll be disconnecting.

    • Make sure you have removed the laptop battery and CD/DVD modules from the expansion bays before proceeding.

  3. PowerBook G3 Pismo PRAM Battery Replacement: étape 3, image 1 de 1
    • Your laptop should look approximately like this.

  4. PowerBook G3 Pismo PRAM Battery Replacement, Heat Shield: étape 4, image 1 de 1
    • Remove the two silver Phillips #1 screws that attach the heat shield to the internal metal framework.

    • Lift the heat shield up and pull it toward you.

  5. PowerBook G3 Pismo PRAM Battery Replacement: étape 5, image 1 de 1
    • Your laptop should look approximately like this.

  6. PowerBook G3 Pismo PRAM Battery Replacement, Airport Card: étape 6, image 1 de 1
    • Skip this step if your computer does not have an Airport card installed.

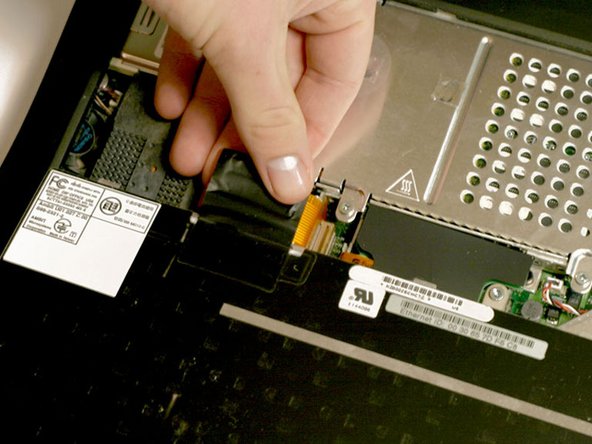
    • Firmly grasp the plastic tab attached to the Airport card and pull up and then to the right.

    • The Airport card is still attached to the antenna cable, so don't just yank it out of the slot.

  7. PowerBook G3 Pismo PRAM Battery Replacement: étape 7, image 1 de 1
    • Disconnect the antenna cable from the Airport card.

  8. PowerBook G3 Pismo PRAM Battery Replacement, PRAM Battery: étape 8, image 1 de 1
    • Pull the battery cable directly up from the logic board.

    • Remove the battery from its holder by pulling up and to the left.

  9. PowerBook G3 Pismo PRAM Battery Replacement: étape 9, image 1 de 1
    • Your laptop should look approximately like this.

Conclusion

To reassemble your device, follow these instructions in reverse order.

24 autres ont terminé cette réparation.

Pièces jointes

iRobot

Membre depuis le 09/24/09

1 Réputation

636 tutoriels rédigés

6 commentaires

Frankly speaking I do not have idea why do I need steps 2-7 to replace battery? Why I can't go directly to step 8 if it is possible? BTW - the battery seems to be composed from 4 standard batteries. Is anyone aware how to assembly new battery? It is not available as spare part (616-0108)

Tomek - Réponse

Agreed, I just successfully removed my PRAM battery skipping all those steps, just popped the keyboard out, removed the DVD drive from the right-hand out and popped that bad boy out, no problemo.

Edward Gain - Réponse

I read that you "removed the DVD drive from the right-hand out...." I'm baffled as to what you mean or how that is done. Can you explain that step?

Scott Kohanek -

Why do I need to remove the airport card? It's just like telling somebody to remove their shoes to take off their hat?

christopher Ng - Réponse

Wish I had read the comments before proceeding. Just removed the Airport card and put it back in for no reason. Thanks for the instructions though.

j.boersma - Réponse

Ajouter un commentaire

Nombre de vues :

Dernières 24 heures : 1

7 derniers jours : 10

30 derniers jours : 59

Total : 40,198