Aller au contenu principal

Quiksilver The Fifty50 Digital Battery Replacement

Ce dont vous avez besoin

  1. Quiksilver The Fifty50 Digital Battery Replacement, Strap: étape 1, image 1 de 2 Quiksilver The Fifty50 Digital Battery Replacement, Strap: étape 1, image 2 de 2
    • Place the watch (face down) on a solid surface.

    • Carefully use the screwdriver and push in one side of the strap.

    • Slowly remove the strap by pushing back one of the hidden metallic holders for the strap.

    • If you are having difficulty trying to take off the strap, feel free to use a 3.5 flat head screw driver, or any kind of tool that make this step easier.

  2. Quiksilver The Fifty50 Digital Battery Replacement: étape 2, image 1 de 2 Quiksilver The Fifty50 Digital Battery Replacement: étape 2, image 2 de 2
    • Gently pull the pin out of the strap.

    • Carefully handle the small metallic holder, as they are sharp and may be difficult to locate if lost.

  3. Quiksilver The Fifty50 Digital Battery Replacement, Back Panel: étape 3, image 1 de 2 Quiksilver The Fifty50 Digital Battery Replacement, Back Panel: étape 3, image 2 de 2
    • Remove the four 1.1 mm screws holding the back panel in place using the Phillips #00 screwdriver.

  4. Quiksilver The Fifty50 Digital Battery Replacement: étape 4, image 1 de 1
    • Carefully separate the panel off of the watch.

    • Careful not to lose the four 1.1 mm screw or else the back panel will not be able to put back.

  5. Quiksilver The Fifty50 Digital Battery Replacement, Analog Battery: étape 5, image 1 de 2 Quiksilver The Fifty50 Digital Battery Replacement, Analog Battery: étape 5, image 2 de 2
    • Carefully lift the white plastic circular out of the watch.

  6. Quiksilver The Fifty50 Digital Battery Replacement: étape 6, image 1 de 3 Quiksilver The Fifty50 Digital Battery Replacement: étape 6, image 2 de 3 Quiksilver The Fifty50 Digital Battery Replacement: étape 6, image 3 de 3
    • Remove the four 1.1 mm screws located on the metallic holder using the Phillips #00 screwdriver.

  7. Quiksilver The Fifty50 Digital Battery Replacement: étape 7, image 1 de 3 Quiksilver The Fifty50 Digital Battery Replacement: étape 7, image 2 de 3 Quiksilver The Fifty50 Digital Battery Replacement: étape 7, image 3 de 3
    • Remove the large circular Analog battery.

  8. Quiksilver The Fifty50 Digital Battery Replacement, Circuit Board: étape 8, image 1 de 2 Quiksilver The Fifty50 Digital Battery Replacement, Circuit Board: étape 8, image 2 de 2
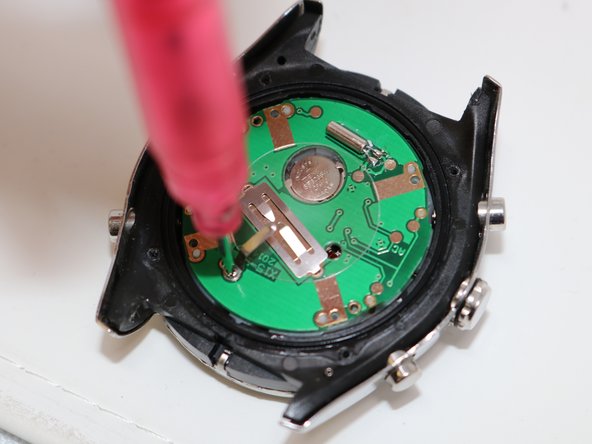
    • Using the Phillips #00 screwdriver, remove the two 1 mm screws holding the circuit board to the device.

  9. Quiksilver The Fifty50 Digital Battery Replacement: étape 9, image 1 de 1
    • Remove the green circular chip using a pair of tweezers.

  10. Quiksilver The Fifty50 Digital Battery Replacement, Digital Battery: étape 10, image 1 de 2 Quiksilver The Fifty50 Digital Battery Replacement, Digital Battery: étape 10, image 2 de 2
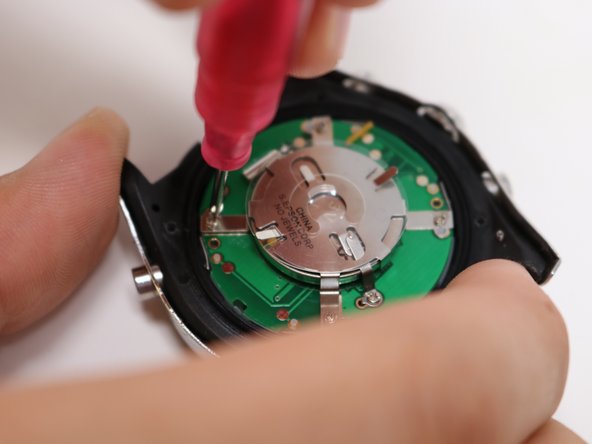
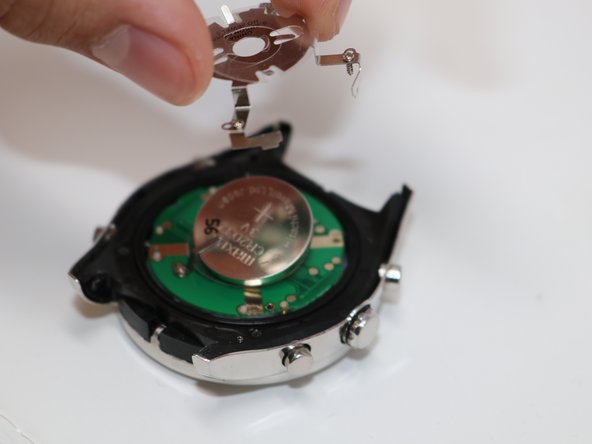
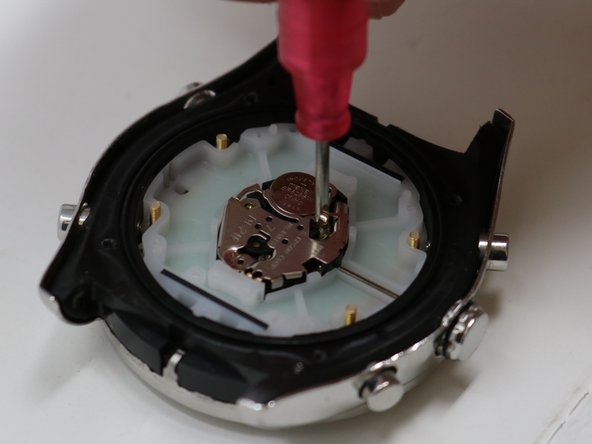
    • Using the Phillips #00 screwdriver, remove the 1.1 mm screw that is holding the digital battery holder in place.

  11. Quiksilver The Fifty50 Digital Battery Replacement: étape 11, image 1 de 1
    • Use the magnetic pick-up tool to remove the small screw.

    • Careful to not lose this screw because it is crucial for putting the watch back.

  12. Quiksilver The Fifty50 Digital Battery Replacement: étape 12, image 1 de 1
    • Lift up the battery holder.

  13. Quiksilver The Fifty50 Digital Battery Replacement: étape 13, image 1 de 1
    • Remove the digital battery from the socket.

Conclusion

To reassemble your device, follow these instructions in reverse order.

Sue Giske

Membre depuis le 07/16/19

622 Réputation

5 tutoriels rédigés

Équipe

UW Tacoma, Team S1-G4, Liner Summer 2019 Membre de l'équipe UW Tacoma, Team S1-G4, Liner Summer 2019

UWT-LINER-SU19S1G4

5 membres

5 tutoriels rédigés

0 commentaires

Ajouter un commentaire

Nombre de vues :

Dernières 24 heures : 1

7 derniers jours : 7

30 derniers jours : 21

Total : 1,575