Introduction
I will demonstrate how to properly replace any faulty storage or memory parts in your laptop. Over time, some parts may get old or might end up becoming faulty as well, and you'll need to replace them. Not everyone knows how easy it is to repair these problems with your laptop, and it'll save time and money.
Ce dont vous avez besoin
-
-
Flip over the laptop and locate all 14 of the screws. Follow the last image to find and remove all screws, noting the different sizes. *M2.5x6 doesn't get removed, marked in red.
-
10 M2x9.5 Screws
-
3 M2x4.5 Screws
-
1 M2.5x6 Pop-Open Screw (do not remove)
-
-
-
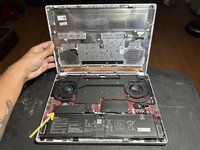
Locate the battery connector, and unplug the battery to make sure you're safe before we continue. For this, slide the little chrome part back and lift the White plastic piece straight up
-
-
-
-
To upgrade the RAM, peel the black cover on the right side to reveal the socket underneath.
-
Move the metal retention clip(s) by pushing down and outward
-
Insert the new module: look for the keying on the module and PCB. It can only be inserted one way.
-
Push down on the RAM like a hinge until the retention clip(s) grab onto the module.
-
-
-
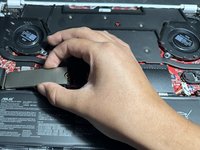
To replace the storage, locate the M.2 SSD under the longer black strip on the left.
-
Remove the screw holding it down. Proceed to pull the SSD out towards the outside of the chassis.
-
Slide the new SSD in making note of the keying as it may only be inserted one way (similar to RAM). You should be inserting it at a roughly 30-45 degree angle.
-
The G14 uses an M key slot. B-Key drives are unsupported. SATA drives (B + M) may work, but aren't recommended
-
Re-insert the screw to hold to new SSD in place.
-
-
-
Put the plastic connector of the battery back on and slide the chrome piece back over it.
-
-
-
Put the back cover on and put all the screws back
-
Around the top edge are a few plastic clips that should snap into place.
-


When booting back up make sure to not freak out if it doesn’t start right away it does take a minute for the first boot up due to the laptop trying to register the new parts.
Annulation : je n'ai pas terminé ce tutoriel.
5 autres ont terminé cette réparation.

Équipe

CSU Los Angeles, Team 3-93, Briggs Fall 2023 Membre de l'équipe CSU Los Angeles, Team 3-93, Briggs Fall 2023
CSULA-BRIGGS-F23S3G93
1 membre
4 tutoriels rédigés
3 commentaires de tutoriel
I have this laptop and I hate/love it. It's a great laptop and plays games very well... until it randomly restarts mid gameplay, typically during "busy" moments. If one were to suspect the soldered on RAM being the culprit for this behavior, where are said RAM chips on the mobo? I presume they're BGA chips, but I ain't scurred to attempt replacing them.